
1. Introduction
This manual provides essential information for the safe and effective use of your Beduan BR3000 3/8" NPT Air Compressor Regulator Combo. This device is designed to precisely regulate and maintain a constant air pressure to your pneumatic tools and systems, ensuring optimal performance and longevity.
Please read this manual thoroughly before installation and operation, and retain it for future reference.
2. Product Features
- Port Size: 3/8" NPT Female
- Operating Pressure: 0-145 psi (0-1 MPa)
- Maximum Working Pressure: 160 psi (1.1 MPa)
- Environment Temperature: 40℉-140℉ (4℃-60℃)
- Lightweight design for easy installation and removal.
- Enables precise regulation and maintenance of constant air pressure.
- Equipped with a manual drain and mounting bracket.

Figure 1: The air pressure gauge features high precision, dual Bar/Psi specifications, high temperature resistance, and shock pressure resistance for various operating conditions.
3. Specifications
| Attribute | Value |
|---|---|
| Manufacturer | Beduan |
| Part Number | 1sj-13200-reg |
| Item Weight | 9.9 ounces (280 grams) |
| Package Dimensions | 5.87 x 2.6 x 2.44 inches (14.9 x 6.6 x 6.2 cm) |
| Item Model Number | 1sj-13200-reg |
| Size | 3/8" NPT |
| Operating Pressure | 0-145 psi |
| Max Working Pressure | 160 psi |
| Environment Temperature | 40℉-140℉ (4℃-60℃) |
4. Safety Information
Always observe general safety precautions when working with compressed air systems. Failure to do so may result in injury or damage to equipment.
- Ensure the air supply is turned off and depressurized before installing, removing, or performing maintenance on the regulator.
- Wear appropriate personal protective equipment (PPE), including eye protection.
- Do not exceed the maximum working pressure of 160 psi.
- Install the regulator in a clean, dry environment within the specified temperature range.
- Check all connections for leaks after installation.
5. Package Contents
Verify that all components are present before beginning installation:
- Beduan BR3000 Air Compressor Regulator
- Pressure Gauge
- Mounting Bracket
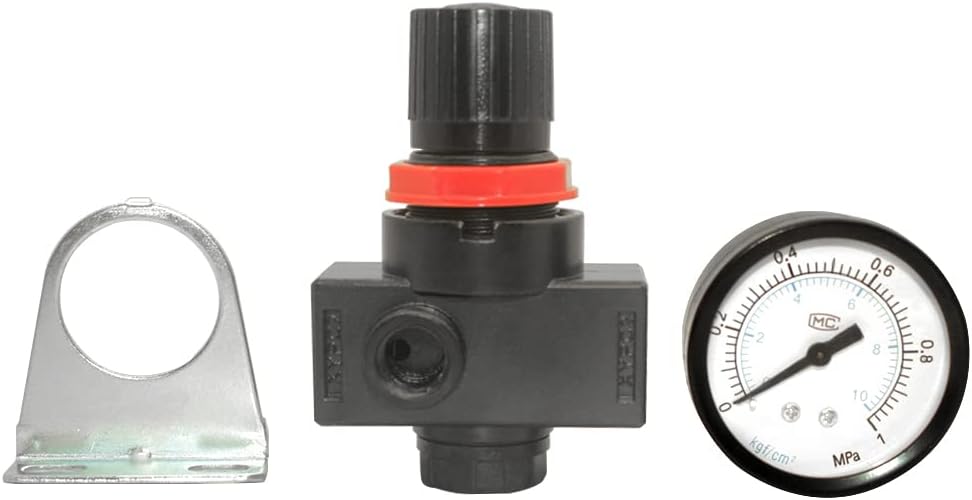
Figure 2: Components included with the Beduan BR3000 regulator.
6. Installation
- Prepare the System: Ensure the air compressor is turned off and the air lines are depressurized.
- Identify Air Flow Direction: The regulator has designated 'IN' and 'OUT' ports. Ensure the regulator is installed correctly with the air flow matching the indicated direction.
- Attach Gauge: Carefully thread the pressure gauge into the designated port on the regulator. Hand-tighten, then use a wrench for a snug fit, being careful not to overtighten.
- Connect to Air Line: Apply appropriate thread sealant (e.g., PTFE tape) to the 3/8" NPT threads of your air lines. Connect the inlet side of the regulator to the air supply and the outlet side to your pneumatic tool or system.
- Mounting (Optional): Use the provided mounting bracket to secure the regulator to a stable surface if desired.
- Check for Leaks: Slowly turn on the air supply and check all connections for air leaks using a soapy water solution. Tighten connections as necessary.
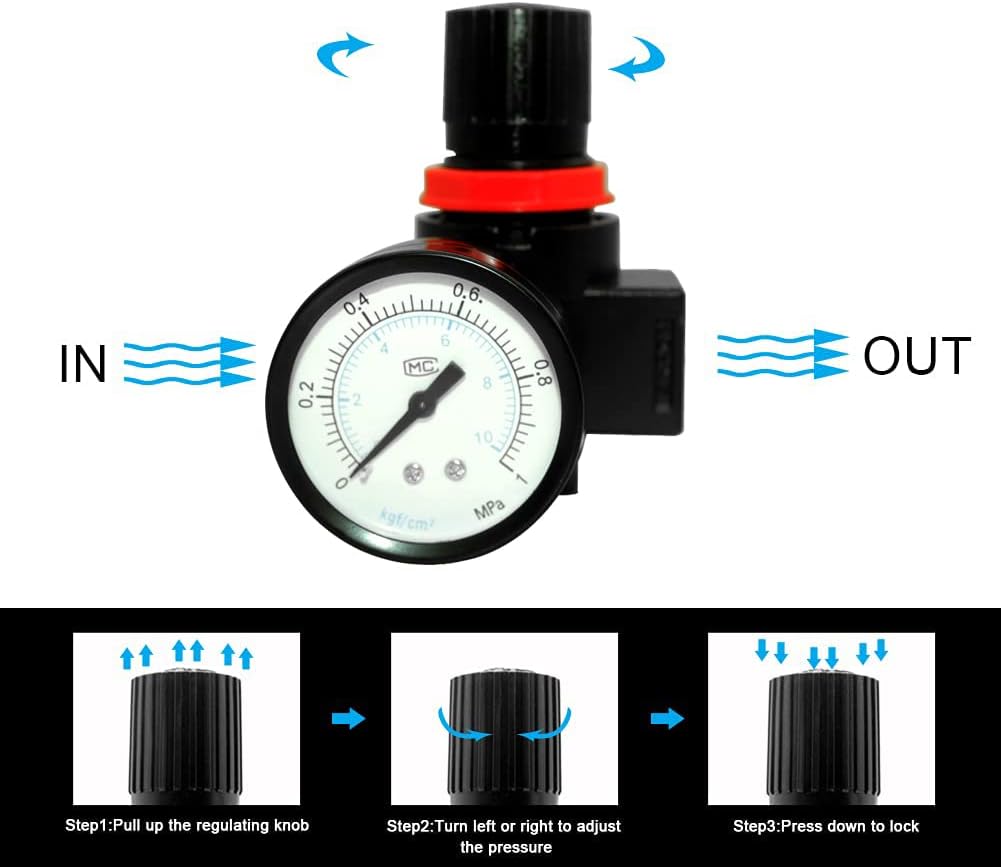
Figure 3: Correct air flow direction and basic adjustment steps.
7. Operation (Pressure Adjustment)
To adjust the output air pressure:
- Step 1: Pull up the regulating knob. Locate the adjustment knob on top of the regulator. Pull it upwards to unlock it.
- Step 2: Turn left or right to adjust the pressure. Rotate the knob clockwise to increase pressure or counter-clockwise to decrease pressure. Observe the pressure gauge to set the desired output pressure.
- Step 3: Press down to lock. Once the desired pressure is set, push the knob downwards to lock it in place. This prevents accidental pressure changes during operation.

Figure 4: Detailed steps for adjusting the air pressure.
8. Maintenance
Regular maintenance ensures the longevity and proper functioning of your regulator.
- Manual Drain: The regulator is equipped with a manual drain. Periodically drain any accumulated moisture from the bowl by opening the drain valve. The frequency of draining depends on the humidity and usage.
- Cleaning: Keep the exterior of the regulator clean. Do not use harsh chemicals or solvents that could damage the plastic components or seals.
- Inspection: Regularly inspect the regulator and gauge for any signs of damage, wear, or leaks. Replace any damaged parts immediately.
9. Troubleshooting
- No Air Flow / Low Pressure:
- Check if the air supply is on and the compressor is operating correctly.
- Ensure the regulator's adjustment knob is pulled up, adjusted, and then pushed down to lock.
- Verify that the regulator is installed with the correct air flow direction (IN to OUT).
- Check for blockages in the air lines or filters upstream.
- Pressure Fluctuation:
- Ensure the adjustment knob is securely locked after setting the pressure.
- Check for leaks in the system downstream of the regulator.
- Verify the air compressor can maintain a consistent supply pressure.
- Air Leaks:
- Apply soapy water to all connections to identify the source of the leak.
- Tighten loose connections.
- If leaks persist, disassemble the connection, reapply thread sealant, and reassemble.
- Inspect O-rings and seals for damage and replace if necessary.
10. Warranty and Support
Specific warranty information for the Beduan BR3000 is not provided in this document. For warranty details, please refer to the product packaging or contact Beduan customer support directly.
For technical assistance or further inquiries, please visit the official Beduan store or contact their customer service department. You can often find support contact information on the manufacturer's website or through the retailer where the product was purchased.
Beduan Store Link: Visit the Beduan Store on Amazon