1. Product Overview
The Start-X Remote Start Kit provides a convenient way to remotely start your 2013-2017 RAM Pickup Truck (1500/2500/3500) using your existing factory key fob. This plug-n-play system is designed for easy installation with zero wire splicing, offering comfort by allowing you to warm or cool your vehicle before entry.
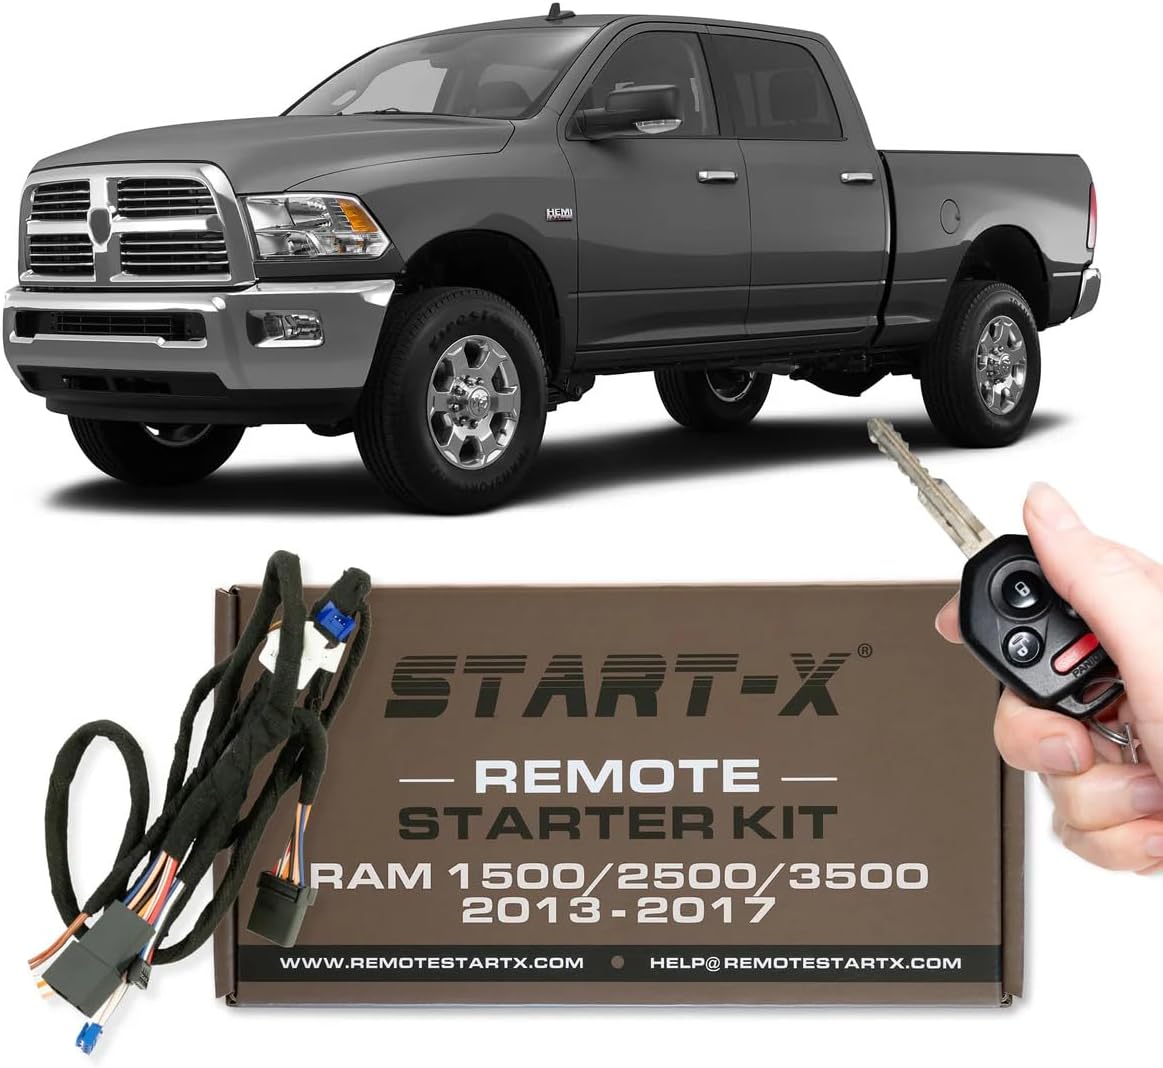
Image 1.1: Start-X Remote Start Kit for RAM Pickup Trucks.
2. Compatibility Requirements
This remote start kit is specifically designed for certain RAM Pickup Truck models and configurations. Please verify your vehicle meets the following criteria:
- Vehicle Models: RAM Pickup Truck 1500, 2500, 3500.
- Model Years: 2013, 2014, 2015, 2016, 2017.
- Ignition Type: Key Start Engine (Tip Start) only. Will not work with Push-to-Start trucks.
- Fuel Type: Compatible with Gas models only. Not compatible with diesel models.
- Transmission: Automatic transmission models only. Not compatible with manual transmission models.
- Remote: Requires your existing factory remote key fob. The kit does not include a remote.
- Programming: A Windows PC is required to complete the programming process.

Image 2.1: Key Ignition Only.

Image 2.2: Gas Models Only.

Image 2.3: Automatic Transmission Only.

Image 2.4: Factory Remote Required.
3. Package Contents
Your Start-X Remote Start Kit package should contain the following items:
- Start-X Remote Start Module
- Plug-n-Play T-Harnesses (OBD and Main Ignition Harness)
- USB Programming Cable
- Warning Label for vehicle hood
- Zip Ties for cable management
- Instruction Manual (this document)

Image 3.1: What's in the Box.
4. Installation Guide
The installation process involves physical connection of the T-harnesses and a one-time programming step using a Windows PC. Follow these steps carefully for a successful installation.
4.1. Pre-Installation Steps
- Ensure your vehicle is turned off and the key is removed from the ignition.
- Gather necessary tools: a Windows PC with internet access, and basic tools for removing dash panels if required for your specific RAM model.
- It is recommended to watch the official installation video for your specific make and model. Visit RemoteStartX.com/Ram10 for video tutorials.
4.2. Physical Installation
- Install OBD T-Harness: Locate your vehicle's OBD-II port (typically under the dashboard on the driver's side). Connect the new OBD T-harness inline with the existing OBD port.
- Access Ignition Harness: Carefully remove the necessary dash panels to access the main ignition harness behind the steering column.
- Install Main Ignition T-Harness: Disconnect the factory ignition harness and connect the Start-X main ignition T-harness inline.
- Connect Canbus Connector: Connect the canbus connector from the main T-harness to the new OBD harness.
- Connect Module (Initial): While connecting the black connector to the Start-X module, press and hold the reset button on the module until the red light flashes. Then, connect the blue and white connectors to the module.

Image 4.1: Easy Plug & Play Installation.
4.3. Vehicle Programming (First Phase)
- Close Driver Door: Ensure the driver's door is closed.
- Open Driver Door: Open the driver's door.
- Key Fob Unlock: Press the unlock button on your factory key fob multiple times until the module's LED flashes green.
- Key to ON Position: Insert your key and turn it to the ON position (do not start the engine). Wait for the LED on the module to turn solid red.
- Turn Key OFF: Turn the key to the OFF position.
- Remove Key: Remove the key from the ignition.
- Start Vehicle: Insert the key and start the vehicle.
- Wait for Green LED: Wait for the LED on the module to flash green, then remove the key.
- Disconnect Module: Disconnect the blue and white plugs from the module FIRST, then disconnect the black module plug LAST.
4.4. Computer Programming (Weblink Desktop Software)
This step requires a Windows PC with internet access.
- Access Weblink: Go to weblinkupdater.com.
- Sign Up/Log In: Click the "Sign up" button in the top right corner to create an account, or log in if you already have one. Check your junk mail for the activation email.
- Download Software: Download and install the Weblink Desktop Software.
- Connect Module: Plug the Start-X module into your PC using the supplied USB adapter.
- Open Software: Open the Weblink software and select "Weblink RS".
- Start Programming: Click "Start Extended Programming" and then "Continue Extended Programming".
- Complete Programming: Once the programming is complete, safely unhook the module from your computer.

Image 4.2: Installation Steps Overview.
4.5. Final Vehicle Connection & Test
- Reconnect Module: Reconnect all three plugs (white, blue, black) to the module in your vehicle.
- Key to ON Position: Turn the key to the ON position. The LED on the module should turn solid GREEN for approximately 2 seconds.
- Turn Key OFF: Turn the key to the OFF position.
- Start Vehicle: Start the vehicle.
- Turn OFF & Remove Key: Turn off the vehicle and remove the key.
- Test Remote Start: Exit the vehicle and close the door. Press the lock button on your factory key fob 3 times. Your vehicle should now start remotely.
- Secure Wiring: Once confirmed working, use the provided zip ties to secure all wiring and the module, ensuring they are not interfering with any moving parts or vents.
5. Operation
To operate the remote start feature:
- Ensure your vehicle is off and all doors are closed.
- Press the Lock button on your factory key fob three (3) times in quick succession.
- The vehicle's lights will flash, and the engine will start.
- The remote start will run for a preset duration (typically 15 minutes, adjustable via Weblink software) before automatically shutting off.

Image 5.1: Pressing the Lock Button on the Key Fob.
5.1. Entering the Vehicle After Remote Start
To enter and drive your vehicle after a remote start:
- Unlock the vehicle using your key fob.
- Open the door, get in, and close the door.
- Insert the key into the ignition and turn it to the RUN position.
- Press the brake pedal.
- Select Drive or Reverse.
These steps are crucial for the anti-theft system to disengage and allow you to drive the vehicle. Failure to follow this sequence will result in the engine shutting off when the brake is pressed.
6. Important Notes & Troubleshooting
- Horn Honk: For some RAM models, the second press of the lock button may cause the horn to honk. This is normal vehicle behavior and not an issue with the remote start kit.
- Programming Issues: If the module does not program correctly or loses its program, ensure all steps are followed precisely, especially the timing of key turns and plug connections. Re-attempt the programming process from the beginning. Verify your internet connection is stable during the Weblink software process.
- Range: The remote start range is limited to the effective range of your factory key fob. If you require extended range, aftermarket long-range remotes compatible with this system may be available from Start-X.
- Engine Shut-off: If the engine shuts off when you press the brake after remote starting, ensure you have inserted the key and turned it to the RUN position before pressing the brake. This is a safety feature.
7. Product Specifications
| Feature | Detail |
|---|---|
| Manufacturer | Start-X |
| Brand | Start-X |
| Model Number | BA-CH8_RAM-1 |
| Item Weight | 12.3 ounces |
| Package Dimensions | 8.11 x 4.17 x 2.32 inches |
8. Support and Warranty
For technical assistance, troubleshooting, or warranty information, please contact Start-X customer support. Refer to the contact information provided on the product packaging or visit the official Start-X website.
Start-X products are designed and engineered in North America, with technical support agents located in the United States.


