Introduction
The Haloview RD7-MINI is a 7-inch 720P wireless backup camera system designed to provide enhanced visibility and safety for large vehicles such as RVs, fifth wheels, travel trailers, motorhomes, and campers. This system features a 7-inch LCD digital monitor with a built-in recorder for real-time recording and video playback. It supports up to four wireless camera inputs and offers a wide 130-degree viewing angle. With its external range extender and integrated Frequency Hopping Technology, the system ensures a stable wireless connection up to 1200 feet, minimizing signal interference and maintaining clear video at speeds up to 70 mph. The camera is designed for durability with an IP69K waterproof rating and includes night vision capabilities and adjustable parking lines.
Package Contents
Before beginning installation, please verify that all components listed below are present in your package.

Image: Contents of the Haloview RD7-MINI system package, including the monitor, camera, TX-box, various cables, mounting brackets, and accessories.
- 7-inch LCD Monitor
- Wireless Camera (720P)
- TX-box (Wireless Transmitter/Range Extender)
- Monitor Mounting Bracket (Center Mount)
- B-F02 Bracket (for Furrion pre-wired vehicles)
- Cigarette Lighter Power Adapter
- 12-meter Power Cable
- 0.3-meter Power Cable
- BMW Connector Adapter
- Wire Fixtures (x18)
- User Manual (Printed)
Setup and Installation
Proper installation is crucial for optimal performance. Ensure the vehicle's power is off before beginning any wiring.
1. System Overview
The system consists of a monitor for in-cab viewing, a camera mounted on the rear of the vehicle, and a TX-box that acts as a wireless transmitter and range extender. The TX-box is typically mounted closer to the front of the vehicle to ensure maximum signal range.

Image: An illustration demonstrating the typical installation of the Haloview RD7-MINI system on an RV, showing the monitor inside the towing vehicle, the TX-box mounted on the RV's roof, and the camera at the rear.
2. Camera Installation
Mount the camera securely at the rear of your vehicle, ensuring a clear line of sight. If your vehicle is pre-wired for a Furrion camera, use the provided B-F02 adapter plate for easy integration. Ensure the camera is positioned to capture the desired viewing area, typically centered and high enough to avoid obstructions.

Image: The Haloview wireless camera mounted on the rear of a vehicle, positioned above a tail light for optimal rear visibility.
3. TX-box Installation
The TX-box is the wireless transmitter and range extender. For optimal signal strength, especially on longer vehicles, mount the TX-box as far forward on the RV as possible, ideally on the roof or a high point, to minimize obstructions between it and the monitor. Connect the camera to the TX-box using the provided cables.
4. Monitor Installation
Install the 7-inch monitor inside your towing vehicle using the center mount bracket. Position it on the dashboard or windshield where it provides a clear view without obstructing your driving vision. Ensure the antenna is securely attached to the monitor for best reception.
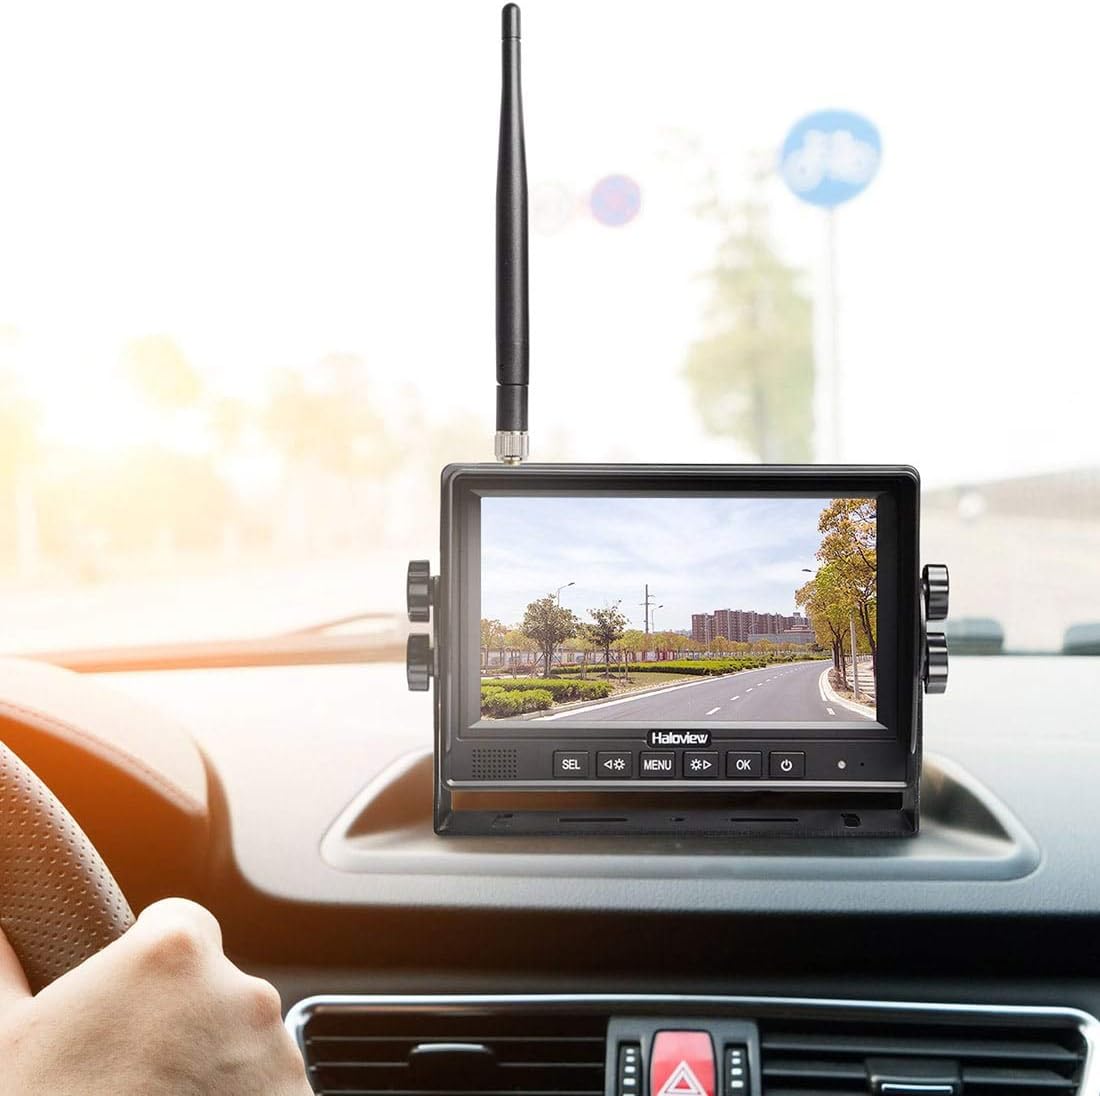
Image: The Haloview 7-inch monitor displaying a live feed, mounted on the dashboard of a vehicle, with the antenna visible.
5. Wiring and Power Supply
The system operates on a 10-32V wide voltage input. The camera and TX-box typically draw power from the vehicle's running lights or a dedicated 12V/24V power source. The monitor can be powered via the included cigarette lighter adapter. Ensure all connections are secure and weatherproofed.

Image: A diagram illustrating two common wiring methods for the camera and TX-box, both requiring a DC 10-32V power source.
Important Note on PWM Signals: Some modern tow vehicles, especially those with LED lighting, may use Pulse Width Modulation (PWM) signals for their running lights instead of a constant DC voltage. This system is not compatible with PWM signals and will not power on correctly if connected to such a source. If you encounter this issue, you may need to connect the camera and TX-box to a constant 10-32V DC power source directly from your RV's battery, possibly with an added switch.
Operating Instructions
1. Powering On/Off
Once properly installed and connected to power, the monitor will typically power on automatically when the vehicle's running lights are activated. To manually power on or off, press and hold the power button located on the monitor.
2. Menu Navigation
Use the buttons on the front of the monitor (typically labeled SEL, MENU, OK, and arrow keys) to navigate through the system's settings. The MENU button accesses the main settings, while arrow keys allow you to scroll through options, and OK confirms selections. Settings include image adjustments, pairing, recording options, and display modes.
3. Pairing Cameras
The camera and monitor are typically pre-paired from the factory. If you need to re-pair or add additional cameras (up to 4 supported), access the pairing menu on the monitor. Follow the on-screen instructions to initiate pairing mode on both the monitor and the camera/TX-box unit. It is recommended to perform pairing before final installation to ensure connectivity.
4. Recording and Playback
The monitor features a built-in recorder. Insert a compatible SD card (not included) into the designated slot to enable recording. You can configure recording settings (e.g., continuous, motion-activated) through the menu. Recorded footage can be played back directly on the monitor.
5. Display Modes and Parking Lines
The monitor supports various display modes, including single camera view and split-screen view for multiple cameras. You can switch between these modes using the dedicated buttons or menu options. The system also provides adjustable parking lines on the display to assist with backing up. These lines can be adjusted for position (left/right, up/down) to match your vehicle's dimensions, though the width between the lines may be fixed.
Maintenance
- Cleaning: Regularly clean the camera lens and monitor screen with a soft, damp cloth. Avoid abrasive cleaners that could scratch surfaces.
- Connections: Periodically check all cable connections for tightness and signs of wear or corrosion. Ensure waterproof seals are intact.
- Firmware: Check the Haloview website for any available firmware updates for your system to ensure optimal performance and access to new features.
Troubleshooting
- No Image on Monitor:
- Ensure the monitor is powered on and receiving power (check cigarette lighter connection or power source).
- Verify the camera and TX-box are receiving power (check vehicle running lights or direct power connection).
- Confirm the camera and monitor are properly paired.
- Check for obstructions between the TX-box and monitor that might block the wireless signal.
- If connected to running lights, ensure your vehicle is not using a PWM signal (see Wiring section).
- Choppy or Freezing Image:
- Signal interference can cause this. Ensure the TX-box antenna is clear of obstructions and positioned optimally.
- Reboot the monitor by powering it off and on.
- Check for other wireless devices operating on similar frequencies that might cause interference.
- Ensure the TX-box is mounted as far forward as possible on long vehicles to maximize range.
- Blurry Image:
- Clean the camera lens.
- Check for physical damage to the camera or lens.
- Ensure the camera is securely mounted and not vibrating excessively.
- Monitor Whine:
- Some users report a high-pitched whine from the monitor. This is often minor and may not be noticeable during driving. If persistent and disruptive, contact support.
- Rearview Camera Image Reversed:
- Access the "Mirror Setup" option in the monitor's menu to adjust the image orientation.
Specifications
| Brand | Haloview |
| Model Number | RD7-MINI |
| Screen Size | 7 Inches |
| Display Technology | LCD |
| Video Capture Resolution | 720p |
| Optical Sensor Technology | CMOS |
| Real Angle of View | 130 Degrees |
| Voltage Input | 10-32 Volts |
| Wireless Range (Line of Sight) | Up to 1200 feet |
| Max Camera Input | 4 Wireless Cameras |
| Waterproof Rating (Camera) | IP69K |
| Special Features | Built-in Recorder, Night Vision, Adjustable Parking Lines, Frequency Hopping Technology |
Warranty and Support
Haloview products typically come with a 1-year limited warranty covering manufacturing defects. For specific warranty details, please refer to the warranty card included in your package or visit the official Haloview website. If you encounter any issues not covered in the troubleshooting section, or require further assistance, please contact Haloview customer support. Be prepared to provide your product model number (RD7-MINI) and proof of purchase.
Contact Information: Please refer to the contact details provided in your product packaging or on the official Haloview website for the most current support information.


