
1. Introduction
Thank you for choosing the Kaisai ECO Split Air Conditioner. This manual provides essential information for the safe and efficient operation, installation, and maintenance of your air conditioning unit. Please read this manual thoroughly before using the appliance and keep it for future reference. This unit is designed to provide both cooling and heating for residential spaces up to 80 square meters, utilizing R32 refrigerant for enhanced energy efficiency and reduced environmental impact.
2. Safety Information
Always observe the following basic precautions to reduce the risk of fire, electric shock, or injury:
- Installation must be performed by qualified personnel in accordance with national wiring standards.
- Ensure the power supply matches the unit's specifications.
- Do not operate the unit with wet hands or when standing on wet surfaces.
- Do not insert objects into the air outlet or inlet.
- Keep the unit away from flammable gases or combustible materials.
- The unit contains R32 refrigerant. Handle with care and ensure proper ventilation during installation and servicing.
- Disconnect power before cleaning or performing any maintenance.
3. Product Overview
3.1 Indoor Unit
The indoor unit is designed for wall mounting and features a sleek, modern design. It houses the evaporator coil, fan, and control electronics. A digital display is integrated into the front panel to show temperature and operational status.

Figure 1: Front view of the indoor unit. This image shows the front of the indoor unit, featuring the 'KAISAI ECO' branding and a digital display area.

Figure 2: Side view of the indoor unit. This image displays the side profile of the indoor unit, highlighting its compact design.
3.2 Outdoor Unit
The outdoor unit contains the compressor, condenser coil, and fan. It is responsible for releasing heat to the outside environment during cooling and absorbing heat during heating operations.

Figure 3: Front view of the outdoor unit. The outdoor unit is shown with its protective grille and fan, essential for heat exchange.
3.3 Remote Control
The infrared remote control allows convenient operation of all unit functions from a distance. It features a temperature sensor for the 'Follow Me' function.
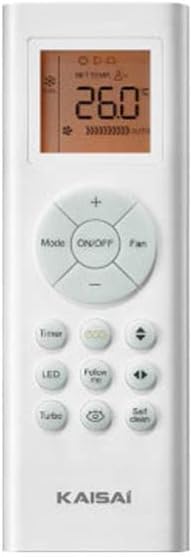
Figure 4: Remote control. The remote control features buttons for power, mode selection, fan speed, timer, turbo, follow me, and sleep functions, along with a digital display.
4. Setup and Installation
Installation of a split air conditioning system requires specialized knowledge and tools, particularly concerning refrigerant handling and electrical connections. It is strongly recommended that installation be performed by a certified HVAC professional.
4.1 Included Installation Components
The product includes a comprehensive installation kit:
- 5 meters of insulated, pre-assembled refrigerant line.
- 5 meters of condensate line.
- 5 meters of NYM electrical cable (5x1.5).
- Wall bracket for outdoor units: hot-dip galvanized steel, powder-coated, with an outreach of 465mm and a load capacity of up to 140 kg.

Figure 5: Installation kit components. This image illustrates the included installation components: wall brackets, insulated refrigerant lines, condensate line, and electrical cable.
4.2 General Installation Steps (Professional Recommended)
- Select Location: Choose appropriate locations for both indoor and outdoor units, ensuring proper airflow and drainage.
- Mount Indoor Unit: Securely mount the indoor unit to the wall, ensuring it is level.
- Install Outdoor Unit: Mount the outdoor unit using the provided wall bracket on a stable surface, ensuring it is level and has adequate clearance.
- Connect Refrigerant Lines: Connect the pre-assembled refrigerant lines between the indoor and outdoor units. This step involves vacuuming the lines and checking for leaks, which requires specialized equipment.
- Connect Condensate Line: Attach the condensate drain line from the indoor unit to ensure proper water drainage.
- Electrical Wiring: Connect the electrical cable between the indoor and outdoor units and to the main power supply, following all local electrical codes.
- Test Operation: After all connections are secure, power on the unit and test all functions to ensure proper operation.
5. Operating Instructions
Use the remote control to operate your Kaisai ECO Split Air Conditioner. Ensure the remote control is pointed towards the indoor unit when sending commands.
5.1 Basic Operation Modes
- Cooling Mode: Press the 'Mode' button until the snowflake icon appears. Set your desired temperature using the temperature adjustment buttons. The unit will cool the room to the set temperature.
- Heating Mode: Press the 'Mode' button until the sun icon appears. Set your desired temperature. The unit will heat the room.
- Fan Mode: Press the 'Mode' button until the fan icon appears. In this mode, the unit circulates air without cooling or heating. Adjust fan speed as desired.
- Auto Mode: The unit automatically selects cooling or heating based on the ambient temperature and your set temperature.
5.2 Special Features
- Turbo Mode: Activates maximum fan speed and compressor output to reach the set temperature quickly. Press the 'Turbo' button on the remote.
- 24-Hour Timer: Allows you to set a specific time for the unit to turn on or off within a 24-hour period. Refer to the remote control section for detailed timer setting instructions.
- Follow Me Function: When activated, the remote control's built-in temperature sensor measures the ambient temperature at its location and adjusts the unit's operation to maintain the set temperature around the remote. Press the 'Follow Me' button.
- Sleep Mode: Optimizes comfort during sleep by gradually adjusting the temperature and reducing fan speed. This mode ensures a quiet and efficient operation, preventing overcooling or overheating. Press the 'Sleep' button.
- Quiet Operation: The Kaisai ECO series is designed for extra quiet operation, minimizing noise levels for a comfortable environment.
- Energy Efficiency: Thanks to advanced DC inverter technology, the unit achieves high energy efficiency ratings (Cooling A++/Heating A+), reducing power consumption.

Figure 6: Key features of the Kaisai ECO Split Air Conditioner. A graphic highlighting features such as WiFi Ready, R32 refrigerant, multifunctional remote control, and wide temperature range.
6. Maintenance
Regular maintenance ensures optimal performance and extends the lifespan of your air conditioner. Always disconnect power before performing any maintenance.
6.1 Air Filter Cleaning
- Frequency: Clean the air filters every two weeks, or more often if the unit is used frequently or in dusty environments.
- Procedure:
- Open the front panel of the indoor unit.
- Remove the air filters.
- Wash the filters with lukewarm water and a mild detergent. Rinse thoroughly.
- Allow the filters to dry completely in a shaded area before reinstalling. Do not expose to direct sunlight.
- Reinstall the dry filters and close the front panel.
6.2 Unit Cleaning
- Indoor Unit: Wipe the exterior of the indoor unit with a soft, damp cloth. Do not use harsh chemicals or abrasive cleaners.
- Outdoor Unit: Periodically check the outdoor unit for debris (leaves, dirt) that may obstruct airflow. Carefully remove any obstructions. Ensure the condenser fins are clean.
6.3 Professional Servicing
It is recommended to have your air conditioner professionally inspected and serviced at least once a year. A professional can check refrigerant levels, clean coils, and ensure all components are functioning correctly.
7. Troubleshooting
Before contacting customer support, please refer to the following common issues and solutions:
| Problem | Possible Cause | Solution |
|---|---|---|
| Unit does not start | No power; Remote control batteries low; Timer function active. | Check power supply and circuit breaker; Replace remote control batteries; Deactivate timer function. |
| Insufficient cooling/heating | Dirty air filters; Doors/windows open; Obstruction of air inlet/outlet; Incorrect mode selection; Low refrigerant. | Clean air filters; Close doors/windows; Remove obstructions; Select correct mode; Contact a professional for refrigerant check. |
| Unusual noise | Loose parts; Unit not level; Debris in outdoor unit fan. | Check for loose parts and tighten; Ensure unit is level; Clear debris from outdoor unit. If noise persists, contact service. |
| Water leakage from indoor unit | Clogged condensate drain pipe; Unit not level. | Clear the drain pipe; Ensure indoor unit is installed level. |
If the problem persists after attempting these solutions, please contact a qualified service technician.
8. Specifications
| Feature | Specification |
|---|---|
| Brand | KAISAI |
| Model | KEX-18HRD (Kaisai Eco) |
| Capacity | 1.5 Ton |
| Cooling Capacity | 18000 BTU |
| Wattage | 5.3 KW |
| Special Function | Heating and Cooling |
| Seasonal Energy Efficiency Ratio (SEER) | 7 |
| Energy Efficiency | High (Cooling A++/Heating A+) |
| Color | White |
| Voltage | 230 V |
| Power Source | Corded Electric |
| Form Factor | Mini-Split |
| Inverter Type | Has Inverter |
| Installation Type | Split System |
| Compressor Type | Rotary Scroll |
| Outdoor Unit Required | Yes |
| Usage Area | Residential |
| Floor Area Coverage | Up to 80 Square Meters |
| Control Method | Remote Controlled |
| Refrigerant | R32 |
9. Warranty and Support
For warranty information, technical support, or service requests, please refer to the documentation provided with your purchase or contact your retailer. Keep your purchase receipt as proof of purchase.
Manufacturer: KAISAI
Distributed by: FLAIRMAX GmbH (in Germany, as per product description)


