1. Introduction
This manual provides essential instructions for the safe and effective operation, maintenance, and troubleshooting of your EBTOOLS 12V Auto Jump Starter Power Bank. Please read this manual thoroughly before using the device to ensure proper function and to prevent damage or injury. Keep this manual for future reference.
2. Safety Information
Always observe the following safety precautions when using the jump starter:
- Do not allow the red and black clamps to touch each other.
- Do not jump start a vehicle if the battery voltage is not 12V.
- Do not attempt to jump start a vehicle with a damaged or leaking battery.
- Ensure proper ventilation when operating in enclosed spaces.
- Keep the device away from children and pets.
- Do not expose the device to extreme temperatures, direct sunlight, or moisture.
- If the device becomes excessively hot during use, discontinue operation immediately.
- Always connect the positive (+) clamp to the positive (+) terminal and the negative (-) clamp to the negative (-) terminal or a suitable ground point on the vehicle chassis.
- Disconnect the clamps in reverse order after the vehicle starts.
3. Product Overview and Components
The EBTOOLS 12V Auto Jump Starter Power Bank is a compact and portable device designed to jump start 12V vehicles with up to 3.0L gasoline engines. It also functions as a power bank for charging electronic devices and includes an integrated flashlight.

Figure 3.1: EBTOOLS Jump Starter Power Bank, smart jumper cables, and USB charging cable.
Key Components:
- Jump Starter Unit: The main power bank with integrated battery, ports, and flashlight.
- Smart Jumper Cables: Red (positive) and black (negative) clamps with a smart protection module.
- USB Charging Cable: For recharging the jump starter unit.
- USB Output Port: For charging external electronic devices.
- Jump Start Port: Connection point for the smart jumper cables.
- LED Flashlight: Integrated light for illumination.
- Power Indicator Lights: Display the remaining battery charge.

Figure 3.2: Side view of the jump starter unit, highlighting the USB output port, LED flashlight, and the covered jump start port.

Figure 3.3: The jump starter unit with its integrated LED flashlight activated, useful for low-light conditions.
4. Charging the Jump Starter
Before initial use, fully charge the jump starter. It is recommended to recharge the device every 3-6 months to maintain battery health, even if not in use.
- Connect the Micro USB end of the provided USB charging cable to the input port on the jump starter unit.
- Connect the standard USB end of the cable to a USB power source (e.g., a computer USB port, a USB wall adapter, or a car charger).
- The power indicator lights on the jump starter will illuminate and flash during charging. All lights will be solid when fully charged.
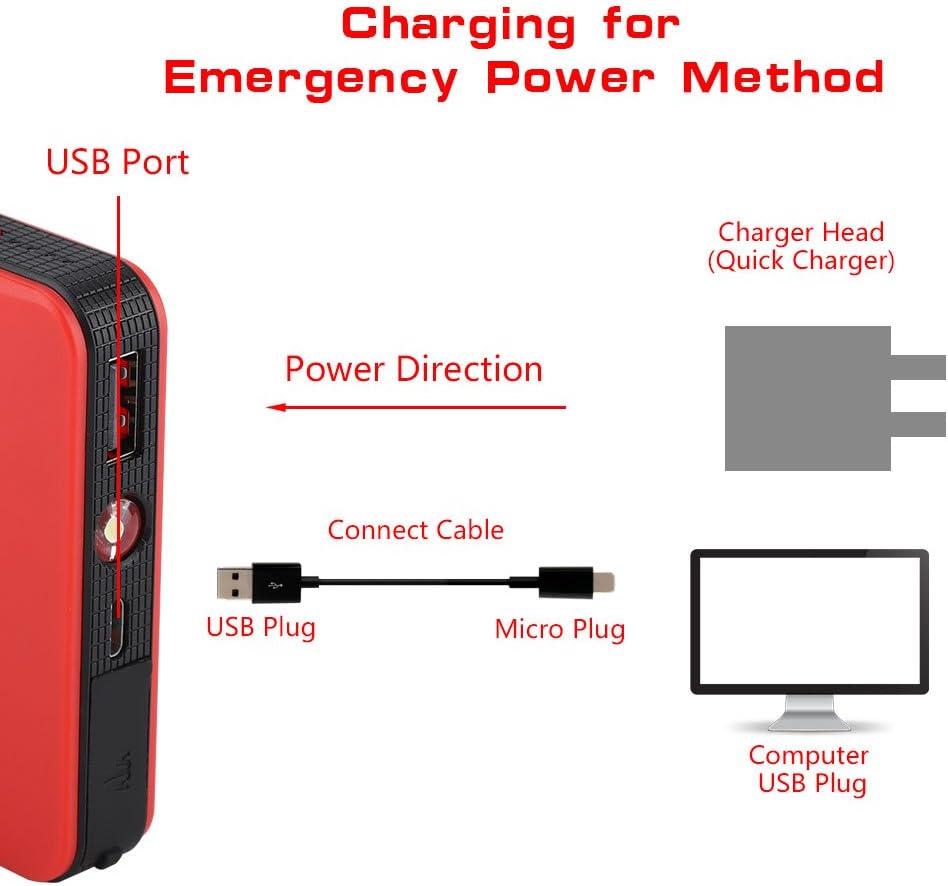
Figure 4.1: Illustration of connecting the USB charging cable to the jump starter's USB port for recharging.
5. Operating Instructions: Jump Starting a Vehicle
Ensure the jump starter is fully charged before attempting to jump start a vehicle.
- Prepare the Vehicle: Turn off the vehicle's ignition and all accessories (lights, radio, air conditioning). Engage the parking brake.
- Connect Jumper Cables to Jump Starter: Open the protective cover on the jump start port of the power bank. Firmly insert the blue connector end of the smart jumper cables into the jump start port. Ensure a secure connection.
- Connect Clamps to Vehicle Battery:
- Connect the RED positive (+) clamp to the positive (+) terminal of the vehicle's battery.
- Connect the BLACK negative (-) clamp to the negative (-) terminal of the vehicle's battery or to a solid, unpainted metal part of the engine block or chassis, away from the battery.

Figure 5.1: The smart jumper cables properly connected to the jump starter unit's dedicated port.
- Check Indicator Lights: The smart jumper cable module may have indicator lights. Refer to the cable's specific instructions for light meanings (e.g., solid green for ready, flashing red for error).
- Start the Vehicle: Once the connections are secure and the indicator lights confirm readiness, start the vehicle's ignition. If the vehicle does not start immediately, wait 30 seconds before trying again. Do not crank for more than 3 seconds per attempt.
- Disconnect Clamps: As soon as the vehicle starts, disconnect the BLACK negative (-) clamp first, then the RED positive (+) clamp.
- Disconnect Jumper Cables from Jump Starter: Remove the smart jumper cables from the jump starter unit. Close the protective cover on the jump start port.
Allow the vehicle's engine to run for at least 15 minutes to recharge its battery.
6. Maintenance and Storage
- Clean the device with a soft, dry cloth. Do not use harsh chemicals or abrasive cleaners.
- Store the jump starter in a cool, dry place, away from direct sunlight and moisture.
- Ensure the jump starter is charged to at least 50% before storing for extended periods. Recharge every 3-6 months.
- Keep the protective cover over the jump start port when not in use to prevent dust and debris from entering.
7. Troubleshooting
| Problem | Possible Cause | Solution |
|---|---|---|
| Vehicle does not start. |
|
|
| Jump starter not charging. |
|
|
| Smart jumper cable indicator shows error. |
|
|
8. Specifications
| Feature | Detail |
|---|---|
| Brand | EBTOOLS |
| Model Number | EBTOOLSuvigqdtza7-02 |
| Battery Capacity | 8000mAH (as per product title) |
| Peak Current | 600 A |
| Output Voltage | 12 Volts (for jump starting), 5 Volts (USB output) |
| Engine Compatibility | Up to 3.0L Gasoline Engines |
| Item Weight | 260 Grams |
| Product Dimensions (L x W x H) | 13.5 x 7.5 x 1.5 cm (5.31 x 2.95 x 0.59 inches) |

Figure 8.1: Physical dimensions of the EBTOOLS Jump Starter unit, showing approximate measurements.
9. Warranty and Support
For warranty information or technical support, please refer to the documentation provided with your purchase or contact the seller directly. Keep your proof of purchase for warranty claims.


