Introduction
The LoraTap Smart WiFi Garage Door Opener Controller transforms your existing garage door opener into a smart system, allowing for convenient control via smartphone app or voice commands. This device offers real-time monitoring, notifications, and enhanced security for your home.

The LoraTap Smart WiFi Garage Door Opener Controller, showing the main unit, magnetic sensor, and a smartphone displaying the control app.
Key features include:
- Smart System Upgrade: Converts traditional garage door openers into smart, app-controlled systems.
- Voice Control: Compatible with Amazon Alexa and Google Assistant for hands-free operation.
- Remote Access: Control your garage door from anywhere using the "Smart Life" app (2.4 GHz Wi-Fi required).
- Real-Time Notifications: Receive alerts for door status changes and operation logs.
- Easy Installation: Designed for quick setup with most common garage door openers.
Setup and Installation
1. Compatibility Check
Before installation, ensure your existing garage door opener is compatible. Use a pair of pliers to momentarily short the wall button terminals on your garage door opener. If the garage door opens or closes, it is compatible with the LoraTap controller.
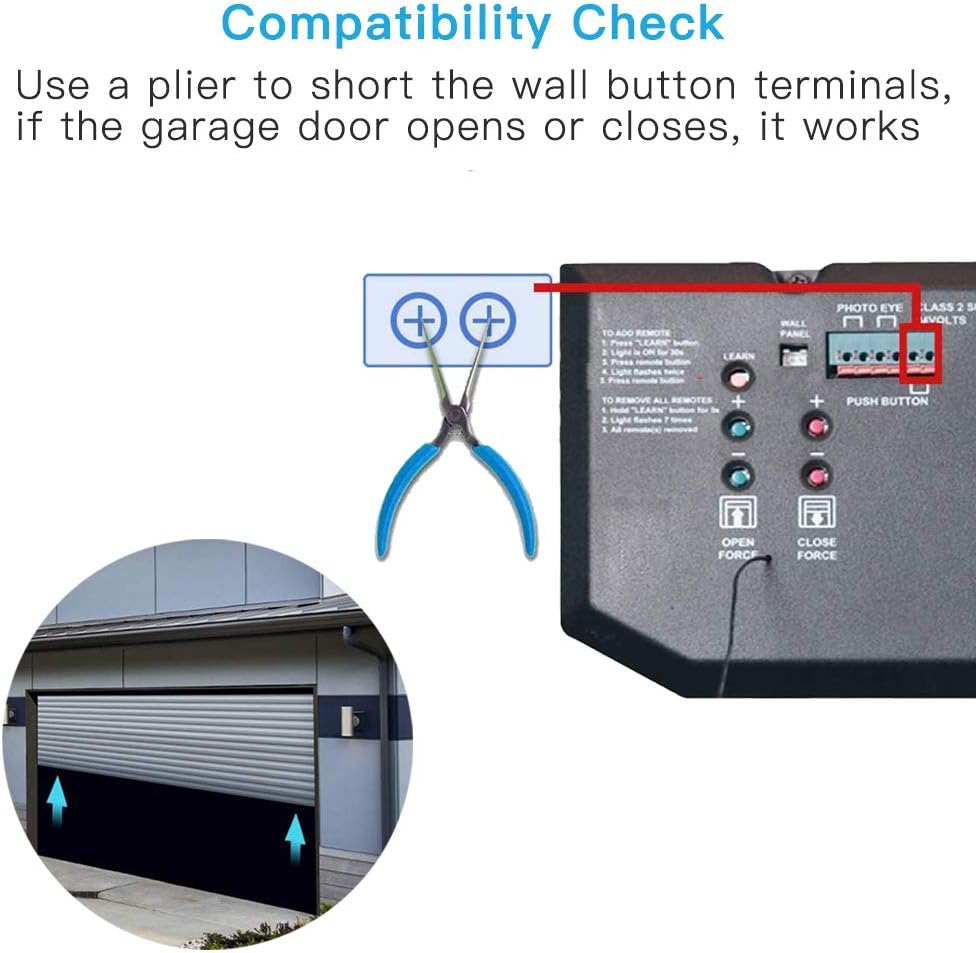
Illustration showing how to perform a compatibility check by shorting the wall button terminals with pliers. If the door responds, it is compatible.
2. What's in the Box
Verify that all components are present in the package:
A visual representation of the package contents, including the garage door opener controller, AC power plug, 5m sensor cable, bracket, screws, line holders, screwdriver, cable, and double-sided adhesive tapes.
- Garage Door Opener Controller (1)
- AC Power Plug (2)
- 5m Sensor Cable (3)
- Bracket (4)
- Screws (5)
- Line Holders (6)
- Screwdriver (7)
- Cable (8)
- Double-sided Adhesive Tapes (9)
Note: The door magnet wire is 5 meters long and waterproof.
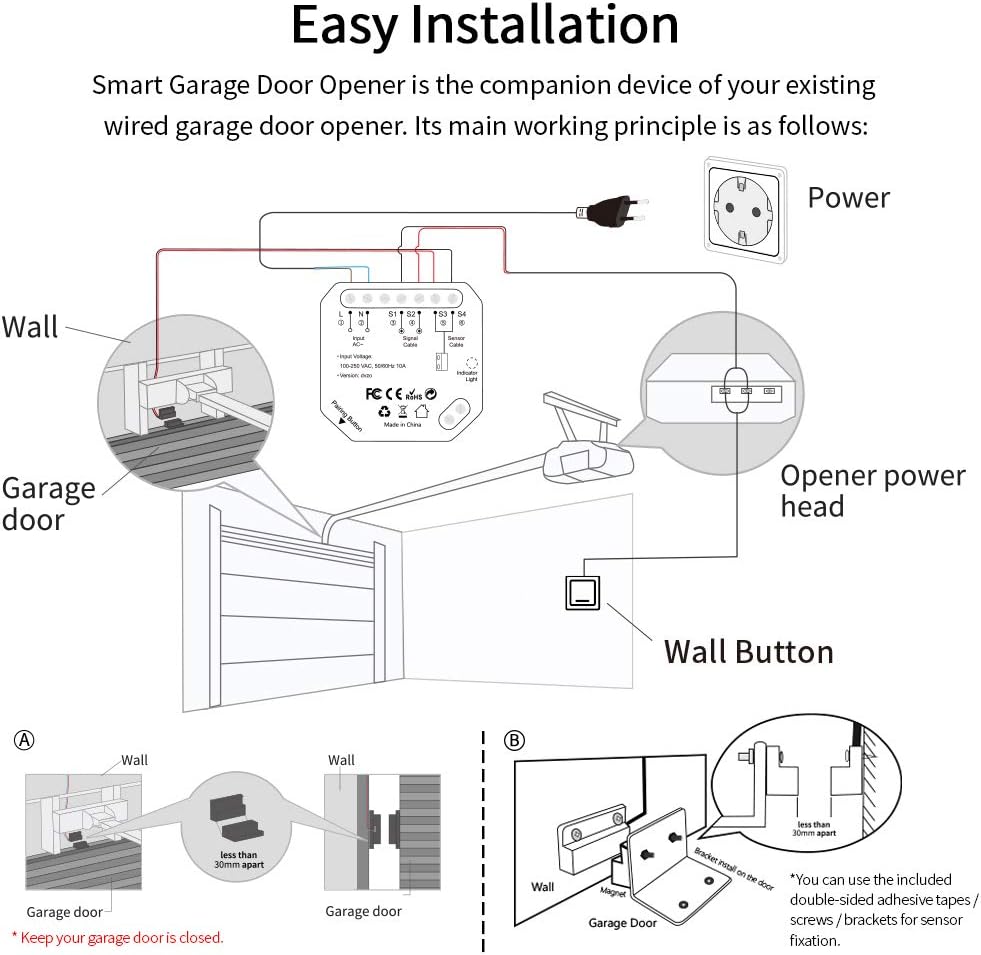
3. Installation Steps
The Smart Garage Door Opener is a companion device to your existing wired garage door opener. Follow these steps for installation:

Detailed wiring diagram showing connections from the LoraTap controller to the power outlet, wall button, and garage door opener head unit. Also illustrates the magnetic sensor installation on the garage door and wall.
- Mount the Controller: Choose a suitable location near your garage door opener and a power outlet. Use the included screws or double-sided adhesive tapes to mount the LoraTap controller.
- Connect Power: Plug the AC power plug into the controller's power input (L and N terminals) and then into a standard 110V AC outlet.
- Connect to Garage Door Opener: Connect the signal cable from the controller (S1 and S2 terminals) to the wall button terminals on your existing garage door opener. Refer to your garage door opener's manual for specific terminal locations.
- Install Sensor Cable: Attach the magnetic sensor to your garage door and the wall. Ensure the two parts of the sensor are less than 30mm apart when the garage door is closed. Connect the sensor cable to the controller's S3 and S4 terminals.
- Secure Wiring: Use the provided line holders to neatly secure all cables, preventing interference with garage door operation.
Important: Ensure your garage door is closed during sensor installation for accurate placement.
4. Wi-Fi Connection and Pairing
To enable smart features, connect the controller to your home Wi-Fi network and pair it with the "Smart Life" app.

A step-by-step guide for pairing the device, including Wi-Fi network compatibility (2.4GHz only), downloading the Tuya/Smart Life app, adding the device, entering Wi-Fi password, and successful addition confirmation.
- Wi-Fi Network Compatibility: Ensure your Wi-Fi network is 2.4GHz. The device does not support 5GHz.
- Download App: Download the "Smart Life" app (or Tuya app) from your smartphone's app store.
- Add Device: Open the app, register or log in, and tap "Add Device" or the "+" icon. Select "Garage Door Opener" from the device list.
- Enter Wi-Fi Details: Follow the in-app instructions to connect the controller to your Wi-Fi network. You will need to enter your Wi-Fi password.
- Pairing: The app will guide you through the pairing process. Once successful, the device will be added to your app.
5. Optimal Placement for Wi-Fi Signal
For reliable operation, the LoraTap controller should be installed within 10 meters (approximately 33 feet) of your Wi-Fi router to ensure a strong and stable signal.

Visual guide indicating that the device should be placed within 10 meters of the Wi-Fi router for good signal strength, and beyond 10 meters for poor signal.
Operation
1. Remote Control via App
Once paired, you can control your garage door from anywhere using the "Smart Life" app. The app provides a virtual button to open or close the door, and displays the current status (open or closed).
A smartphone screen showing the "Garage Door Opener" interface within the Smart Life app, demonstrating remote control capabilities from any location.
The app also allows you to set timers, countdowns, and create scenes for automated operation, such as closing the garage door at a specific time each night.
2. Voice Control
Integrate the LoraTap controller with Amazon Alexa or Google Assistant for convenient voice-activated control.

An illustration demonstrating voice commands like "Alexa, turn on the garage door" and "Alexa, turn off the garage door" for hands-free operation, with Amazon Echo and Google Home devices shown.
Once linked, you can use commands such as:
- "Alexa, turn on the garage door." (to open)
- "Alexa, turn off the garage door." (to close)
- "Hey Google, turn on the garage door." (to open)
- "Hey Google, turn off the garage door." (to close)
Note: Some voice assistants may use "turn on/off" commands instead of "open/close" for this type of device.
3. Real-Time Monitoring and Alerts
The magnetic sensor provides real-time feedback on your garage door's status, which is displayed in the app. You will receive instant notifications on your smartphone for any changes in the door's status.
Comparison of the app interface showing the garage door as "Closed" when the sensor magnets are together, and "Opened" when they are separated.
An example of an alarm prompt notification on a mobile phone, indicating that the garage door has been left open for an extended period.
This feature enhances security by alerting you if the door is opened unexpectedly or left open for too long. You can also review operation logs within the app.
Maintenance
The LoraTap Smart WiFi Garage Door Opener Controller requires minimal maintenance. To ensure optimal performance and longevity:
- Keep Clean: Periodically wipe the device and sensor with a dry, soft cloth to remove dust and debris.
- Check Connections: Occasionally inspect all wired connections (power, signal, sensor) to ensure they are secure and free from damage.
- Sensor Alignment: Verify that the magnetic sensor components remain properly aligned on the garage door and wall, ensuring they are less than 30mm apart when the door is closed.
- App Updates: Keep the "Smart Life" app updated to the latest version to benefit from new features and bug fixes.
Troubleshooting
If you encounter issues with your LoraTap Smart WiFi Garage Door Opener Controller, refer to the following common problems and solutions:
- Device Not Connecting to Wi-Fi:
- Ensure your Wi-Fi network is 2.4GHz. The device does not support 5GHz.
- Verify the Wi-Fi password entered in the app is correct.
- Make sure the controller is within 10 meters of your Wi-Fi router.
- Restart your Wi-Fi router and the LoraTap controller, then attempt pairing again.
- Garage Door Not Responding to App/Voice Commands:
- Check if the controller is powered on and connected to Wi-Fi (indicator light status).
- Verify the signal cable connection (S1/S2) to your garage door opener's wall button terminals.
- Perform the compatibility check again (shorting wall button terminals) to ensure your opener is still responsive.
- For voice control, ensure the correct commands are used (e.g., "turn on/off" instead of "open/close" for some assistants).
- Incorrect Door Status in App (Always Open/Closed):
- Check the sensor cable connection (S3/S4) to the controller.
- Ensure the magnetic sensor components are properly aligned and within 30mm of each other when the door is closed.
- Inspect the sensor cable for any damage or breaks.
- "Lock" Feature Not Working (if applicable to your opener):
- Some garage door openers may have their internal "lock" feature overridden or affected by external smart controllers. Consult your garage door opener's manual or manufacturer for specific behavior.
- Device Malfunction After Power Outage:
- The device is designed to reconnect automatically. If it doesn't, try power cycling the controller (unplug and plug back in) and your Wi-Fi router.
If problems persist, contact LoraTap customer support for further assistance.
Specifications
| Feature | Detail |
|---|---|
| Manufacturer | LoraTap |
| Model Number | uk-door-16h-115 |
| Item Weight | 10.8 ounces |
| Package Dimensions | 7.8 x 3.31 x 2.2 inches |
| Country of Origin | China |
| Material | ABS |
| Power Source | AC |
| Voltage | 110 Volts |
| Installation Method | Surface-Mounted |
| Item Package Quantity | 1 |
| Mounting Type | Protruding |
| Switch Style | Push button |
| Special Features | Easy to Install |
| Usage | Commercial/Residential |
| Included Components | Extra long sensor cable, AC power plug, line holders, bracket, double sided adhesive tapes, screws |
| Batteries Required? | No |
Warranty and Support
Warranty Information
Specific warranty details for the LoraTap Smart WiFi Garage Door Opener Controller are typically provided at the point of purchase or within the product packaging. Please refer to the documentation included with your product or contact LoraTap directly for comprehensive warranty terms and conditions.
Customer Support
For technical assistance, troubleshooting, or any inquiries regarding your LoraTap product, please contact LoraTap customer support through their official website or the contact information provided in your product documentation. You may also visit the LoraTap Store on Amazon for additional resources.


