1. Introduction
Thank you for choosing the ELIVED EV009 Full Motion TV Wall Mount. This manual provides detailed instructions for safe and proper installation, operation, and maintenance of your TV mount. Please read this manual thoroughly before installation and retain it for future reference.
2. Safety Information
Important: Always ensure the mounting surface can support the combined weight of the mount and your TV. If you are unsure about the installation process, consult a qualified professional.
- Do not exceed the maximum weight capacity of 40 kg (88 lbs).
- Ensure your TV's VESA pattern is compatible with the mount (100x100mm to 400x400mm).
- This mount is designed for installation on concrete walls, brick walls, or single wood studs. Do not install on drywall or plasterboard alone.
- Use all provided hardware and follow installation steps precisely.
- Keep children and pets away during installation.
3. Package Contents
Verify that all components are present and undamaged before proceeding with installation. If any parts are missing or damaged, please contact customer service.

Image 1: Overview of all components included with the ELIVED EV009 TV Wall Mount. This includes the main articulating arm assembly, TV mounting brackets, a small spirit level for accurate installation, cable ties for cable management, and various wall anchors and screws for different wall types.
The package typically includes:
- Wall Plate Assembly with Articulating Arm
- TV Brackets (x2)
- Mounting Hardware Kit (various screws, washers, spacers, wall anchors)
- Spirit Level
- Cable Ties
- Instruction Manual
4. Compatibility Check
Before installation, confirm your TV and wall meet the following requirements:
4.1 TV Size and Weight
- TV Size: Suitable for most TVs from 26 inches to 60 inches.
- TV Weight: Your TV must weigh less than 40 kg (88 lbs).
4.2 VESA Pattern
The VESA (Video Electronics Standards Association) pattern refers to the spacing of the mounting holes on the back of your TV. Measure the horizontal and vertical distance between these holes.

Image 2: Illustration of compatible VESA mounting patterns. This diagram helps users identify if their TV's mounting holes match the supported configurations, ranging from 100x100mm to 400x400mm.
This mount supports the following VESA patterns:
- 100 x 100 mm
- 200 x 100 mm
- 200 x 200 mm
- 200 x 300 mm
- 300 x 200 mm
- 300 x 300 mm
- 400 x 200 mm
- 400 x 300 mm
- 400 x 400 mm
4.3 Wall Type
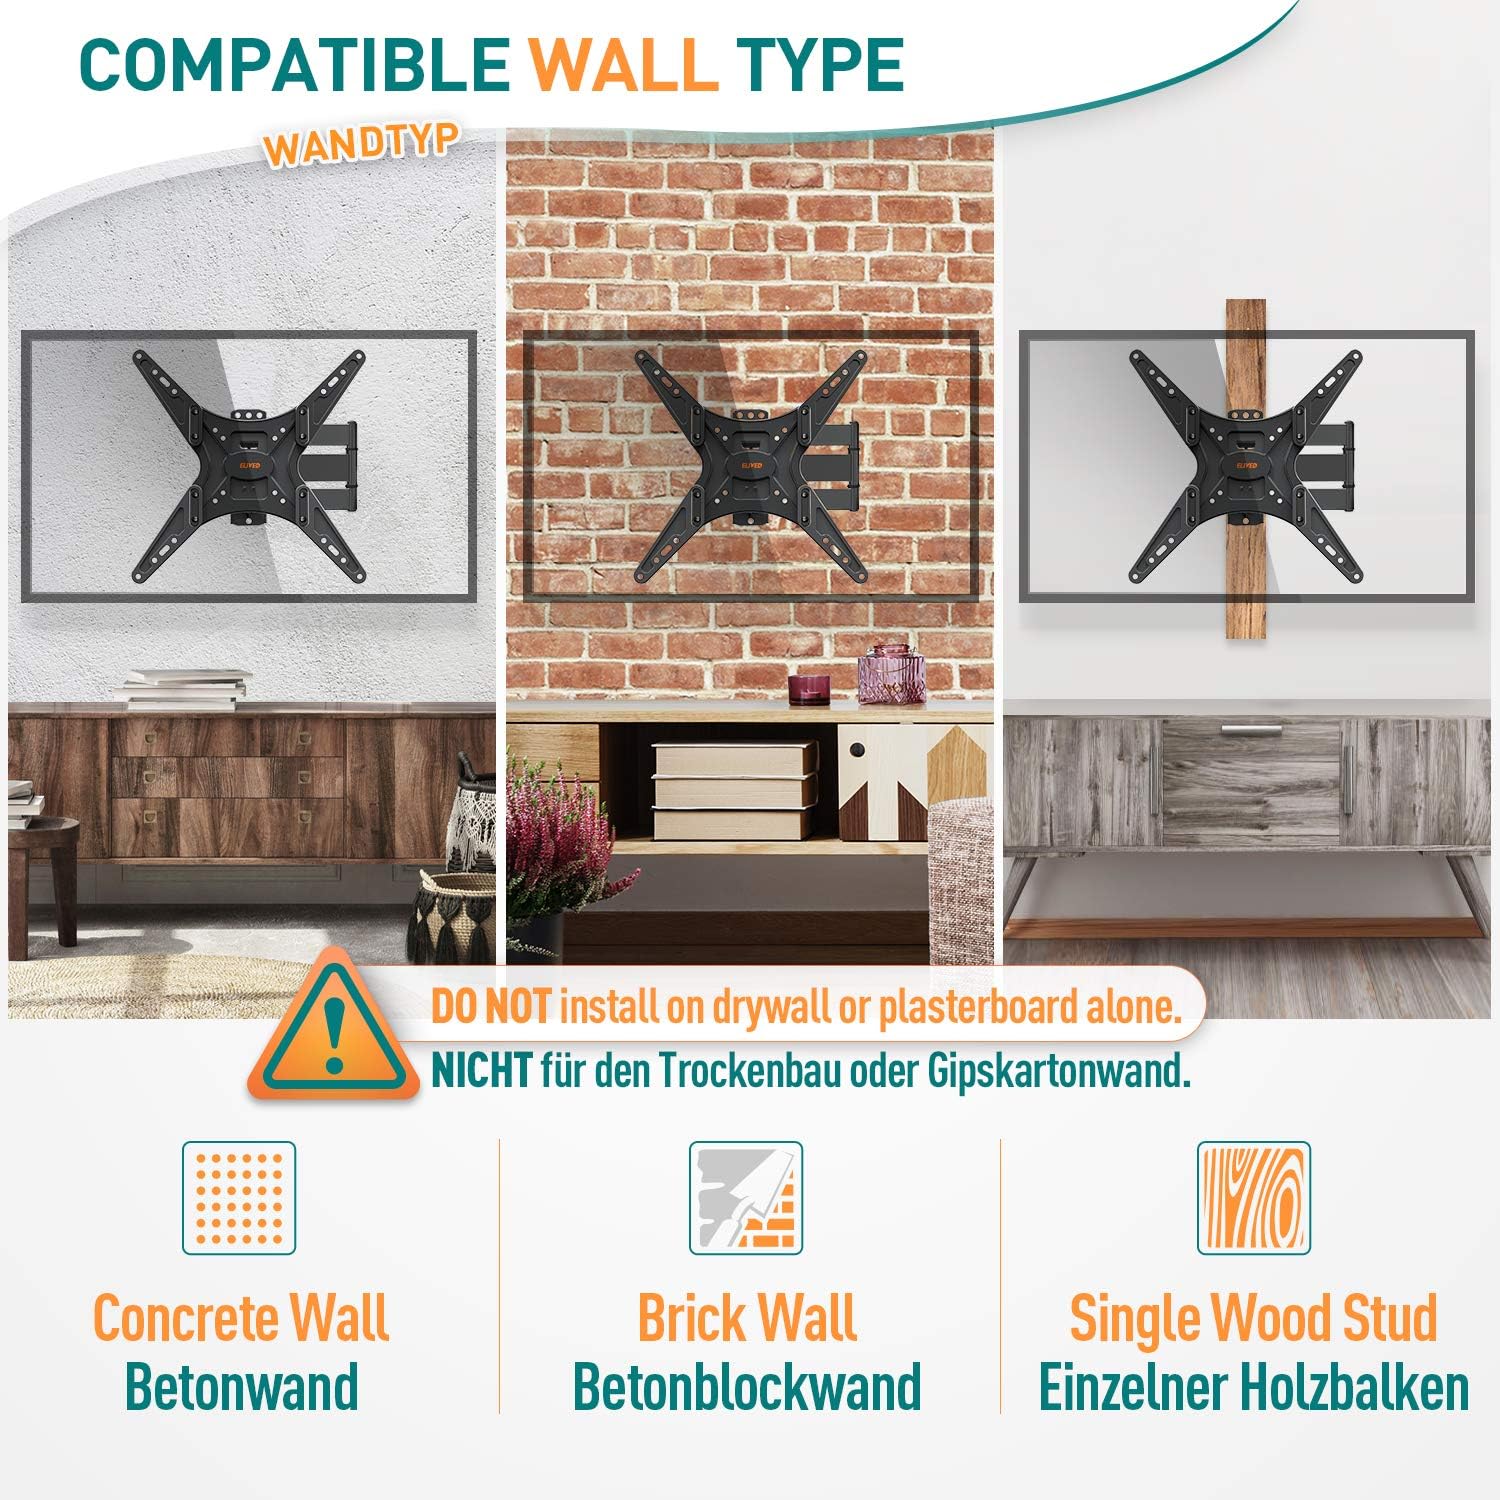
Image 3: Visual guide to compatible wall types. The mount can be installed on solid concrete, brick, or a single wood stud. It explicitly warns against installation on drywall or plasterboard without additional support.
This mount is designed for installation on:
- Concrete Walls
- Brick Walls
- Single Wood Studs
Warning: Do not install this mount on drywall or plasterboard alone without securing it to a wood stud or concrete/brick behind the drywall. Doing so may result in product failure and personal injury.
5. Setup: Installation Guide
Follow these steps carefully to install your ELIVED EV009 TV Wall Mount.
5.1 Tools Required (Not Included)
- Pencil
- Drill
- Stud Finder (for wood stud installation)
- Socket Wrench or Adjustable Wrench
- Phillips Head Screwdriver
- Measuring Tape
5.2 Step-by-Step Installation

Image 4: Simplified 3-step installation process. This visual guide outlines attaching the TV brackets, mounting the wall plate, and finally hanging the TV onto the installed wall plate.
- Step 1: Attach Brackets to TV Back
Carefully place your TV face down on a soft, clean surface. Attach the two TV brackets to the back of your TV using the appropriate screws, washers, and spacers from the hardware kit. Ensure the brackets are centered and securely fastened to the VESA mounting holes.
- Step 2: Install Wall Plate
Determine the desired height for your TV. Mark the drilling locations on the wall. For wood stud installation, use a stud finder to locate the center of the stud. For concrete/brick walls, drill pilot holes using the recommended drill bit size. Secure the wall plate assembly to the wall using the provided lag bolts and anchors. Use the included spirit level to ensure the wall plate is perfectly horizontal.
- Step 3: Hang TV on Wall Plate
With assistance, carefully lift the TV (with brackets attached) and hook the brackets onto the wall plate. Ensure the TV is securely seated on the mount. Engage any safety locking mechanisms if present.

Image 5: A visual representation of two people easily installing a TV onto the ELIVED EV009 wall mount, highlighting the product's user-friendly design.
6. Operating: Adjusting Your TV Mount
The ELIVED EV009 mount offers various adjustments to optimize your viewing experience.

Image 6: Detailed illustration of the mount's adjustable features, including swivel, tilt, level adjustment, and extension from the wall, allowing for optimal viewing angles.
- Tilt Adjustment: The TV can be tilted 5° upwards and 15° downwards. This helps reduce glare and provides a comfortable viewing angle. Loosen the tilt knobs on the TV brackets, adjust to the desired angle, and then tighten the knobs securely.
- Swivel Adjustment: The articulating arm allows the TV to swivel ±90° (left or right). Gently push or pull the TV to achieve your preferred viewing position.
- Level Adjustment: After installation, you can adjust the TV's level by ±3° to correct any slight misalignment. This feature helps ensure your TV is perfectly horizontal without re-drilling.
- Extension and Retraction: The mount extends up to 479 mm (18.9 inches) from the wall and retracts to a minimum distance of 64 mm (2.5 inches).
7. Maintenance
Regular maintenance ensures the longevity and safe operation of your TV mount.
- Cleaning: Wipe the mount with a soft, dry cloth. Avoid using abrasive cleaners or solvents.
- Check Connections: Periodically check all screws and bolts to ensure they remain tight and secure. Re-tighten if necessary.
- Inspect for Damage: Regularly inspect the mount for any signs of wear, corrosion, or damage. If any damage is observed, discontinue use and contact customer service.
8. Troubleshooting
If you encounter any issues during or after installation, refer to the following common solutions:
- TV Not Level: Use the post-installation level adjustment feature (±3°) to correct any slight tilt. Ensure the wall plate was installed horizontally using the spirit level.
- Difficulty Moving/Adjusting TV: Check if any adjustment knobs or bolts are overtightened. Loosen them slightly to allow for movement, then re-tighten to secure the position.
- Mounting Screws Don't Fit TV: The hardware kit includes various sizes of TV screws. Refer to your TV's manual to determine the correct screw size. Use appropriate spacers if needed to ensure a secure fit without overtightening.
- Unsure About Wall Type: If you are uncertain about your wall's composition or its ability to support the mount, consult a professional installer.
For further assistance, please contact ELIVED customer service.
9. Specifications

Image 7: Technical drawing displaying the precise dimensions of the ELIVED EV009 mount, including its extension, tilt range, and overall size, along with its weight capacity and TV size compatibility.
| Feature | Detail |
|---|---|
| Model Number | EV009 |
| Brand | ELIVED |
| Material | High-strength Alloy Steel |
| Color | Black |
| Compatible TV Sizes | 26" - 60" |
| Weight Capacity | Up to 40 kg (88 lbs) |
| VESA Compatibility | 100x100mm, 200x100mm, 200x200mm, 200x300mm, 300x200mm, 300x300mm, 400x200mm, 400x300mm, 400x400mm |
| Tilt Angle | +5° to -15° |
| Swivel Angle | ±90° |
| Rotation Adjustment | ±3° (Post-installation leveling) |
| Wall Distance | 64 mm (retracted) to 479 mm (extended) |
| Compatible Wall Types | Concrete, Brick, Single Wood Stud |
10. Warranty and Customer Support
ELIVED is committed to providing high-quality products and excellent customer service.
If you have any questions, concerns, or require assistance with your ELIVED EV009 TV Wall Mount, please do not hesitate to contact our customer support team. This includes inquiries regarding:
- Product compatibility with your TV.
- Installation guidance.
- Missing or replacement hardware (screws, spacers, washers, etc.).
- Any other product-related issues.
Please refer to your purchase documentation or the ELIVED official website for specific warranty details and contact information.


