Product Overview
The Radioddity GA-510 is a high-performance dual-band portable radio, offering robust communication capabilities for various applications. With a powerful 10W transmission output, it ensures clear and extended range communication. It features 128 memory channels and advanced functions like Busy Channel Lockout and DTMF. The device is designed for user-friendly operation, including full manual programming via the keypad.

Image: The Radioddity GA-510 two-way radio unit shown alongside its two included 2200mAh rechargeable batteries.
Key features include a 10W radio device with VHF and UHF dual-band support, up to 128 memory channels, 50 CTCSS/105 DCS, and 1750Hz tone. It supports dual watch and dual display. The GA-510 can be set to three transmission power modes (High/Medium/Low: 10W/5W/1W), allowing for a range of up to 10 km. It comes equipped with two powerful 2200mAh rechargeable batteries for extended use. The device supports full manual programming directly via the keypad, enabling users to add or delete channels on the fly. Additional features include a tri-color backlit LCD screen and an emergency alarm function, making it suitable for outdoor adventures.
Component Identification
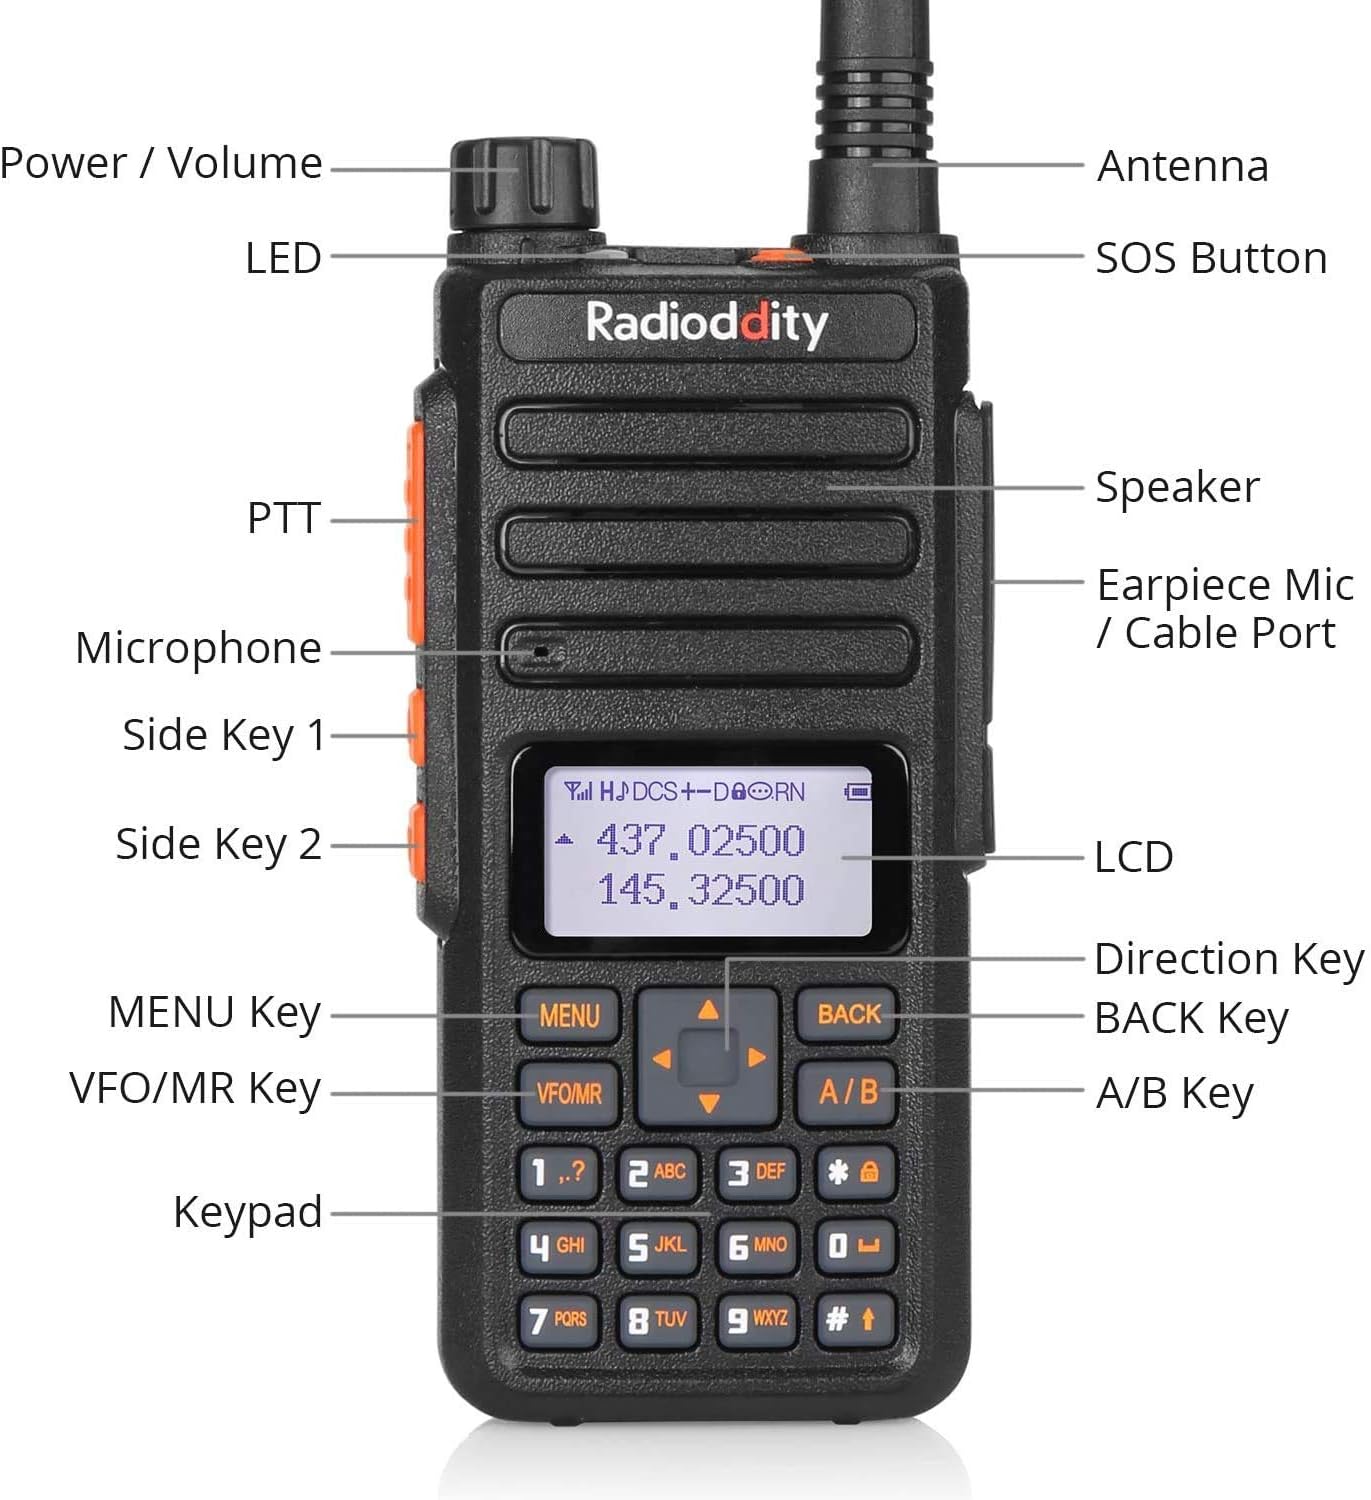
Image: A detailed diagram labeling the various components of the Radioddity GA-510, including Power/Volume knob, Antenna, LED indicator, SOS Button, PTT (Push-to-Talk) button, Speaker, Earpiece Mic/Cable Port, Microphone, Side Key 1, Side Key 2, LCD screen, Direction Key, MENU Key, BACK Key, VFO/MR Key, A/B Key, and Keypad.
Familiarize yourself with the radio's components for optimal operation:
- Power / Volume Knob: Rotates to turn the radio on/off and adjust volume.
- Antenna: For transmitting and receiving signals.
- LED Indicator: Shows radio status (e.g., transmitting, receiving, charging).
- SOS Button: Activates emergency alarm.
- PTT (Push-to-Talk) Button: Press and hold to transmit, release to receive.
- Speaker: Outputs audio.
- Earpiece Mic / Cable Port: Connects external audio accessories or programming cable.
- Microphone: For voice input during transmission.
- Side Key 1 & 2: Programmable function keys.
- LCD: Displays channel, frequency, and menu information.
- Direction Key: Navigates menus and adjusts settings.
- MENU Key: Enters the menu system.
- BACK Key: Exits menus or returns to previous screen.
- VFO/MR Key: Toggles between Frequency Mode (VFO) and Memory Channel Mode (MR).
- A/B Key: Switches between upper and lower display frequencies/channels.
- Keypad: For manual frequency input, channel selection, and menu navigation.
Setup
1. Battery Installation and Charging
The GA-510 comes with two 2200mAh Lithium-ion batteries. Ensure they are fully charged before first use.
- Align the battery pack with the grooves on the back of the radio.
- Slide the battery pack upwards until it clicks into place securely.
- To remove, press the battery release latch (if present) and slide the battery downwards.

Image: Diagram illustrating the 2200mAh capacity of the dual batteries, showing up to 48 hours standby time, up to 12 hours working time, and up to 6 hours working time under 10W transmission.
Use the provided charging cradle and adapter to charge the battery. The LED indicator on the radio or charger will show charging status (typically red for charging, green for fully charged).
2. Antenna Attachment
The GA-510 uses an SMA-F antenna connector.
- Screw the antenna clockwise into the antenna connector on top of the radio until it is finger-tight. Do not overtighten.
- Ensure the antenna is securely attached for optimal performance.
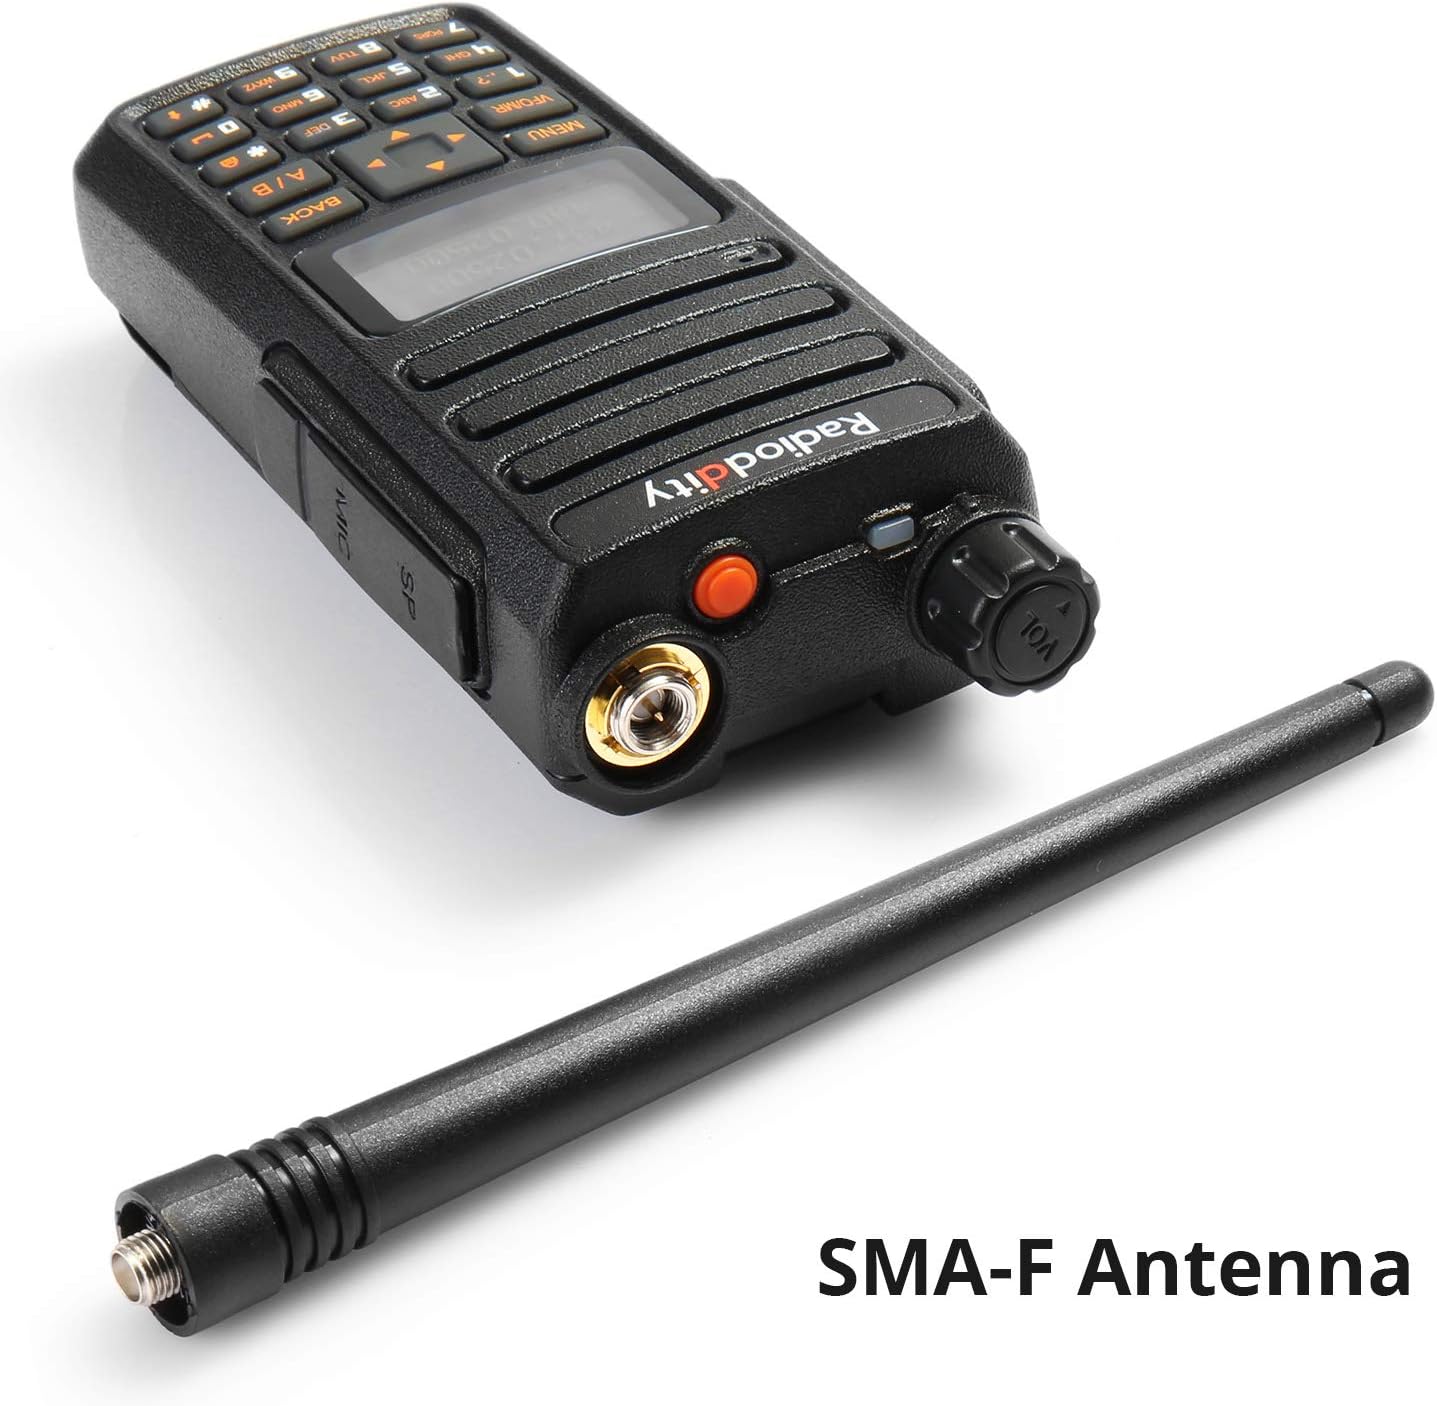
Image: The Radioddity GA-510 radio unit shown next to its SMA-F antenna, highlighting the antenna connection type.
3. Belt Clip Installation
Attach the belt clip to the back of the radio using the provided screws for convenient carrying.

Image: A composite image showing various close-up details of the Radioddity GA-510, including the belt clip attachment point, antenna connector, side buttons, and keypad.
Operating Instructions
1. Power On/Off and Volume Adjustment
Rotate the Power/Volume knob clockwise to turn the radio on. Continue rotating clockwise to increase the volume. Rotate counter-clockwise to decrease volume and turn the radio off.
2. Mode Selection (VFO/MR)
Press the VFO/MR key to switch between Frequency Mode (VFO) and Memory Channel Mode (MR).
- VFO Mode: Allows direct frequency input and scanning.
- MR Mode: Allows selection of pre-programmed memory channels.
3. Channel/Frequency Selection
- In VFO Mode, use the keypad to directly input frequencies or the Direction Keys (Up/Down arrows) to tune.
- In MR Mode, use the Direction Keys (Up/Down arrows) to scroll through programmed channels.
4. Transmitting and Receiving
To transmit, press and hold the PTT button on the left side of the radio. Speak clearly into the microphone. Release the PTT button to stop transmitting and return to receive mode.
5. Manual Programming
The GA-510 supports full manual programming directly from the keypad. This allows you to add, modify, or delete channels and settings without a computer.
- Press the MENU key to enter the main menu.
- Use the Direction Keys to navigate through menu options.
- Press MENU again to select an option.
- Use the keypad to input values or Direction Keys to select settings.
- Press MENU to confirm changes, or BACK to exit without saving.
Refer to the detailed programming guide (if available separately) for specific menu functions and programming steps.
6. Emergency Alarm
Press the dedicated SOS Button (usually located on top or side) to activate the emergency alarm function. This can be useful in critical situations.
Maintenance
- Cleaning: Wipe the radio surface with a soft, damp cloth. Do not use harsh chemicals or abrasive cleaners.
- Battery Care:
- Avoid overcharging or completely draining the batteries.
- Store batteries in a cool, dry place when not in use.
- If storing for extended periods, charge batteries to about 50% capacity.
- Storage: Store the radio in a dry, dust-free environment away from direct sunlight and extreme temperatures.
- Antenna: Ensure the antenna connection remains clean and free of debris.
Troubleshooting
| Problem | Possible Cause | Solution |
|---|---|---|
| Radio does not power on. | Battery is dead or not properly installed. | Charge the battery. Ensure battery is securely attached. |
| Cannot transmit or receive. | Incorrect frequency/channel, antenna not connected, low battery, squelch level too high. | Verify frequency/channel. Check antenna connection. Charge battery. Adjust squelch level. |
| Poor audio quality. | Low signal strength, incorrect CTCSS/DCS, volume too low/high. | Move closer to other radio. Check CTCSS/DCS settings. Adjust volume. |
| Keypad programming issues. | Incorrect menu steps, keypad lock enabled. | Review manual programming steps. Check for keypad lock function. |
Specifications
| Feature | Detail |
|---|---|
| Brand | Radioddity |
| Model Number | GA-510 |
| Frequency Range | VHF (136-174 MHz) and UHF (400-480 MHz) |
| Memory Channels | 128 |
| Output Power | 10W / 5W / 1W (High/Medium/Low) |
| Battery Type | Lithium-ion |
| Battery Capacity | 2 x 2200 mAh |
| Voltage | 7.4 Volts |
| Max Range | Up to 10 Kilometers (theoretical, depends on conditions) |
| Water Resistance Level | Waterproof (as per specification, usually means splash-proof or light rain) |
| Dimensions (approx.) | 120 x 55 x 30 mm (excluding antenna) |
| Weight (approx.) | 300 g |

Image: A visual representation of the Radioddity GA-510's dimensions and weight (0.25kg / 0.55lbs), with measurements in inches and millimeters.
Warranty and Support
Radioddity provides an 18-month warranty and lifetime support for the GA-510. For technical assistance, troubleshooting beyond this manual, or warranty claims, please contact Radioddity customer service through their official website or the platform where the product was purchased.
Please retain your proof of purchase for warranty purposes.


