1. Introduction
This user manual provides detailed instructions for the installation, configuration, and maintenance of your ASUS Prime H410M-E Micro-ATX motherboard. Designed for Intel 10th Generation Core processors, this motherboard offers essential features for building a reliable and efficient personal computer system.
Please read this manual thoroughly before you begin the installation process to ensure proper setup and to maximize the performance and longevity of your system.
2. Safety Information
Always observe the following safety precautions when handling your motherboard and other computer components:
- Disconnect the power cord from the wall outlet before touching any component.
- Wear an anti-static wrist strap or frequently touch a grounded object (e.g., the metal chassis of your PC case) to prevent electrostatic discharge (ESD) damage.
- Handle components by their edges to avoid touching sensitive parts.
- Ensure proper ventilation within your PC case to prevent overheating.
- Keep the motherboard away from moisture and extreme temperatures.
3. Setup and Installation
3.1 Package Contents
Verify that all items are present in your motherboard package:
- ASUS Prime H410M-E Motherboard
- User Guide
- I/O Shield
- SATA Data Cables
- M.2 Anchor/Screw Package
- Support DVD (Drivers and Utilities)
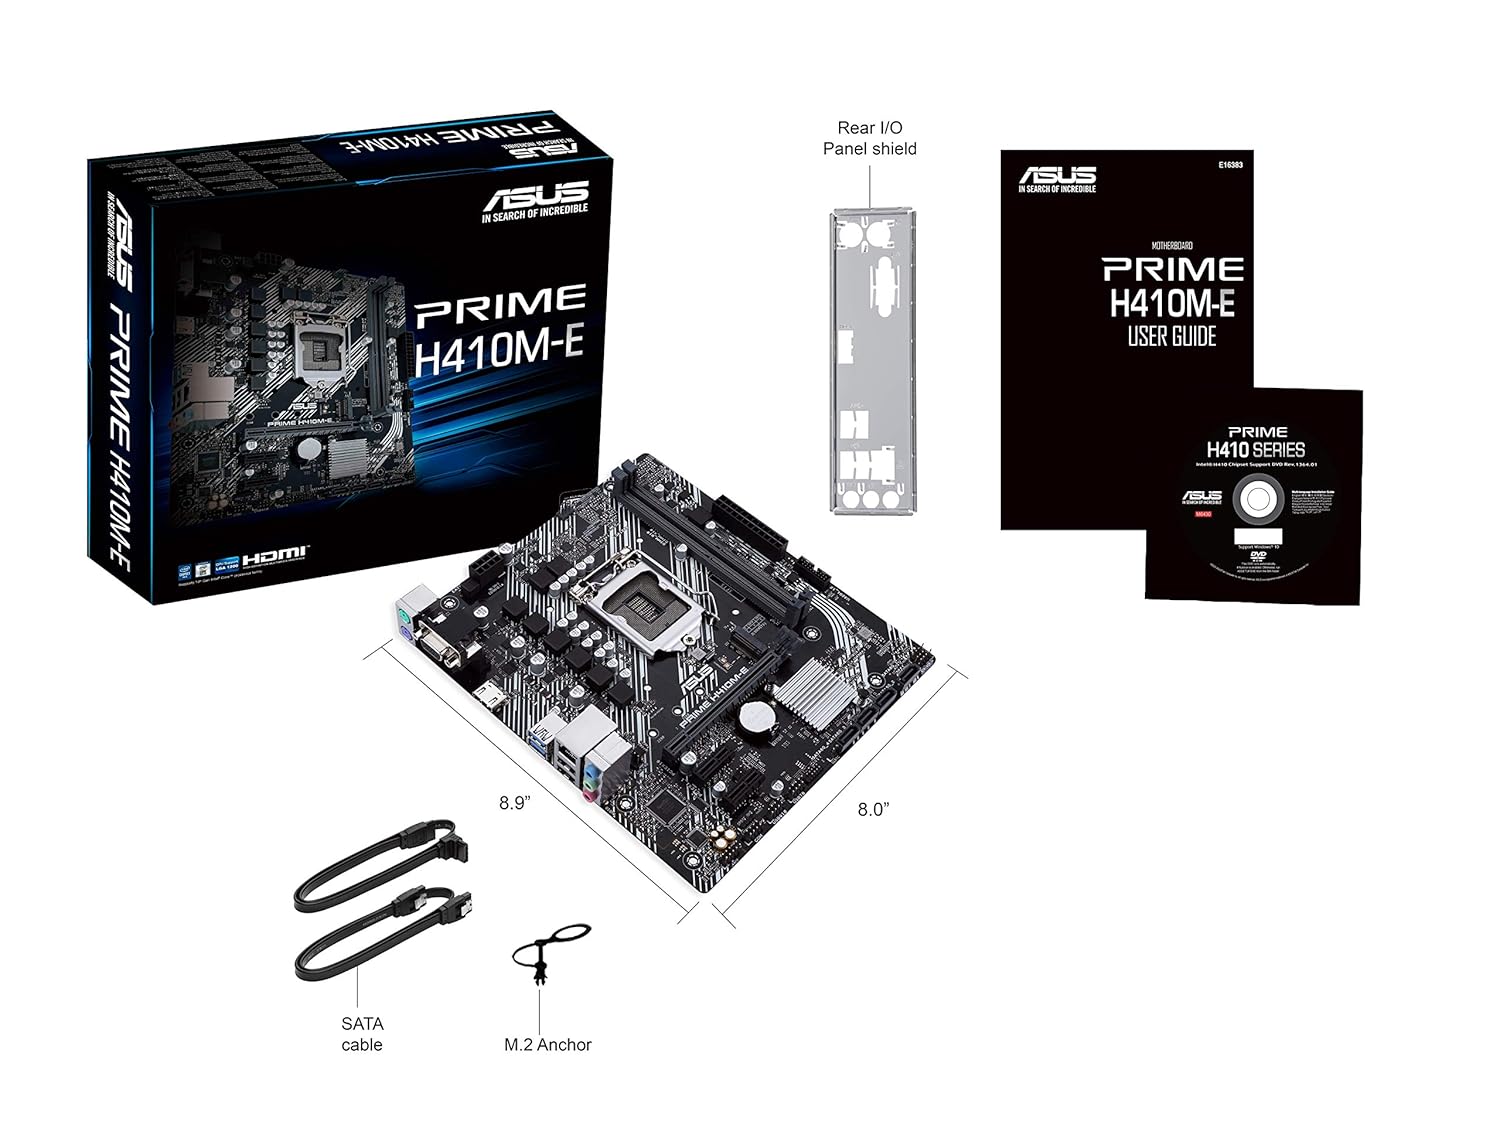
Figure 3.1: Contents of the ASUS Prime H410M-E motherboard package, including the motherboard, user guide, I/O shield, SATA cables, and M.2 screw.
3.2 Motherboard Layout
Familiarize yourself with the key components and connectors on your motherboard.

Figure 3.2: Top-down view of the ASUS Prime H410M-E motherboard, showing the CPU socket, RAM slots, PCIe slot, and various headers.

Figure 3.3: Angled view of the ASUS Prime H410M-E motherboard, highlighting the various ports and connectors from a different perspective.
3.3 CPU Installation
The ASUS Prime H410M-E supports Intel LGA 1200 socket processors (10th Gen Intel Core, Pentium Gold, and Celeron Processors). Follow these steps to install your CPU:
- Open the CPU socket lever.
- Carefully align the CPU with the socket, ensuring the golden triangle on the CPU matches the triangle on the socket.
- Gently place the CPU into the socket without forcing it.
- Close the lever to secure the CPU.

Figure 3.4: Close-up view of the LGA 1200 CPU socket on the motherboard, ready for processor installation.
3.4 Memory (RAM) Installation
This motherboard features two DDR4 DIMM slots, supporting up to 64GB of RAM. For optimal performance, install memory modules in matched pairs.
- Open the clips at both ends of the DIMM slot.
- Align the memory module with the slot, ensuring the notch on the module matches the key in the slot.
- Press down firmly on both ends of the module until the clips snap into place.

Figure 3.5: View of the two DDR4 DIMM slots on the motherboard, indicating where memory modules should be installed.
3.5 M.2 SSD Installation
The motherboard includes one M.2 slot for high-speed NVMe or SATA SSDs.
- Locate the M.2 slot and the corresponding standoff.
- Insert the M.2 SSD into the slot at a 30-degree angle.
- Gently push down the SSD and secure it with the M.2 screw.

Figure 3.6: The M.2 slot on the motherboard, supporting various M.2 SSD lengths (42mm, 60mm, 80mm).
3.6 PCIe Card Installation
Install your graphics card or other expansion cards into the PCI Express slot.
- Align the card with the PCIe slot.
- Press down firmly until the card is fully seated and the retention clip locks into place.
- Secure the card to the chassis with a screw.

Figure 3.7: The PCIe x16 slot on the motherboard, designed for graphics cards and other expansion cards.
3.7 Connecting Peripherals and Power
Connect your storage drives, power supply, and front panel connectors.
- SATA Drives: Connect SATA data cables from your storage drives (HDDs/SSDs) to the SATA ports on the motherboard.
- Power Supply: Connect the 24-pin ATX power connector and the 8-pin CPU power connector from your power supply to the motherboard.
- Front Panel Connectors: Connect the power button, reset button, HDD LED, power LED, and USB/audio headers from your PC case to the corresponding pins on the motherboard. Refer to the motherboard diagram for exact pin locations.
- Rear I/O Ports: Connect your monitor, keyboard, mouse, and other USB devices to the rear I/O panel.

Figure 3.8: The SATA 6Gb/s ports on the motherboard, used for connecting traditional hard drives and SSDs.

Figure 3.9: Illustration of the front panel headers, where case buttons and LEDs are connected.

Figure 3.10: The rear input/output (I/O) panel of the motherboard, featuring various ports for external devices such as USB, audio, and video outputs.
4. Operating Your Motherboard
4.1 First Boot and BIOS/UEFI Setup
After assembling your system, power it on. The system will typically boot into the BIOS/UEFI setup utility or attempt to boot from an installed operating system. The ASUS UEFI BIOS Utility provides an intuitive interface for configuring system settings.
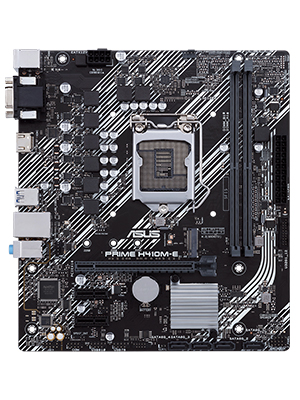
Figure 4.1: The ASUS UEFI BIOS Utility in Advanced Mode, allowing for detailed system configuration.
4.2 Driver Installation
After installing your operating system, install the necessary drivers from the included support DVD or download the latest drivers from the ASUS official website. Key drivers include chipset, audio, LAN, and graphics drivers.
4.3 ASUS OptiMem Technology
The ASUS Prime H410M-E features ASUS OptiMem, a proprietary trace layout that allows memory kits to operate at higher frequencies with lower voltages. This technology enhances memory stability and performance by carefully routing memory signals across PCB layers.

Figure 4.2: An illustration demonstrating the optimized trace layout of ASUS OptiMem technology for improved memory signal integrity.
5. Maintenance
5.1 Cleaning Your Motherboard
Regularly clean your PC to prevent dust buildup, which can lead to overheating and component failure. Use compressed air to remove dust from fans, heatsinks, and other components. Ensure the system is powered off and unplugged before cleaning.
5.2 BIOS Updates
Periodically check the ASUS support website for BIOS updates. BIOS updates can improve system stability, add support for new hardware, or fix bugs. Follow the instructions provided by ASUS carefully when updating the BIOS.
5.3 Thermal Management
Maintain optimal temperatures within your system. The ASUS Prime H410M-E includes Fan Xpert software (via Armoury Crate) for comprehensive control over system fans, ensuring efficient cooling and quiet operation.

Figure 5.1: Diagram illustrating thermal monitoring points on the motherboard (CPU, Chassis Fan, Motherboard) for effective cooling management.
6. Troubleshooting
If you encounter issues with your system, refer to the following common troubleshooting tips:
- No Power: Ensure all power cables (24-pin ATX, 8-pin CPU) are securely connected. Check power supply functionality.
- No Display: Verify that the monitor is connected to the correct video output (motherboard or graphics card). Reseat the graphics card and RAM modules.
- System Instability: Check RAM seating, ensure CPU cooler is properly installed, and verify power connections. Update BIOS and drivers.
- Component Recognition Issues: Ensure all components are fully seated in their respective slots. Check for bent pins on the CPU socket.
6.1 ASUS 5X Protection III
The ASUS Prime H410M-E motherboard is built with 5X Protection III, a suite of hardware safeguards designed to ensure long-term durability and reliability:
- SafeSlot Core: Reinforced PCIe slot for stronger retention and shear resistance.
- LANGuard: Hardware-level networking protection against surges and static electricity.
- Overvoltage Protection: Circuit design with built-in voltage regulators to protect your chipset, connectivity ports, and audio codecs from unexpected high-level voltages.
- DRAM Overcurrent Protection: Onboard resettable fuses prevent overcurrent and short-circuit damage to memory and other components.
- Stainless-Steel Back I/O: Corrosion-resistant stainless steel back I/O panels bonded with chromium oxide for a 3X longer lifespan.

Figure 6.1: Illustration of SafeSlot Core, showing the reinforced PCIe slot for enhanced durability.
7. Specifications
| Feature | Specification |
|---|---|
| Brand | ASUS |
| Model | PRIME H410M-E |
| Form Factor | Micro ATX |
| CPU Socket | LGA 1200 |
| Compatible Processors | 10th Generation Intel Core, Pentium Gold, Celeron Processors |
| Chipset | Intel H410 |
| RAM Memory Technology | DDR4 |
| Memory Slots Available | 2 |
| RAM Memory Maximum Size | 64 GB |
| Graphics Card Interface | PCI Express |
| Total USB Ports | 6 |
| Product Dimensions | 27 x 26.29 x 5.16 cm |
| Item Weight | 426.38 g |
8. Warranty and Support
Your ASUS Prime H410M-E motherboard comes with a 3-year warranty from the date of purchase. This warranty covers defects in materials and workmanship under normal use.
For technical support, driver downloads, BIOS updates, and further information, please visit the official ASUS support website:
When contacting support, please have your motherboard's serial number and proof of purchase ready.