1. Introduction
This manual provides detailed instructions for the setup, operation, maintenance, and troubleshooting of your ANDYCINE C7 Field Camera Monitor. Please read this manual thoroughly before using the device to ensure proper functionality and to maximize its performance.
2. What's in the Box
Verify that all items listed below are included in your package. If any items are missing or damaged, please contact customer support.
- ANDYCINE C7 Field Camera Monitor
- 1x Battery (Sony L-series compatible)
- 1x Battery Charge Cable
- 1x Mini HDMI to HDMI Cable
- 1x Micro HDMI to HDMI Cable
- 1x Carrying Case
- 1x Swivel Mount Bracket

Figure 2.1: ANDYCINE C7 Monitor and Included Accessories.
3. Product Features
The ANDYCINE C7 Field Camera Monitor is designed to enhance your video production workflow with a range of professional features:
- 7-inch Touch Screen: Intuitive gesture and swipe controls for menu navigation and feature access.
- High Brightness Display: 2200 nits brightness for clear visibility in strong sunlight and outdoor environments.
- Full HD Resolution: 1920x1200 native resolution for sharp and accurate color reproduction.
- Professional Monitoring Tools: Includes accurate waveforms (RGB Parade, YUV Parade, Y Parade), vectorscope, histogram, audio level display, focus peaking, false colors, and pixel-to-pixel zoom.
- 3D LUT Support: Load custom 3D LUT files via an SD card slot for real-time image preview.
- Auto Dimming: Built-in light sensor automatically adjusts screen brightness based on ambient light conditions.
- Dual Battery Plate: Swappable dual F970 battery plate accepts Sony L-series batteries for extended power.
- DC Output: 8V DC output allows powering compatible cameras via an optional DC coupler.
- 4K HDMI Input/Loop-out: Supports HDMI signals up to 4K at 24 frames per second.
- Flexible Mounting: Includes a swivel mount bracket for 360-degree rotation and 180-degree tilt.

Figure 3.1: Professional Monitoring Features.
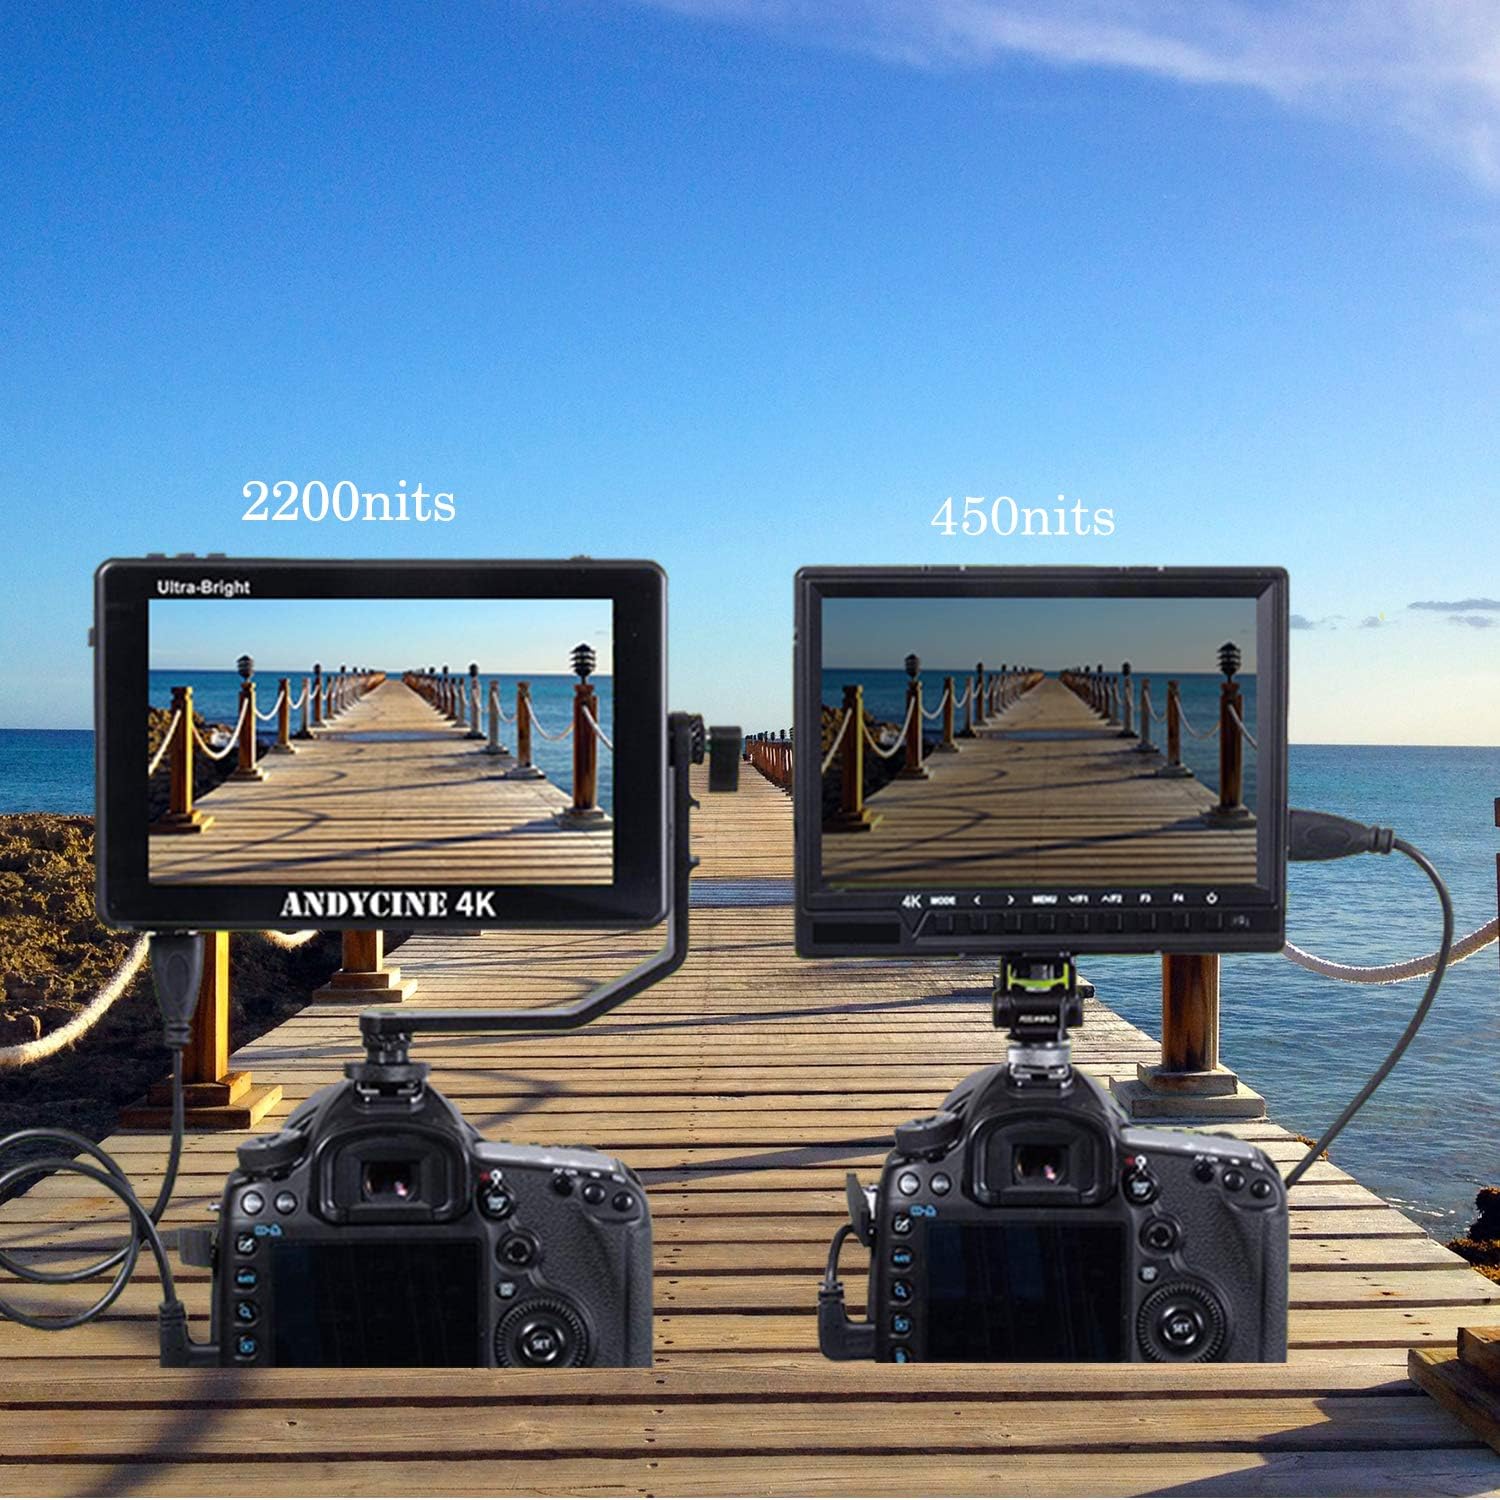
Figure 3.2: 2200 Nits Ultra-Bright Display.
4. Setup
4.1. Powering the Monitor
- Install Battery: Insert a fully charged Sony L-series compatible battery into one of the dual battery slots on the rear of the monitor. Ensure it clicks into place securely.
- External Power (Optional): Connect a compatible DC 12V power adapter to the DC IN port for continuous power.

Figure 4.1: Dual F970 Battery Plate.
4.2. Mounting the Monitor
- Attach the included swivel mount bracket to the 1/4"-20 thread hole on the bottom or side of the monitor.
- Secure the swivel mount to your camera's hot shoe or another mounting point.
- Adjust the monitor's angle using the swivel and tilt functions for optimal viewing.

Figure 4.2: Monitor Mounted with Swivel Arm.
4.3. Connecting to a Camera
- Use the appropriate HDMI cable (Mini HDMI to HDMI or Micro HDMI to HDMI, included) to connect your camera's HDMI output to the monitor's HDMI IN port.
- If desired, connect another monitor or device to the HDMI OUT port for signal loop-through.

Figure 4.3: HDMI Connection to Camera.
4.4. Powering a Camera (Optional)
The monitor features an 8V DC OUT port that can power compatible cameras using an optional DC coupler (not included).
- Connect an optional DC coupler cable from the monitor's DC OUT 8.4V port to your camera's power input.
- Ensure your camera is compatible with 8V DC input.

Figure 4.4: Powering Camera via DC Output.
5. Operating Instructions
5.1. Power On/Off
Press and hold the power button located on the top edge of the monitor to turn the device on or off.
5.2. Touch Screen Navigation
The 7-inch touch screen allows for intuitive control:
- Access Menu: Swipe from the edge of the screen or tap the menu icon to access the main settings menu.
- Adjust Settings: Tap on menu options to select and adjust parameters.
- Zoom/Drag: Use pinch-to-zoom gestures to magnify images and drag with fingers to pan.
- Quick Access: Customize quick access functions for frequently used tools like focus peaking, false colors, and waveforms.

Figure 5.1: Touch Screen Interaction.
5.3. Using Monitoring Tools
The monitor provides various tools to assist with exposure, focus, and color accuracy:
- Waveforms & Vectorscope: Access these tools from the menu to analyze video signal levels and color saturation.
- Focus Peaking: Highlights in-focus areas with a selectable color.
- False Colors: Displays exposure levels using a spectrum of colors.
- 3D LUT: Load custom Look-Up Tables via the SD card slot to preview different color grades in real-time.
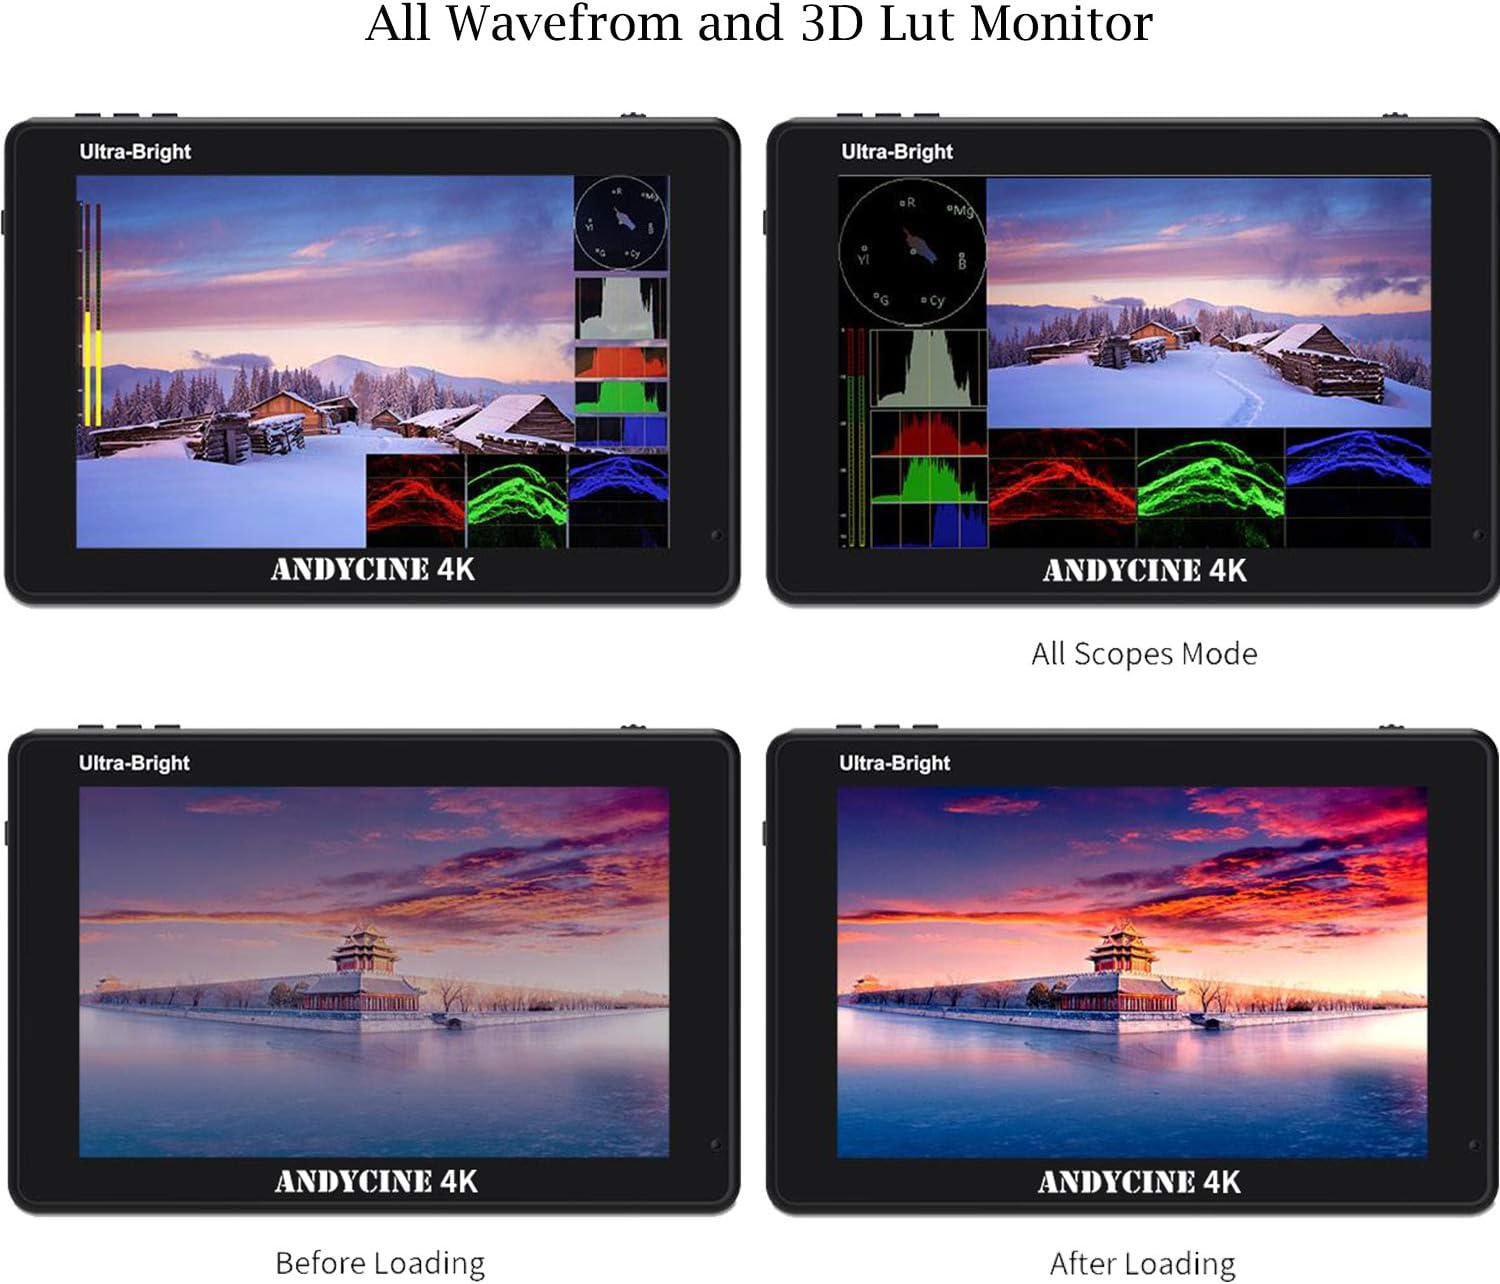
Figure 5.2: Waveform and 3D LUT Display.
5.4. Auto Dimming Function
The built-in light sensor automatically adjusts the screen's backlight brightness to suit the ambient lighting conditions. This feature helps protect your eyes and conserves battery power.
6. Maintenance
- Cleaning: Use a soft, dry cloth to clean the monitor screen and body. For stubborn smudges, a slightly damp microfiber cloth can be used. Avoid abrasive cleaners or solvents.
- Storage: When not in use, store the monitor in its carrying case in a cool, dry place away from direct sunlight and extreme temperatures.
- Battery Care: Remove batteries if the monitor will not be used for an extended period. Store batteries in a cool, dry place and recharge them periodically to maintain their lifespan.
7. Troubleshooting
| Problem | Possible Cause | Solution |
|---|---|---|
| Monitor does not power on | Battery is depleted or not installed correctly; external power not connected or faulty. | Ensure battery is fully charged and correctly inserted. Check external power connection and adapter. |
| No video signal | HDMI cable is loose or faulty; incorrect input selected; camera output settings. | Check HDMI cable connections. Verify camera's HDMI output is active and set to a compatible resolution. Ensure correct input is selected on the monitor. |
| Screen flickers or displays distorted image | Faulty HDMI cable; incompatible signal; electromagnetic interference. | Try a different HDMI cable. Ensure camera output resolution and frame rate are supported. Move away from strong electromagnetic sources. |
| Monitor overheats and shuts down | Prolonged use in high ambient temperatures or direct sunlight; internal issue. | Operate in a cooler environment. Avoid direct sunlight for extended periods. If the issue persists, contact customer support. |
| Touch screen unresponsive | Screen lock activated; software glitch. | Restart the monitor. Check if touch screen lock is enabled in settings. |
8. Specifications
| Feature | Detail |
|---|---|
| Model | C7 |
| Screen Size | 7 inches |
| Resolution | 1920x1200 |
| Brightness | 2200 nits |
| Input/Output | HDMI In, HDMI Out, DC In (12V), DC Out (8.4V) |
| Power Source | Dual F970 Battery Plate, DC 12V |
| Item Weight | 3.03 pounds (approx. 1.37 kg) |
| Package Dimensions | 9.25 x 6.77 x 3.66 inches |
| Manufacturer | ANDYCINE |

Figure 8.1: Monitor Dimensions and Port Layout.
9. Warranty and Support
9.1. Warranty Information
The ANDYCINE C7 Field Camera Monitor comes with a 1-year warranty. This warranty covers free replacement or refund for manufacturing defects. Please retain your proof of purchase for warranty claims.
9.2. Customer Support
For technical assistance, warranty claims, or any inquiries regarding your ANDYCINE C7 monitor, please contact ANDYCINE customer support. You can typically reach support by sending a message through the retailer's platform or visiting the official ANDYCINE website.


