Introduction
This manual provides detailed instructions for the safe installation, operation, and maintenance of your Hinkley Marquis 52-Inch 5-Blade Ceiling Fan. Please read all instructions carefully before beginning installation and retain this manual for future reference. Proper installation and operation are essential for optimal performance and safety.
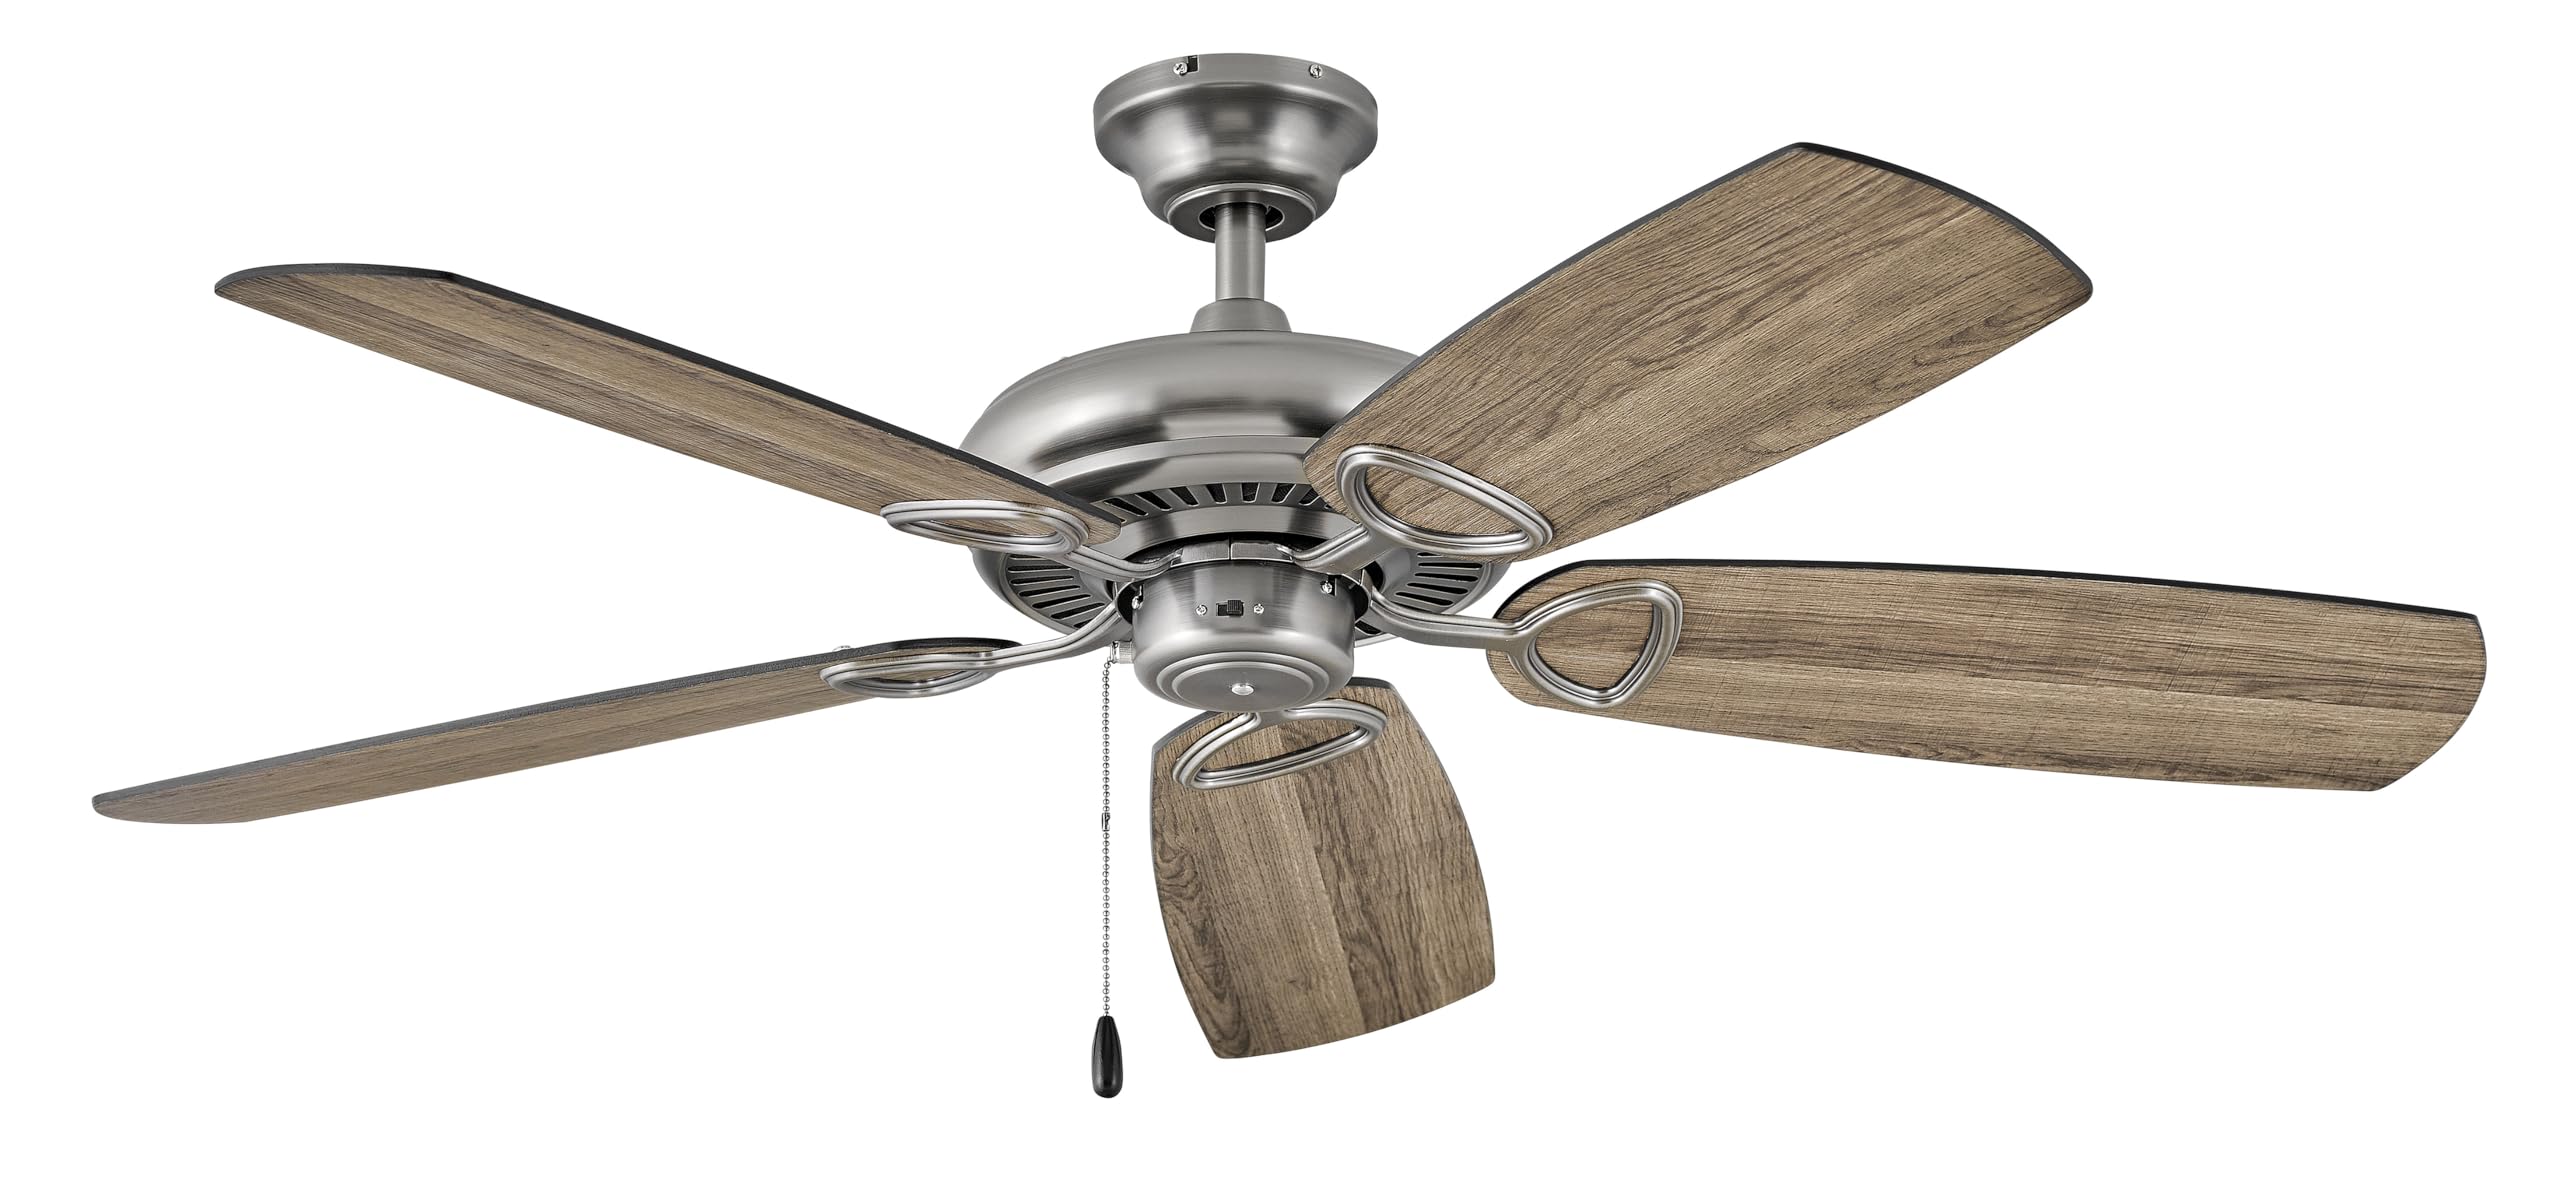
Image: Hinkley Marquis 52-Inch 5-Blade Ceiling Fan in Pewter finish with five wooden-look blades.
Safety Information
WARNING: To reduce the risk of fire, electric shock, or personal injury, always follow these safety guidelines.
- Ensure the electrical supply is disconnected at the circuit breaker or fuse box before installation or servicing.
- All electrical wiring must be performed by a qualified electrician in accordance with national and local electrical codes.
- The mounting structure must be capable of supporting the weight of the fan (approximately 18.92 pounds).
- Do not operate the fan with damaged blades or housing.
- Maintain a minimum clearance of 7 feet from the floor to the bottom edge of the fan blades.
- Avoid placing objects in the path of the rotating blades.
Package Contents
Verify that all components are present before beginning installation:
- Ceiling Fan Assembly
- Fan Blades (5)
- Mounting Hardware
- Remote Control
- Instruction Manual
Specifications
| Brand | Hinkley |
| Model Number | 901352FPW-NIA |
| Color | Pewter |
| Electric Fan Design | Ceiling Fan |
| Power Source | Corded Electric |
| Room Type | Dining Room, Bedroom, Living Room |
| Recommended Uses | Air Circulation, Cooling |
| Finish Type | Finished |
| Voltage | 120 Volts |
| Switch Type | Pull Chain (Remote Control included) |
| Item Weight | 18.92 Pounds |
| Included Components | Remote |
| Indoor/Outdoor Usage | Outdoor |
| Control Method | Remote |
| Product Dimensions | 52 x 52 x 13.25 inches |
| Assembled Height | 13.25 inches |
| Assembled Length | 52 inches |
| Assembled Width | 52 inches |
| Shade Material | Glass |
| Light Direction | Downlight |
Energy Information
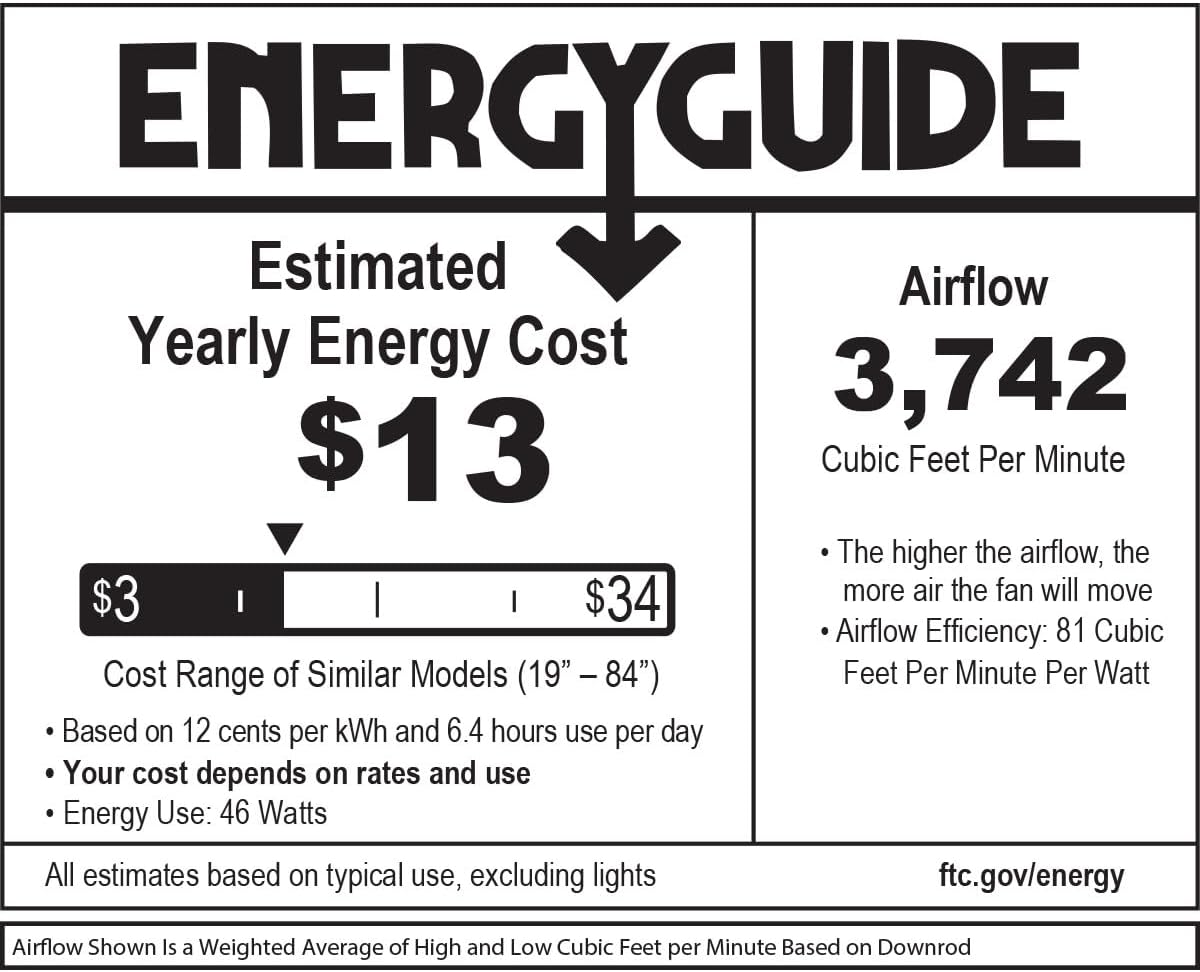
Image: EnergyGuide label indicating an estimated yearly energy cost of $13 and an airflow of 3,742 Cubic Feet Per Minute.
Setup and Installation
Professional installation by a qualified electrician is highly recommended for safety and proper function. Ensure all local electrical codes are followed.
Pre-Installation Checks
- Verify that the electrical box is securely mounted and rated for ceiling fan support.
- Confirm that the chosen location allows for proper blade clearance from walls and other obstructions.
Mounting the Fan
- Secure the mounting bracket to the electrical outlet box using the provided screws.
- Carefully lift the fan motor assembly and hang it from the mounting bracket.
Wiring Connections
Connect the fan's electrical wires to the household wiring according to the wiring diagram provided in the full installation guide (not included in this summary). Ensure all connections are secure and insulated.
Attaching Blades and Canopy
- Attach the fan blades to the motor housing using the blade screws. Ensure all blades are securely fastened.
- Install the canopy over the mounting bracket, securing it with the designated screws.
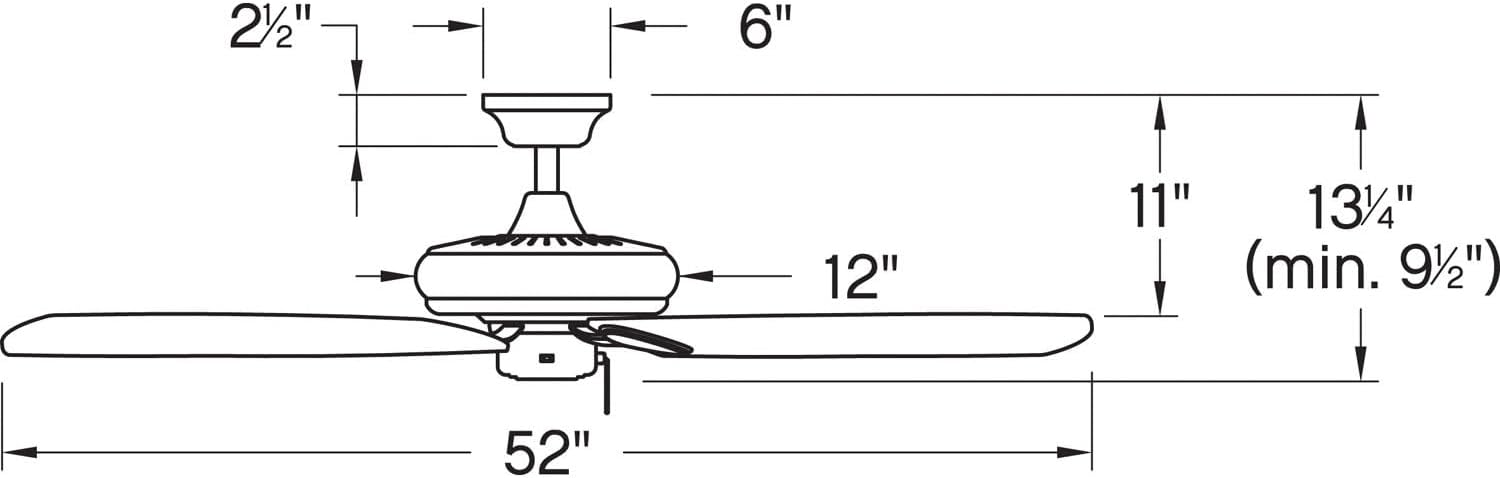
Image: Dimensional diagram of the ceiling fan, illustrating key measurements for installation.
Operating Instructions
The Hinkley Marquis ceiling fan is operated using the included remote control. It also features smart home compatibility (WiFi accessory sold separately).
Remote Control Functions
- Fan Speed: Use the speed buttons to adjust the fan's rotation speed (typically low, medium, high).
- Light Control: Press the light button to turn the light on or off. Hold the button to dim or brighten the light (if dimmable).
- Fan Direction: A button may be present to reverse the fan's direction for seasonal use (downward airflow for cooling, upward for heat circulation).
Smart Home Compatibility
This fan is designed to be smart home compatible. A WiFi accessory, sold separately, is required to enable features such as speed, light, and seasonal mode control via a smart device or voice activation. This allows for setting schedules and preferences for enhanced convenience.

Image: WiFi compatibility features, highlighting smartphone control, voice activation, and scheduling options (requires separate accessory).
Maintenance
Regular maintenance ensures the longevity and efficient operation of your ceiling fan.
Cleaning
- Always turn off the power to the fan at the circuit breaker before cleaning.
- Use a soft, damp cloth to clean the fan blades and motor housing. Avoid abrasive cleaners that may damage finishes.
- Do not use water directly on the fan motor or electrical components.
Checking Connections
Periodically check all screws and connections on the fan and mounting hardware to ensure they are secure. Tighten any loose screws as needed.
Troubleshooting
If you experience issues with your ceiling fan, refer to the following common problems and solutions:
| Problem | Possible Cause | Solution |
|---|---|---|
| Fan does not start | No power to the fan; loose wire connections; remote control battery low. | Check circuit breaker/fuse; ensure all wiring connections are secure; replace remote control battery. |
| Fan wobbles | Loose blade screws; unbalanced blades; loose mounting bracket. | Tighten all blade screws; ensure blades are balanced (balancing kit may be required); check mounting bracket for secure attachment. |
| Noisy operation | Loose screws; motor not seated properly; fan not broken in. | Check and tighten all screws; ensure motor housing is properly secured; allow for a break-in period (usually 24 hours). |
| Light does not work | Bulb needs replacement; loose wire connection; remote control issue. | Replace light bulb; check light kit wiring; ensure remote control battery is functional. |
Warranty and Support
For specific warranty information and details regarding your Hinkley Marquis ceiling fan, please refer to the warranty card included with your product or visit the official Hinkley website. For technical support or assistance with parts, contact Hinkley customer service directly.
You can find more information and contact details on the official Hinkley website: www.hinkley.com


