1. Introduction
This manual provides comprehensive instructions for the safe and proper installation and operation of the MOUNTUP MU0015 Heavy Duty Full Motion TV Wall Mount. This mount is designed to securely hold large flat or curved screen televisions ranging from 47 to 90 inches in size and weighing up to 200 lbs (90.7 kg). It offers full motion capabilities including articulating extension, swivel, and tilt for optimal viewing flexibility.
2. Safety Information
WARNING: Failure to read and follow all instructions may result in personal injury, property damage, or voiding of warranty. If you do not understand these instructions or have doubts about the safety of the installation, please contact MOUNTUP customer service or a qualified installer.
- Do not install this product on drywall alone. It must be mounted to wood studs, solid concrete, or brick walls.
- Ensure the mounting surface can safely support the combined weight of the mount and the television.
- Use only the hardware provided or specified by MOUNTUP. Using incompatible hardware may cause damage or failure.
- Never exceed the maximum weight capacity of 200 lbs (90.7 kg).
- This product is intended for indoor use only.
- Keep children and pets away during installation.
- Periodically check all connections and fasteners to ensure they remain secure.
3. Package Contents
Verify that all components are present and undamaged before beginning installation.

Image: The pre-assembled wall mount and separate TV brackets, illustrating the main components of the package.
- Pre-assembled Wall Mount Unit
- TV Brackets (2 pieces)
- Hardware Kit (various screws, washers, spacers, lag bolts, concrete anchors - if requested)
- Magnetic Bubble Level
- Drilling Template
4. Specifications
| Brand | MOUNTUP |
| Model Number | MU0015 |
| TV Size Compatibility | 47 - 90 inches |
| Weight Capacity | Up to 200 lbs (90.7 kg) |
| VESA Compatibility (mm) | 150x100, 200x100, 200x200, 300x200, 300x300, 400x200, 400x300, 400x400, 600x400, 800x400 |
| Movement Type | Full Motion (Articulating) |
| Swivel Range | ±45° |
| Tilt Range | 5° Up / 10° Down |
| Level Adjustment | ±1° (post-installation) |
| Extension from Wall | 3.7 inches (retracted) to 24.4 inches (extended) |
| Material | Alloy Steel |
| Wall Compatibility | 16"/18"/24" Wood Studs, Solid Concrete, Brick Wall |

Image: Visual guide for checking TV specifications, VESA patterns, and compatible wall types for installation.
5. Installation Guide
Follow these steps carefully for a secure installation. It is recommended to have two people for installation, especially when handling the TV.
5.1 Pre-Installation Checks
- Verify TV Compatibility: Check your TV's weight and VESA mounting pattern. The mount supports TVs from 47-90 inches, up to 200 lbs, and VESA patterns up to 800x400mm. Refer to your TV's manual for VESA information.
- Inspect Wall Type: Determine if your wall is wood stud, solid concrete, or brick. Do not install on drywall alone. For concrete/brick walls, ensure you have the correct anchors (contact MOUNTUP if needed).

Image: A visual representation of the mount's compatibility, indicating supported TV sizes (47-90 inches), maximum load (200 lbs), and various VESA patterns.

Image: Illustration of wall compatibility, showing installation on wood studs (16"/18"/24") and concrete/brick walls with lag bolts and anchors.
5.2 Mounting the Wall Plate
- Mark Drilling Locations: Use the provided drilling template and bubble level to mark the pilot hole locations on your wall. Ensure the template is level.
- Drill Pilot Holes: Drill pilot holes at the marked locations. For wood studs, use a 7/32" (5.5mm) drill bit. For concrete/brick, use a 3/8" (10mm) drill bit and insert concrete anchors.
- Attach Wall Plate: Secure the wall plate to the wall using the provided lag bolts. Tighten them firmly but do not overtighten.

Image: A person using the drilling template and bubble level to mark precise drilling points on the wall.
5.3 Attaching Brackets to TV
- Select TV Screws: Choose the correct diameter and length screws that fit your TV's mounting holes. Use washers and spacers as needed to ensure a flush fit and prevent damage to the TV.
- Attach Brackets: Secure the two TV brackets to the back of your television. Ensure they are centered and securely fastened.

Image: Close-up view demonstrating the process of attaching the TV brackets to the back of a television.
5.4 Hanging the TV
- Hang TV: With assistance, carefully lift the TV and hook the attached brackets onto the wall plate. Ensure the TV is seated properly and securely on the mount.
- Secure TV: Engage any safety locks or screws on the brackets to prevent the TV from accidentally disengaging from the wall plate.

Image: Illustration of two people carefully lifting and placing the television onto the mounted wall plate.
6. Operating the Mount (Adjustments)
The MOUNTUP MU0015 offers various adjustments to achieve your desired viewing angle.
6.1 Extension and Retraction
Gently pull or push the TV to extend it up to 24.4 inches from the wall or retract it to a minimum of 3.7 inches. Ensure smooth movement and avoid sudden forceful actions.
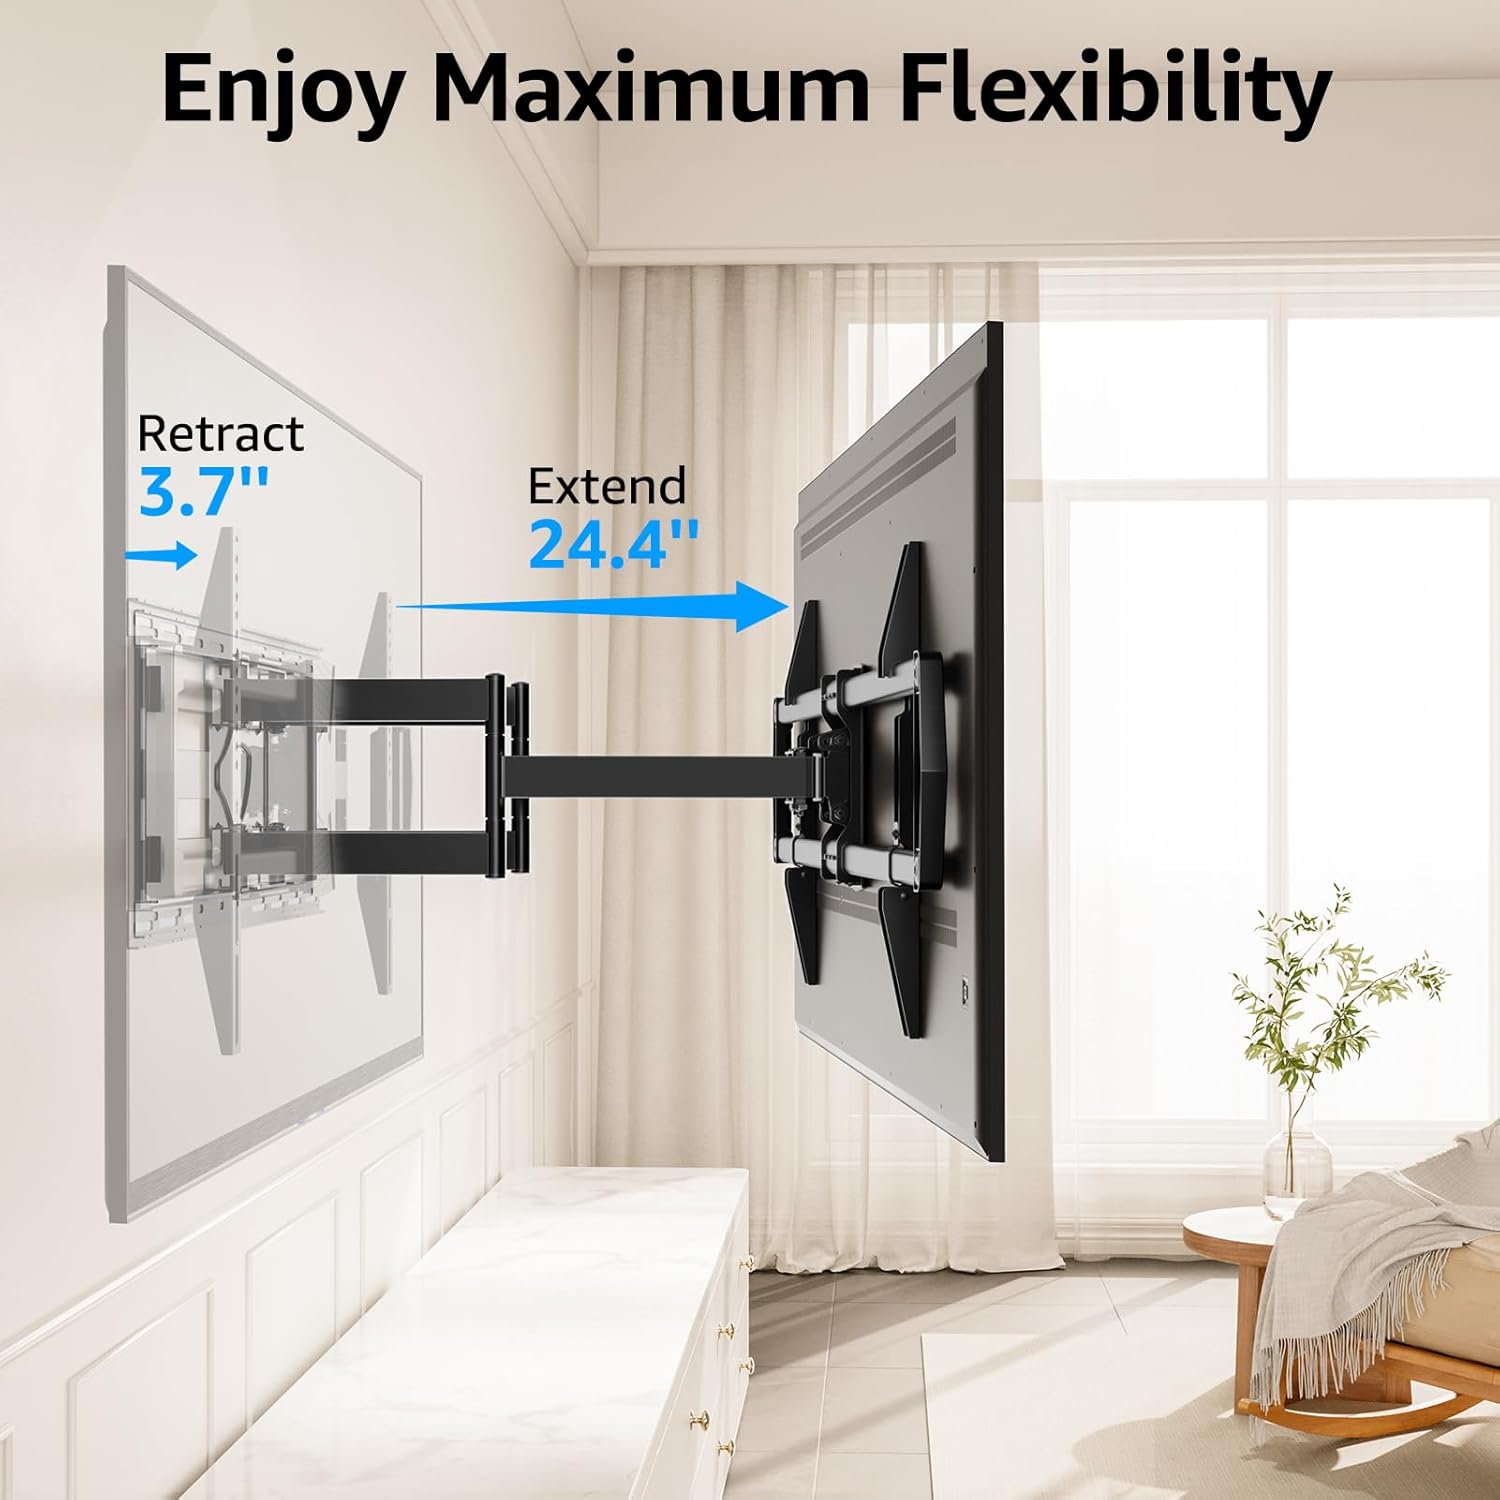
Image: A television mounted on the wall, demonstrating the mount's ability to extend up to 24.4 inches and retract to 3.7 inches from the wall.
6.2 Swivel Adjustment
The TV can be swiveled up to ±45° left or right. This allows for optimal viewing from different seating positions within a room.
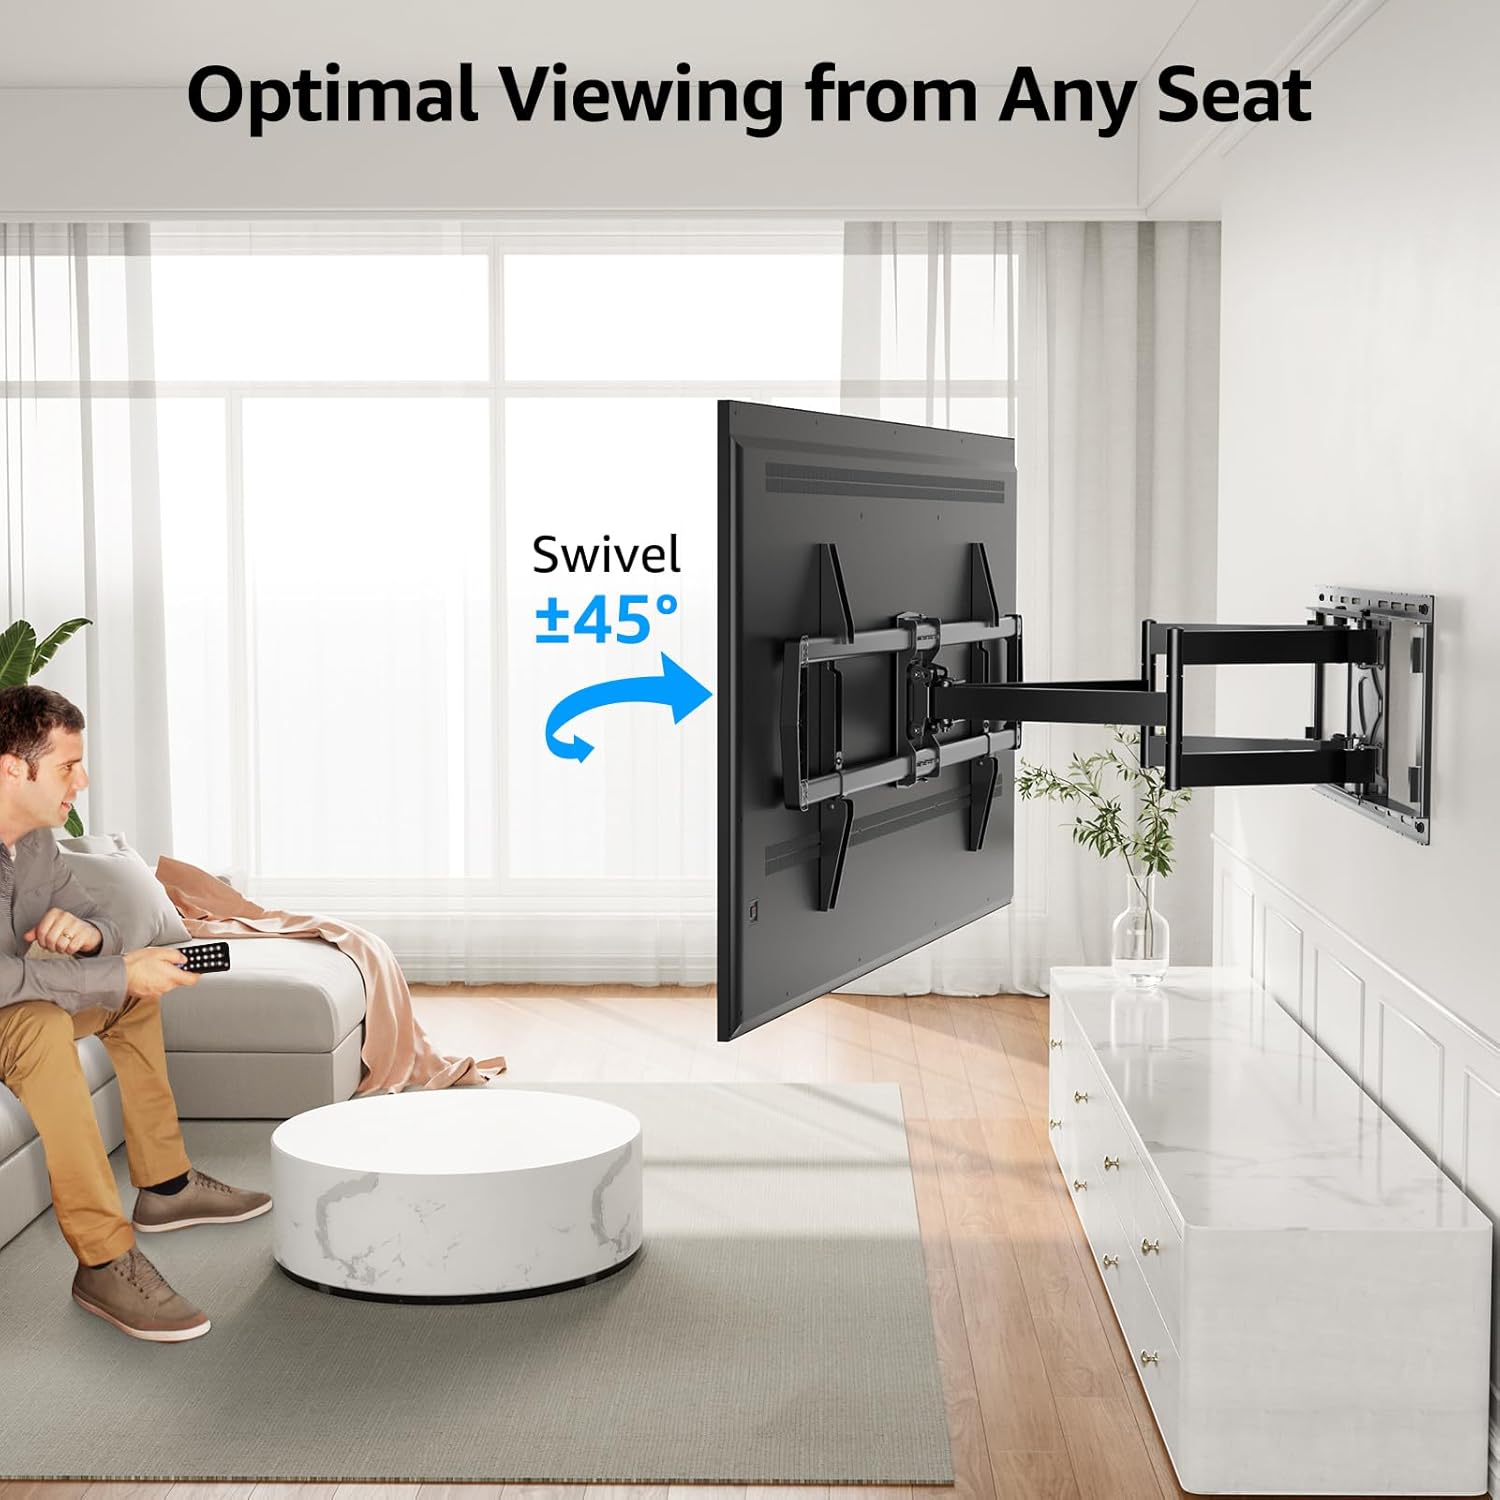
Image: A television swiveled to the side, illustrating the ±45° swivel capability for optimal viewing from various angles.
6.3 Tilt Adjustment
The TV can be tilted 5° up and 10° down to reduce glare and achieve a comfortable viewing angle. Use the provided wrench to adjust the tilt mechanism.

Image: A television screen displaying tilt adjustments, showing the ability to tilt 5° up and 10° down to minimize glare.
6.4 Post-Installation Level Adjustment
After installation, you can make a fine level adjustment of ±1° to ensure your TV is perfectly horizontal. This adjustment is typically done by loosening specific screws on the TV brackets, leveling the TV, and then re-tightening.

Image: A close-up view of the leveling adjustment mechanism on the TV mount, indicating how to achieve a perfect horizontal alignment.
7. Maintenance
Regular maintenance ensures the longevity and safe operation of your TV wall mount.
- Periodic Inspection: Every few months, check all mounting screws and connections to ensure they are still tight and secure.
- Cleaning: Wipe the mount with a soft, dry cloth to remove dust. Avoid using abrasive cleaners or solvents.
- Movement Check: Periodically move the TV through its full range of motion (swivel, tilt, extend) to ensure smooth operation.
8. Troubleshooting
If you encounter issues, refer to the following common solutions:
- TV is not level after installation: Use the post-installation level adjustment feature (refer to Section 6.4) to fine-tune the horizontal alignment.
- Mount movement is stiff: Check for any obstructions or cables that might be impeding movement. Ensure no bolts are overtightened, which could restrict articulation.
- Mount feels unstable: Immediately remove the TV from the mount. Re-check all wall plate and TV bracket connections. Ensure the wall type is appropriate and all lag bolts/anchors are securely fastened. Verify that the TV's weight and VESA pattern are within the mount's specifications.
- Missing parts: If any parts are missing from the package, contact MOUNTUP customer service for assistance.
9. Warranty and Support
MOUNTUP is committed to providing professional customer service. If you have any questions, require technical assistance, or need to inquire about warranty information, please contact the MOUNTUP professional service team. They are available to assist you with any issues or concerns regarding your product.
For contact details, please refer to the MOUNTUP official website or the product packaging.


