1. Introduction
This instruction manual provides essential information for the safe and effective use of your Dasqua 4612-5115 0-3" Depth Micrometer. Please read this manual thoroughly before operating the instrument and retain it for future reference. This precision tool is designed for accurate measurement of depths in holes, slots, and other recessed features.
2. Safety Information
To ensure safe operation and prolong the life of your depth micrometer, observe the following safety guidelines:
- Always handle the micrometer with care to avoid dropping or impacting it, which can affect its accuracy.
- Keep the instrument clean and free from dust, dirt, and corrosive substances.
- Store the micrometer in its protective case when not in use to prevent damage.
- Do not apply excessive force when taking measurements or adjusting the thimble, as this can cause damage.
- Ensure the measuring surfaces are clean before each use to maintain accuracy.
3. Product Overview
3.1 Components
The Dasqua 4612-5115 Depth Micrometer consists of several key components:
- Base: The flat surface that rests on the reference plane of the workpiece.
- Spindle/Measuring Rod: The rod that extends from the base to measure depth. This model includes multiple interchangeable rods for different ranges.
- Sleeve: The stationary part with the main scale (graduations).
- Thimble: The rotating part with the vernier scale, used for fine adjustments and reading measurements.
- Ratchet Stop: Provides constant measuring force to ensure consistent readings.
- Locking Clamp: Used to secure the spindle in position after a measurement is taken.

Figure 1: Dasqua 4612-5115 Depth Micrometer. This image shows the main body of the micrometer, including the base, thimble, and the measuring rod extending from the bottom.

Figure 2: Depth Micrometer with Interchangeable Rods. This image illustrates the micrometer body alongside its interchangeable measuring rods, highlighting the versatility for different depth ranges.
3.2 Features
- Measures depths of holes or parts with grooved or elevated surfaces.
- Accuracy: ±0.00025".
- Strictly manufactured in accordance with DIN863 standards.
- Satin chrome finish for durability and glare reduction.
- Positive locking clamp for securing measurements.
- Rachet thimble and hardened, ground, and lapped threads for consistent repeatability and accuracy.
- Clear and easy-to-read graduations.
- Supplied with a fitted case for protection.
4. Setup
Before using your depth micrometer, follow these steps for proper setup:
- Unpack: Carefully remove the micrometer and its accessories from the protective case.
- Clean: Wipe all measuring surfaces and the base with a clean, lint-free cloth. Ensure no dust or debris is present.
- Select Measuring Rod: Choose the appropriate measuring rod based on the expected depth range. The 4612-5115 model typically includes rods for 0-1", 1-2", and 2-3" ranges.
- Install Measuring Rod: Insert the selected measuring rod into the micrometer body. Ensure it is seated firmly and correctly. The rod should be able to move freely when the thimble is rotated.
- Zero Adjustment:
- Place the micrometer base on a precision flat surface (e.g., a surface plate).
- Gently rotate the thimble using the ratchet stop until the end of the measuring rod makes contact with the flat surface. The ratchet will click when the correct measuring force is applied.
- Check the reading. The zero line on the thimble should align perfectly with the main datum line on the sleeve. If it does not, adjust the sleeve by loosening the locking screw (if present) and rotating the sleeve until alignment is achieved, then retighten. For models without a movable sleeve, note the zero error and compensate during measurement.

Figure 3: Interchangeable Measuring Rods. This close-up shows two measuring rods, illustrating their design and how they would be inserted into the micrometer body.
5. Operating Instructions
Follow these steps to accurately measure depth using your Dasqua 4612-5115 Depth Micrometer:
- Prepare Workpiece: Ensure the surface of the workpiece where the micrometer base will rest is clean and free of burrs or debris.
- Position Micrometer: Place the base of the depth micrometer firmly on the reference surface of the workpiece, ensuring it is stable and flat. The measuring rod should be positioned directly over the feature to be measured (e.g., hole, slot).
- Lower Measuring Rod: Rotate the thimble using the ratchet stop. This will lower the measuring rod until its end makes contact with the bottom of the feature being measured. Continue rotating until the ratchet clicks 2-3 times, indicating consistent measuring force.
- Lock Measurement: Once contact is made and the ratchet has clicked, gently tighten the locking clamp to secure the measuring rod in position. This prevents accidental movement while reading.
- Read Measurement: Carefully lift the micrometer from the workpiece. Read the measurement from the sleeve and thimble scales.
- Read the largest visible number on the sleeve (main scale) to determine the full inches and tenths of an inch.
- Read the line on the sleeve that aligns with the edge of the thimble to determine the hundredths of an inch.
- Read the line on the thimble that aligns with the main datum line on the sleeve to determine the thousandths of an inch.
- Combine these readings to get the total depth. Remember to add the initial length of the measuring rod if it's not the 0-1" rod.
- Record Measurement: Note down the measurement.
- Unlock and Retract: Loosen the locking clamp and retract the measuring rod by rotating the thimble before storing.
6. Maintenance
Proper maintenance ensures the longevity and accuracy of your depth micrometer:
- Cleaning: After each use, wipe down all surfaces, especially the measuring rod and base, with a clean, soft, lint-free cloth. For stubborn grime, a small amount of instrument cleaning fluid can be used, followed by a dry wipe.
- Lubrication: Periodically apply a very thin film of light instrument oil to the spindle threads to ensure smooth operation and prevent corrosion. Avoid over-lubrication.
- Storage: Always store the micrometer in its original protective case in a dry, temperature-controlled environment. Avoid areas with high humidity, dust, or corrosive fumes.
- Calibration: For critical applications, regular calibration by a qualified technician is recommended to verify accuracy.
- Avoid Damage: Never use the micrometer as a hammer or pry tool. Avoid dropping it or exposing it to extreme temperatures.
7. Troubleshooting
Here are some common issues and their potential solutions:
| Problem | Possible Cause | Solution |
|---|---|---|
| Inaccurate readings / Tolerance off |
|
|
| Measuring rod slips |
|
|
| Thimble rotation is stiff or gritty |
|
|
8. Specifications
Key specifications for the Dasqua 4612-5115 Depth Micrometer:
| Feature | Detail |
|---|---|
| Model Number | 4612-5115 |
| Measuring Range | 0-3 inches (with interchangeable rods) |
| Accuracy | ±0.00025" |
| Standard | DIN863 |
| Finish | Satin Chrome |
| Power Source | Hand-powered |
| Item Weight | 0.28 g (Note: This weight seems unusually low for a micrometer and might be a data entry error. Refer to product packaging for accurate weight.) |
| Product Dimensions (LxWxH) | 22.9 x 12.7 x 5.1 cm (approximately 9 x 5 x 2 inches) |
| Included Components | Depth Micrometer, Interchangeable Measuring Rods, Fitted Case |
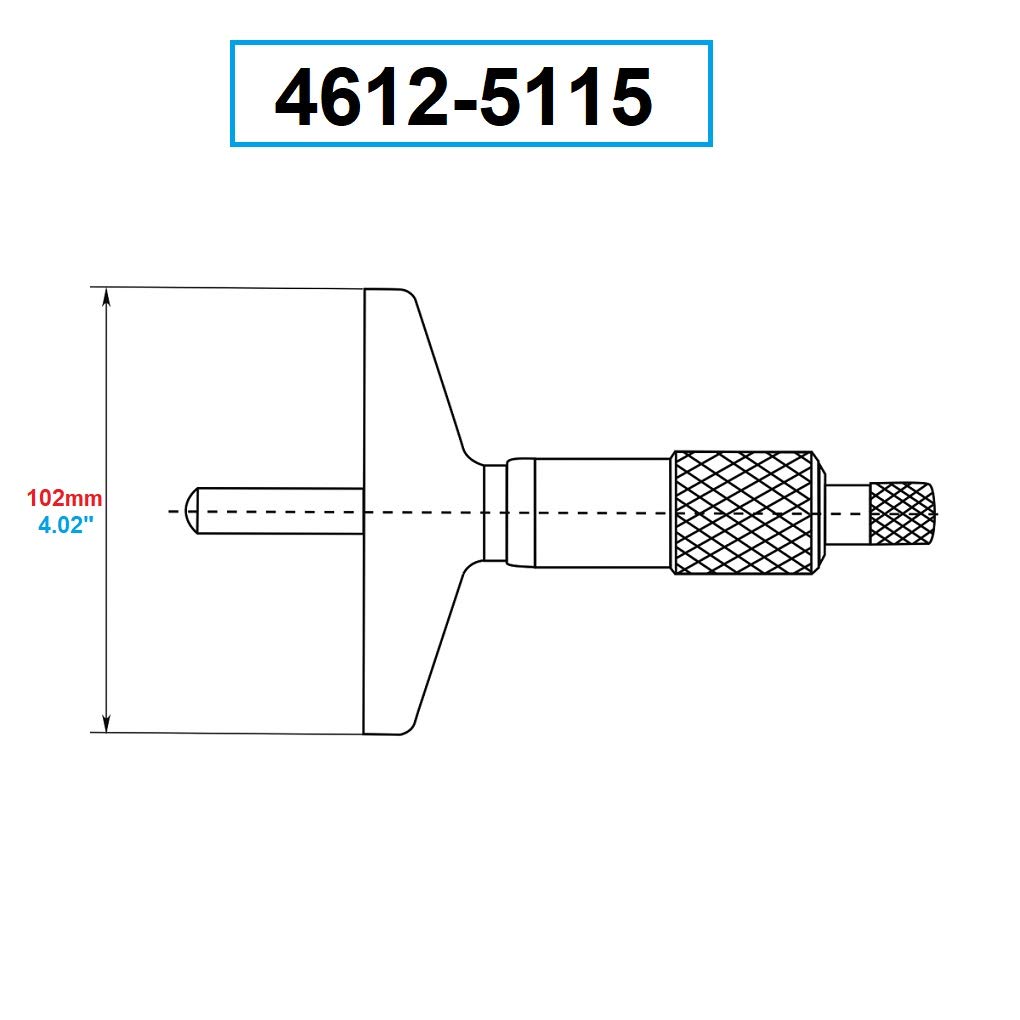
Figure 4: Dimensional Drawing. This diagram provides key dimensions for the micrometer, including the 102mm (4.02") length of the base.
9. Warranty and Support
For specific warranty information, please refer to the documentation included with your purchase or contact Dasqua customer support directly. General support inquiries can often be resolved by reviewing this manual or visiting the manufacturer's official website.
Manufacturer: ABS Import Tools Inc.