
1. Introduction
This manual provides instructions for the installation, operation, and maintenance of the TOAUTO 2-Axis Digital Readout (DRO) system, which includes a 5um Glass Linear Scale. This system is designed for precise measurement applications on CNC milling machines, lathes, and EDM machines, offering high accuracy and stable performance. This specific manual covers linear scales with travel lengths of 100mm, 150mm, and 200mm.

Figure 1.1: Overview of the TOAUTO 2-Axis Digital Readout (DRO) and 5um Glass Linear Scale components. This image displays the linear scale, its connecting cable, and various mounting hardware including brackets, screws, and washers.
2. Product Features
- High Precision: Features a glass linear precision metrology grating with a resolution of 5um and an accuracy of ±5um/0.0002" (at 20°C).
- Fast Response: Pulse signal period of 20um and a travelling speed of 100m/min.
- Clear Display: Equipped with an 8-bit LED high-definition nixie tube for clear readings.
- Durable Construction: Aluminum profile scale body and zinc alloy die-cast head with chrome plating for corrosion resistance and good rigidity.
- Stable Measurement: Advanced trigonometric calculation and a reliable 5-bearing system design for stable and repeatable positioning measurements.
- Easy Mounting: Includes slotted end blocks for simple and adjustable mounting.
- Power Supply: Operates within an AC 80V~260V, 50~60Hz range, with a US plug.
3. Specifications
| Specification | Value |
|---|---|
| Brand | TOAUTO |
| Material | Glass (for linear scale) |
| Measurement Accuracy | 5um |
| Travel Length Options | 100mm, 150mm, 200mm |
| Total Length (Travel Length + 140mm) | 240mm, 290mm, 340mm (for 100mm, 150mm, 200mm travel respectively) |
| Supply Voltage Range | AC 80V~260V; 50~60Hz |
| Model Number | 100-200 |
| Manufacturer Part Number | DRO-5YM-002 |
| Number of Items | 1 (per scale unit) |

Figure 3.1: Illustration of the difference between Travel Length and Total Length of the linear scale. The image highlights that the overall length of the scale is the travel length plus an additional 140mm (5.51 inches).
4. Setup and Installation
Proper installation of the linear scale is crucial for accurate measurements. Follow these general steps:
- Unpack Components: Carefully remove all components from the packaging. Verify that all parts, including the linear scale, mounting brackets, screws, and washers, are present.
- Determine Travel Length: Before mounting, accurately measure the required travel length for your machine axis. Refer to Figure 4.1 for detailed instructions on how to measure travel length.
- Mount the Scale Body: Securely attach the main body of the linear scale to the stationary part of your machine (e.g., machine bed) using the provided mounting brackets and hardware. Ensure it is parallel to the axis of motion.
- Mount the Read Head: Attach the read head (the moving part of the scale) to the moving part of your machine (e.g., machine table or saddle). Ensure the read head moves smoothly along the scale body without binding or excessive play.
- Align the Scale: Adjust the position of the scale and read head to ensure proper alignment. The read head should maintain a consistent gap from the scale body throughout its entire travel.
- Connect to DRO Unit: Connect the linear scale cable to the corresponding axis input on your 2-Axis Digital Readout (DRO) unit. Ensure the connector is firmly seated.
- Power Connection: Connect the DRO unit to a power source (AC 80V~260V, 50~60Hz) using the provided US plug.
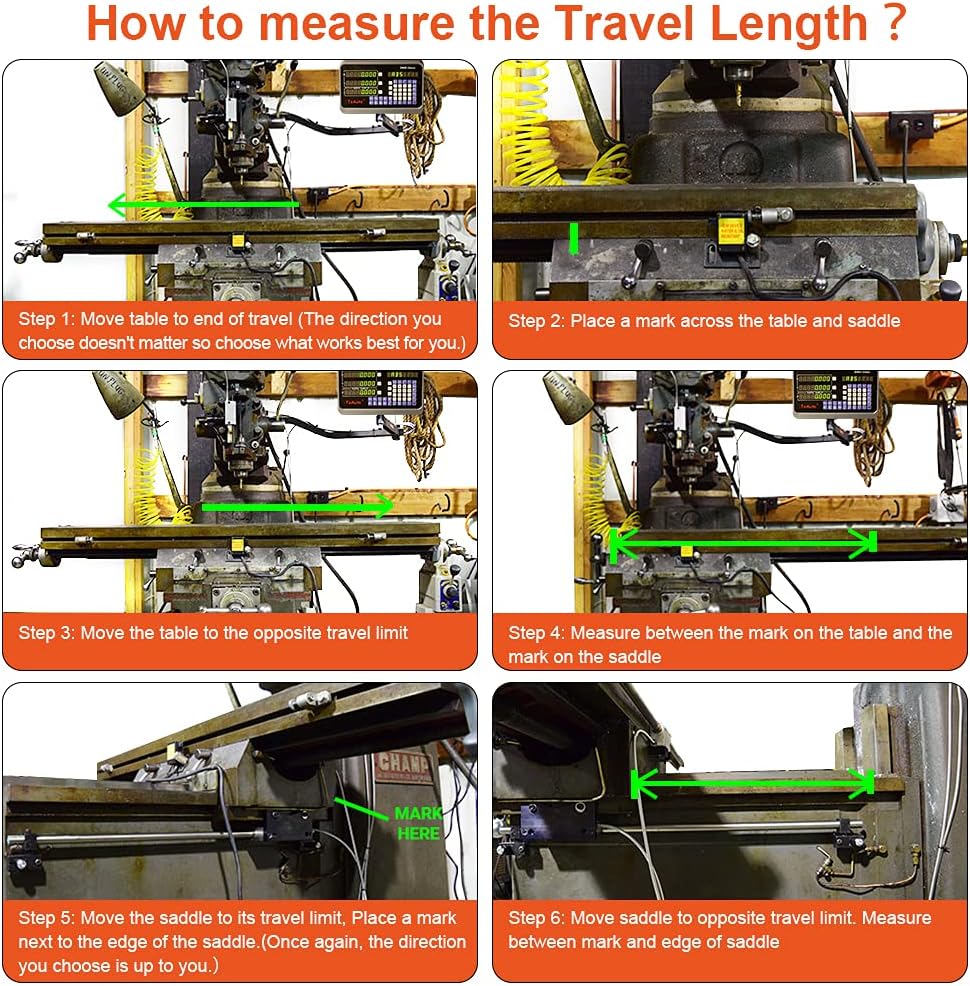
Figure 4.1: Detailed steps for measuring the travel length on a machine. This involves moving the table to its end of travel, marking a point, moving to the opposite limit, and measuring the distance. Similar steps are shown for measuring saddle travel.

Figure 4.2: Close-up view of the 9-pin D-sub connector used to connect the linear scale to the DRO unit. Ensure a secure connection for reliable data transmission.
5. Operating Instructions
Once the DRO system is installed and powered on, you can begin taking measurements. The specific functions and button layout will depend on your DRO unit model, but general operations include:
- Power On/Off: Use the main power switch on the DRO unit to turn it on or off.
- Zeroing: Press the "ZERO" or "RESET" button for the desired axis (X or Y) to set the current position as zero. This is typically done at a reference point on your workpiece or machine.
- Absolute/Incremental Modes: Most DROs offer absolute (ABS) and incremental (INC) measurement modes. Absolute mode measures from a fixed datum, while incremental mode allows you to set temporary zeros for relative measurements.
- Unit Conversion: Use the "MM/INCH" button to switch between metric (millimeters) and imperial (inches) units.
- Half Function: Some DROs have a "1/2" or "CENTER" function to find the center point between two measured points.
- Coordinate Setting: Advanced DRO units allow setting specific coordinate values for each axis.
Refer to your specific DRO unit's manual for detailed button functions and advanced operational features.
6. Maintenance
To ensure the longevity and accuracy of your TOAUTO Digital Readout system, follow these maintenance guidelines:
- Cleaning the Scale: Regularly clean the glass linear scale surface with a soft, lint-free cloth and a mild, non-abrasive cleaning solution (e.g., isopropyl alcohol). Avoid harsh chemicals or abrasive materials that could scratch the glass.
- Inspect Cables and Connectors: Periodically check all cables and connectors for signs of wear, damage, or loose connections. Ensure they are securely fastened.
- Environmental Protection: Protect the DRO unit and linear scales from excessive dust, moisture, and extreme temperatures. While the scale body is corrosion-resistant, maintaining a clean environment is best for optimal performance.
- Mounting Hardware: Periodically check all mounting screws and brackets to ensure they remain tight and secure. Loose mounting can lead to inaccurate readings.
7. Troubleshooting
If you encounter issues with your TOAUTO Digital Readout system, consider the following common troubleshooting steps:
- No Display on DRO Unit:
- Check if the power cable is securely connected to both the DRO unit and the power outlet.
- Verify that the power switch on the DRO unit is in the "ON" position.
- Ensure the power outlet is functional.
- Inaccurate Readings or Jumps:
- Inspect the linear scale surface for dirt, debris, or damage. Clean the scale as described in the Maintenance section.
- Check the connection between the linear scale and the DRO unit. Ensure the cable is not damaged and the connector is fully seated.
- Verify that the read head is properly aligned and moves smoothly along the scale. Adjust mounting if necessary.
- Ensure there is no excessive vibration or mechanical play in the machine axis.
- Axis Not Responding:
- Confirm the linear scale cable for that specific axis is correctly plugged into the DRO unit.
- Check for any visible damage to the scale cable or read head.
If these steps do not resolve the issue, contact TOAUTO customer support for further assistance.
8. Warranty and Support
All products from TOAUTO are provided with a 2-year warranty after-sales service and lifetime technical support. For warranty claims, technical assistance, or any inquiries, please contact TOAUTO customer service through the official channels provided at the time of purchase or on the TOAUTO website.