
1. Introduction
The Alctron MP73EQV2 is a high-quality single-channel microphone amplifier featuring an integrated EQ function. Designed to optimize sound quality, it utilizes a unique electronic circuit combined with high, mid, and low equalizers offering 11 frequency selections. This design ensures premium sound amplification, resulting in clear and natural output. Its fully discrete signal path, complemented by two separate transformers for input and output, further enhances performance by isolating noise. Constructed with durable aluminum alloy, the MP73EQV2 is both fashionable and robust.
2. Important Safety Information
CAUTION: RISK OF ELECTRIC SHOCK. DO NOT OPEN.
WARNING: TO REDUCE THE RISK OF FIRE OR ELECTRONIC SHOCK, DO NOT EXPOSE THIS EQUIPMENT TO RAIN OR MOISTURE.
- Read these instructions thoroughly before operating the unit.
- Keep these instructions for future reference.
- Heed all warnings and follow all instructions.
- Do not use this apparatus near water.
- Clean only with a dry cloth.
- Do not block any ventilation openings. Install in accordance with the manufacturer's instructions.
- Do not install near any heat sources such as radiators, heat registers, stoves, or other apparatus (including amplifiers) that produce heat.
- Protect the power cord from being walked on or pinched, particularly at plugs, convenience receptacles, and the point where they exit from the apparatus.
- Only use attachments/accessories specified by the manufacturer.
- Unplug this apparatus during lightning storms or when unused for long periods of time.
- Refer all servicing to qualified service personnel. Servicing is required when the apparatus has been damaged in any way, such as power-supply cord or plug is damaged, liquid has been spilled or objects have fallen into the apparatus, the apparatus has been exposed to rain or moisture, does not operate normally, or has been dropped.
3. Key Features
- Single-channel microphone pre-amplifier with integrated EQ.
- High/Mid/Low equalizer with 11 frequency selections for precise sound shaping.
- Unique electronic circuit design for premium sound amplification.
- Delivers clear and natural output sound.
- Fully discrete signal path.
- Two separate transformers for input and output to enhance performance and isolate noise.
- Durable aluminum alloy construction.
4. Product Overview
4.1 Front Panel Controls
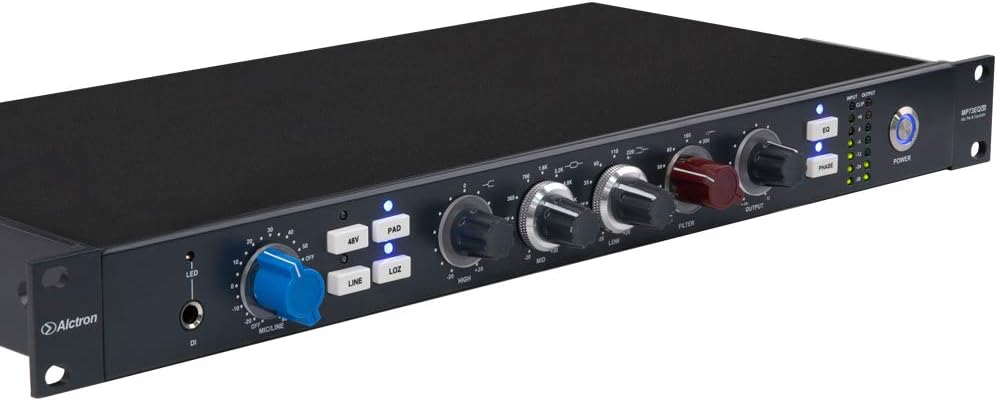
This image displays the front panel of the Alctron MP73EQV2, showcasing its various controls and indicators. From left to right, it includes a DI input, gain controls, phantom power, impedance switches, equalization knobs, filter, output level, phase switch, power button, and LED meters for input, output, and clipping.
- DI Input (LED/Jack): Direct Instrument input for connecting instruments. The LED indicates signal presence.
- MIC/LINE Gain Knob: Adjusts the input gain for microphone or line-level signals.
- 48V Button: Activates +48V phantom power for condenser microphones. An indicator LED illuminates when active.
- PAD Button: Engages an attenuation pad (typically -20dB) for high-level input signals to prevent clipping.
- LOZ Button: Switches the input impedance for microphone inputs, often between 300Ω and 1200Ω, affecting microphone tone.
- HIGH EQ Knob: Controls the high-frequency equalization.
- MID EQ Knob: Controls the mid-frequency equalization, often with selectable frequency points.
- LOW EQ Knob: Controls the low-frequency equalization.
- FILTER Knob: Likely controls a high-pass or low-pass filter to remove unwanted frequencies.
- OUTPUT Knob: Adjusts the overall output level of the amplifier.
- PHASE Button: Inverts the phase of the input signal by 180 degrees.
- POWER Button: Turns the unit on or off.
- INPUT/OUTPUT/CLIP LEDs: Visual indicators for input signal level, output signal level, and signal clipping.
4.2 Rear Panel Connections

This image shows the rear panel of the Alctron MP73EQV2, detailing its power input and audio connections. From left to right, it features the DC power input, followed by XLR connectors for output, line input, and microphone input.
- DC 24V Input: Connect the provided 24V DC power adapter here.
- OUTPUT (XLR): Balanced XLR output for connecting to an audio interface, mixer, or other recording/playback equipment.
- LINE IN (XLR): Balanced XLR input for line-level audio sources.
- MIC IN (XLR): Balanced XLR input for connecting microphones.
5. Setup and Connections
Follow these steps to properly set up your Alctron MP73EQV2:
- Power Connection: Connect the provided 24V DC power adapter to the 'DC 24V' input on the rear panel. Plug the adapter into a suitable power outlet.
- Microphone Connection: For microphone use, connect your microphone to the 'MIC IN' XLR input on the rear panel using a balanced XLR cable. If using a condenser microphone, ensure the 48V phantom power is activated on the front panel after connecting.
- Line-Level Connection: For line-level sources, connect your device (e.g., preamplifier output, instrument with line output) to the 'LINE IN' XLR input on the rear panel.
- Instrument DI Connection: For direct instrument input, connect your instrument (e.g., guitar, bass) to the 'DI' input jack on the front panel.
- Output Connection: Connect the 'OUTPUT' XLR on the rear panel to your audio interface, mixer, or recording device using a balanced XLR cable.
- Power On: Press the 'POWER' button on the front panel to turn on the unit. The power indicator LED will illuminate.
6. Operating the MP73EQV2
Once connected, you can begin operating your MP73EQV2. Always start with gain and output levels at their minimum to avoid sudden loud sounds.
- Gain Adjustment: Use the 'MIC/LINE Gain' knob to set the input level. Monitor the input LED indicators to ensure the signal is strong but not clipping (red).
- 48V Phantom Power: If using a condenser microphone, press the '48V' button. Ensure the microphone is connected before activating phantom power.
- PAD Switch: If your input signal is too hot and causes clipping even at low gain settings, engage the 'PAD' button to attenuate the signal.
- LOZ Switch: Experiment with the 'LOZ' switch when using microphones to find the impedance setting that best complements your microphone's characteristics and desired tone.
- Equalization (EQ): Use the 'HIGH', 'MID', and 'LOW' EQ knobs to shape the tonal characteristics of your audio. The MP73EQV2 offers 11 frequency selections for precise adjustments. Adjust these to enhance or cut specific frequencies as needed for your sound.
- Filter: The 'FILTER' knob can be used to remove unwanted low-end rumble or high-frequency hiss, depending on its design (e.g., high-pass filter).
- Phase Inversion: The 'PHASE' button inverts the polarity of the signal. This can be useful for correcting phase issues when combining multiple microphones or signals.
- Output Level: Use the 'OUTPUT' knob to control the final signal level sent to your recording device or mixer. Monitor the output LED meters to prevent clipping at the output stage.
7. Care and Maintenance
- Cleaning: Use a soft, dry cloth to clean the exterior of the unit. Do not use liquid cleaners or solvents.
- Storage: Store the unit in a cool, dry place away from direct sunlight and extreme temperatures.
- Handling: Avoid dropping or subjecting the unit to strong impacts.
- Ventilation: Ensure proper ventilation around the unit to prevent overheating. Do not block ventilation openings.
8. Troubleshooting
- No Sound Output:
- Check all cable connections (input, output, power).
- Ensure the unit is powered on.
- Verify input and output gain knobs are not set to minimum.
- Confirm the microphone or instrument is working correctly.
- If using a condenser mic, ensure 48V phantom power is active.
- Distorted Sound:
- Reduce input gain ('MIC/LINE Gain') to prevent clipping (input LED should not consistently hit red).
- Engage the 'PAD' button if the input signal is very strong.
- Reduce the 'OUTPUT' level if the receiving device is clipping.
- Excessive Noise/Hum:
- Ensure all cables are balanced XLR where appropriate.
- Check for ground loops; try plugging equipment into the same power strip.
- Keep audio cables away from power cables.
- Test different power outlets.
- 48V Phantom Power Not Working:
- Ensure the '48V' button is pressed and its indicator LED is lit.
- Verify the microphone cable is functioning correctly.
9. Technical Specifications
- Item Weight: 12 pounds
- Package Dimensions: 23.23 x 11.02 x 4.33 inches
- ASIN: B086X3MKH4
- Date First Available: April 9, 2020
- Functionality: Single-channel microphone amplifier with EQ function, fully discrete signal path, two separate transformers for input and output.
10. Warranty and Customer Support
Alctron products are designed for reliability and performance. For specific warranty information, please refer to the warranty card included with your product or visit the official Alctron website. If you encounter any issues or require technical assistance, please contact Alctron customer support through their official channels. Keep your purchase receipt as proof of purchase for warranty claims.