
1. Product Overview
The SJXING SUN X5 Plus 80W UV LED Nail Lamp is a professional-grade nail dryer designed for efficient curing of various gel nail polishes. Its advanced features ensure fast and even drying for both fingernails and toenails, making it suitable for both home and salon use.
Key Features
- High Power Output: 80W for significantly faster curing times compared to lower wattage dryers.
- Dual UV/LED Light Source: Equipped with 36 durable LED beads (rated for up to 50,000 hours) to cure all types of gel polishes, including LED gel, UV gel, builder gel, and sculpture gel.
- Automatic Sensor: Hands-in, light-on; hands-out, light-off for convenient operation.
- Multiple Timer Settings: Includes 10s, 30s, 60s, and a special 99s low heat mode for comfortable curing and to prevent heat spikes.
- Digital Display: Built-in LED display shows the remaining curing time.
- Wide Coverage: Strategically placed LED beads ensure flawless curing without dead zones, covering all angles of nails.
- Temperature Protection: Designed to provide a comfortable curing experience while protecting hands.
- Removable Bottom Plate: Facilitates easy cleaning and is suitable for pedicures.

Figure 1: The SJXING SUN X5 Plus 80W UV LED Nail Lamp, showcasing its design and key features.
2. Setup Instructions
2.1 Unpacking
Carefully remove all components from the packaging. Ensure the following items are present:
- 1x SJXING SUN X5 Plus 80W UV LED Nail Lamp
- 1x US Plug Power Adapter
- 1x User Manual
2.2 Connecting Power
Connect the power cord to the designated port on the back of the nail lamp. Plug the US Plug Power Adapter into a secure and appropriate electrical outlet. The lamp's display will illuminate, indicating it is ready for use.
3. Operating Instructions
3.1 Preparing Nails
Proper nail preparation is crucial for optimal gel polish adhesion and curing.
- Clip your nails to the desired length.
- Gently cap the nail edge and file the surface of the nail to create a smooth base.
- Carefully remove any excess cuticle and trim the nail edges.
- Ensure the nail bed is smooth and clean before applying any base coat.
3.2 Applying Gel Polish
Apply a thin, even layer of your chosen gel polish according to its specific usage instructions. Avoid touching the cuticle or skin alongside the nails to prevent lifting or uneven application.
3.3 Curing Nails
The SUN X5 Plus features an automatic sensor and multiple timer settings for efficient curing.
- Automatic Sensor: Simply place your hand or foot into the lamp. The internal sensor will detect its presence and automatically activate the lights. The default curing time will begin counting down on the LED display.
- Manual Timer Settings: For specific curing requirements, select one of the preset timer buttons (10s, 30s, 60s, or 99s low heat mode) before placing your hand or foot inside. The selected time will be displayed and count down.
- Curing Time Variation: Note that curing times can vary based on the brand and type of gel polish. Always refer to your gel polish manufacturer's recommendations. The SUN X5 Plus is designed for all types of gel polishes, but not for regular nail polish.
- Base Coat & Top Coat: Apply a base coat and cure for approximately 30 seconds. After completing your nail art design, apply a top coat and cure for at least 60 seconds to ensure a non-sticky finish. Incorrect application or curing of base and top coats can lead to improper curing.
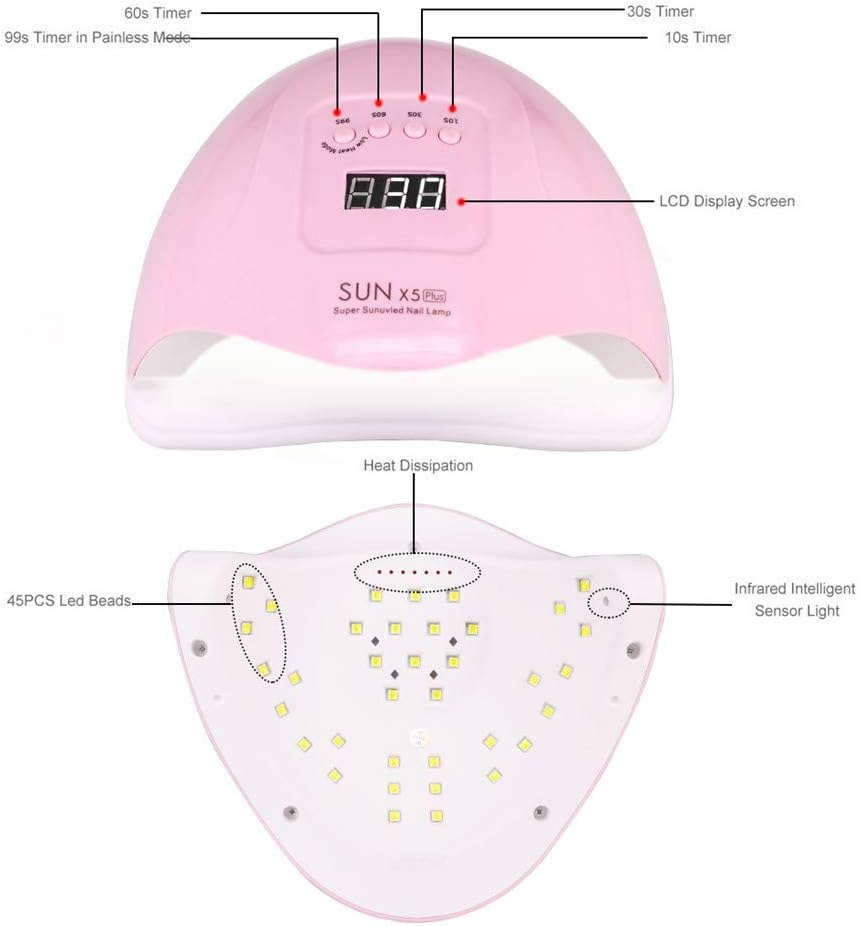
Figure 2: Control panel and internal layout of the nail lamp, highlighting timer buttons and LED placement.
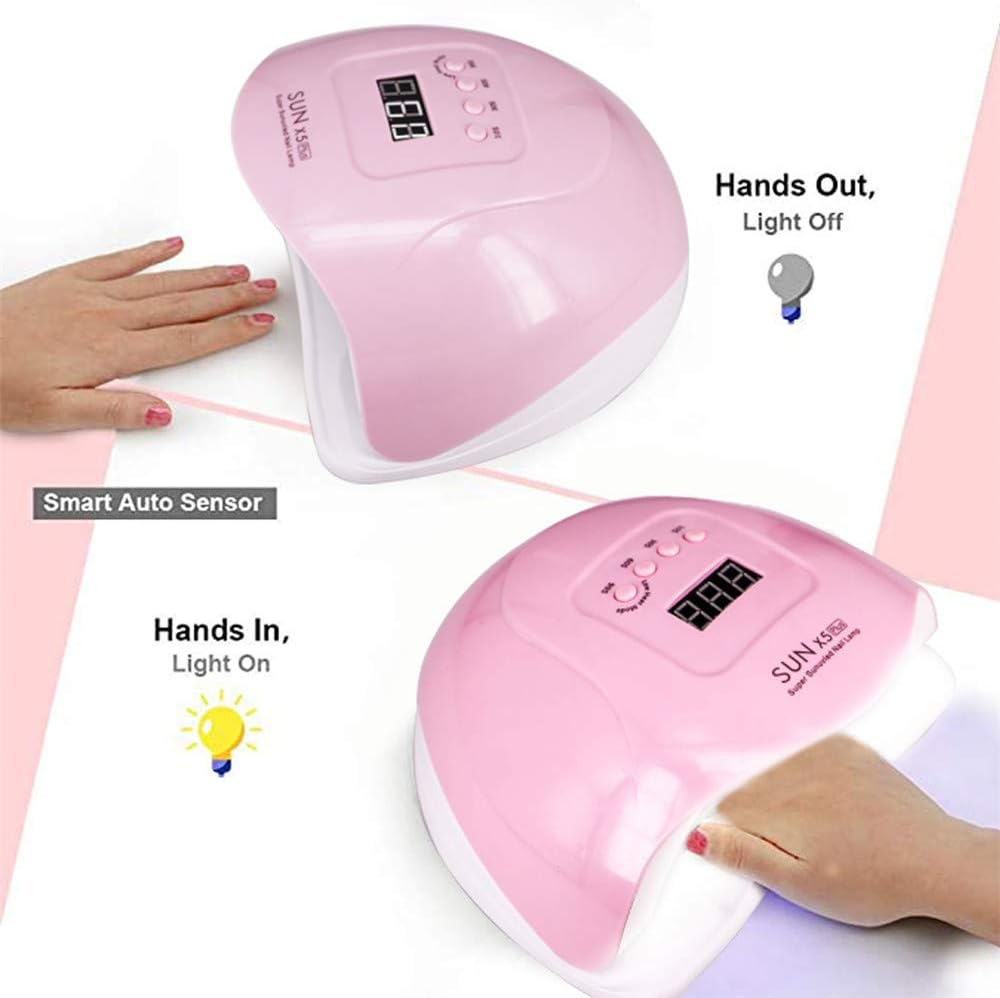
Figure 3: Illustration of the automatic sensor functionality.
4. Maintenance
4.1 Cleaning
To maintain hygiene and performance, regularly clean your nail lamp. The bottom plate of the lamp is removable, allowing for easy cleaning after use. Wipe down the interior and exterior surfaces with a soft, dry cloth. Avoid using harsh chemicals or abrasive cleaners.
5. Troubleshooting
5.1 Gel Not Curing Properly
- Check Gel Type: Ensure you are using gel polish, not regular nail polish, as this lamp is specifically designed for gel.
- Application Thickness: Apply gel polish in thin, even layers. Thick layers may not cure completely.
- Curing Time: Verify that the selected curing time is appropriate for your specific gel polish brand. If unsure, try a longer setting (e.g., 60s or 99s low heat mode).
- Base/Top Coat: Incorrect use of base coat and top coat can affect curing. Ensure the nail bed is smooth and clean before applying base coat (cure for 30s). After design, apply top coat and cure for at least 60s to prevent stickiness.
- Sticky Residue: If gel polish remains slightly sticky after curing, wipe your nails with a gentle cleanser or rubbing alcohol to remove the sticky residue. This is a normal part of the gel manicure process for some polishes.
6. Product Specifications
| Specification | Detail |
|---|---|
| Model Number | sun x5plus |
| Power | 80W |
| Light Source | UV/LED (36 LED beads) |
| Timer Settings | 10s, 30s, 60s, 99s (Low Heat Mode) |
| Sensor Type | Automatic Infrared Sensor |
| Display | LED Digital Display |
| Material | Plastic |
| Color | Pink |
| Power Source | Corded Electric |
| Voltage | 110 Volts (AC) |
| Dimensions | 9.45 x 8.39 x 4.25 inches |
| Weight | 14.07 ounces |
7. Warranty and Support
The SJXING SUN X5 Plus UV LED Nail Lamp comes with a one-year product quality assurance. Additionally, a 30-day no-reason return policy is provided.
Should you encounter any issues or have questions regarding the use of your nail lamp, please contact our after-sales support team via email. We aim to reply and resolve your problem within 24 hours.
For further assistance, please refer to the contact information provided in your product packaging or on the official SJXING website.