Introduction
The hygger Aquarium Programmable LED Light is designed to provide optimal lighting for your aquarium, supporting plant growth and enhancing the visual appeal of your aquatic environment. It features a full spectrum output, programmable modes, and a user-friendly LCD display for easy control. This manual provides detailed instructions for setup, operation, and maintenance.

Figure 1: Hygger Aquarium Programmable LED Light overview, showing the LCD display and its placement on an aquarium.
Setup
Follow these steps to set up your hygger Aquarium Programmable LED Light:
- Unpack Components: Carefully remove the LED light unit, power adapter, and extendable brackets from the packaging.
- Attach Brackets: The extendable bending brackets can be adjusted in length. Attach them securely to both ends of the light unit.

Figure 2: Detail of the extendable bending bracket, showing its dimensions and design for easy installation.
- Position Light: Place the light unit on top of your freshwater tank, ensuring the brackets rest firmly on the tank edges. The light is suitable for tanks 18 to 24 inches long.

Figure 3: The Hygger LED light positioned on an aquarium, illustrating its adjustable nature for different tank lengths.
- Connect Power: Connect the separable adapter to the light unit and then plug the adapter into a power outlet.

Figure 4: The separable power adapter, highlighting its easy connection to the light unit.
- Initial Power On: The light will power on. It is recommended to set the local time first for proper program functionality.
Visual Setup Guide:
Video 1: Official hygger Aquarium Programmable LED Light HG-957 setup and feature overview. This video demonstrates the physical installation of the light on an aquarium, including attaching the brackets and connecting the power supply. It also briefly touches upon setting the local time and various lighting modes.
Operating Modes
The hygger LED light offers four distinct operating modes to suit various aquarium needs:
1. Default Mode
In Default Mode, the light simulates a natural sunrise to sunset effect, transitioning from dim to bright and then to a night effect. It includes all-optical light and adjustable blue light. The brightness and time settings are preset.
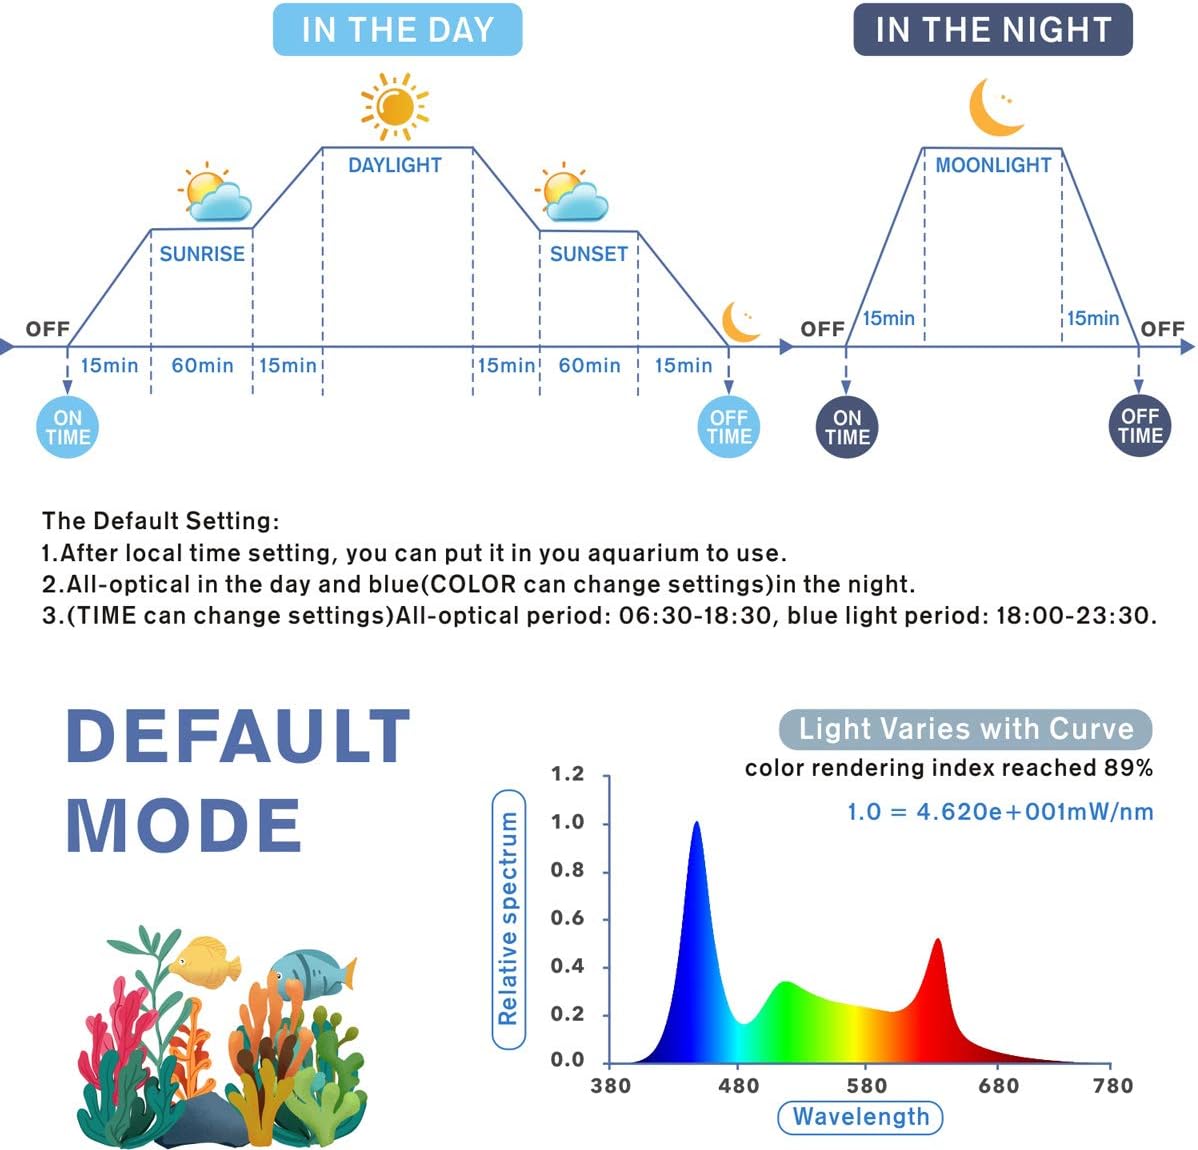
Figure 5: Visual representation of the Default Mode's light cycle, showing gradual transitions from sunrise to sunset and moonlight phases.
2. DIY Mode
DIY Mode allows for extensive customization, ideal for planted tanks. You can set 8 time stages, each with 10 kinds of brightness levels and custom start/end times. L1-L6 are all-optical, while L7-L8 are blue light.

Figure 6: Explanation of DIY Mode, emphasizing its suitability for planted aquariums with customizable lighting stages and brightness.
Setting up DIY Mode (Advanced):
- Ensure Standard Mode (Day-L and Moon) is OFF. If DIY mode is already on, turn it off first, then turn off Standard Mode, then re-enable DIY mode.
- Long press the 'Set' and 'Bulb' buttons simultaneously until "OFF" (or "ON") appears. Use 'Up' to change to "ON".
- Use 'Set' to cycle through settings for each phase (L1, L2, etc.). For each phase, set light intensity (0-100) and start/end times. Intensity 0 means lights off for that phase. L7 and L8 are blue light, others are white.
- When lights turn on/off in DIY mode, it's a gradual 15-minute transition.
- If manually adjusting lights, reset the local time (long press 'Set' until hour blinks, then 'Set' 3 more times) to re-enable DIY mode's automatic function.
3. Gradient Mode
In Gradient Mode, the light cycles through 7 colors (dark blue, green, purple, light blue, yellow, red). The brightness and time cannot be set in this mode.

Figure 7: Overview of Cycle Mode, showing the control panel and examples of different color outputs.
4. All-day All-optical Mode
This mode provides continuous all-optical light. You can fine-tune the color temperature of the RGB light, but brightness and time settings are not adjustable.
LCD Display Operation
The LCD display features four function keys: Mode Setting, Up, Down, and Light Setting (Bulb). The main screen shows real-time local time (12/24 hour optional), and two smaller screens display program timers for day and night settings.

Figure 8: Detailed view of the LCD display and its control buttons, indicating local time and program timers.
Maintenance
Proper maintenance ensures the longevity and optimal performance of your hygger LED light:
- Cleaning: The lamp beads are IP68 waterproof, making them easy to clean and wipe. Regularly wipe the light surface to prevent mineral buildup and maintain light output.

Figure 9: The light unit demonstrating its IP68 waterproof rating, indicating it can withstand splashes and is easy to clean.
- Adapter Care: The separable adapter design allows for easy replacement if damaged, preventing the need to replace the entire light unit.
- Power Off Memory: The light has a power off memory function. After power is restored, the local time will default to 12 noon, but other settings will remain unchanged.
Troubleshooting
Here are some common issues and their solutions:
- Settings Reset After Power Interruption: While the light retains most settings, the local time defaults to 12 noon after a power outage. You will need to manually reset the local time.
- Manual Light Adjustment Affects Automatic Mode: If you manually turn the light on or off, it may interfere with the automatic programming. To re-enable automatic DIY mode, reset the local time by long pressing 'Set' until the hour blinks, then press 'Set' three more times. The light will then gradually adjust to its programmed state over 15 minutes.
- Light Not Turning On/Off Automatically: Ensure that Standard Mode (Day-L and Moon) is turned OFF before enabling DIY Mode. If DIY mode is already on, turn it off first, then turn off Standard Mode, then re-enable DIY mode.
Specifications
| Feature | Detail |
|---|---|
| Light Size | 45 x 10 x 2.2 cm (18 x 3.9 x 0.87 inches) |
| Application | 18~24 inches long tanks |
| Input Voltage | AC100-240V |
| Output Voltage | DC15V |
| LED Quantity | 77 PCS (White 38pcs, Blue 10pcs, Red 6pcs, Green 4pcs, RGB 19pcs) |
| Rendering Index | 89 |
| Lumens | 1290 |
| Color Temperature | 6500-10000K |
| Power Cord Length | 4.9 ft |
| Material | Aluminum alloy plastic case |
| Waterproof Rating | IP68 |
Warranty & Support
For any product inquiries, technical support, or warranty claims, please contact hygger customer service. Refer to the product packaging or the official hygger website for the most up-to-date contact information.