Introduction
This manual provides comprehensive instructions for the installation, operation, and maintenance of your hygger Aquarium Programmable LED Light, Model HG-957. This light is designed to provide optimal lighting conditions for freshwater aquariums, supporting both fish and plant health with its full spectrum capabilities and programmable features.

Image: Top and bottom view of the hygger Aquarium Programmable LED Light, showing the LED array and the control panel.
Important Safety Instructions
- Read all instructions carefully before use.
- Do not operate if the cord or plug is damaged.
- Ensure the light is securely mounted above the aquarium and cannot fall into the water.
- Always unplug the light before performing any maintenance on the aquarium or the light itself.
- This product is designed for indoor use only.
- Keep out of reach of children.
- The lamp beads are IP68 waterproof, but the power adapter and control panel are not. Avoid splashing water on these components.
Package Contents
Please check the package for the following items:
- hygger Aquarium Programmable LED Light Unit (Model HG-957)
- Extendable Brackets (2 pieces)
- Power Adapter (DC15V output)
- Instruction Manual

Image: Illustration of the separable power adapter connection.
Product Features
- Four Lighting Modes: Default, DIY, Gradient, and All-day All-optical modes for versatile lighting control.
- Sunrise to Sunset Simulation: Default mode simulates natural light cycles.
- Customizable DIY Mode: Set 8 stages of brightness (10 levels) and time for personalized lighting.
- IP68 Waterproof Lamp Beads: Ensures durability and ease of cleaning.
- Separable Adapter: Allows for easy replacement without replacing the entire light unit.
- Power-off Memory Function: Retains settings after power interruption, with local time defaulting to 12 noon.
- Extendable Brackets: Adjustable length for various freshwater tank sizes (12-18 inches for this model).
- High Color Rendering Index (CRI): Up to 89%, close to natural light, protecting eyes and fish.
- Long Lifespan: High-quality 2835 + 5050 model lamp beads with a lifespan of at least 50,000 hours.
- LCD Display: Clear display for real-time local time and program timers.

Image: Visual representation of key features: eye protection, soft light, and IP68 waterproof rating.
Technical Specifications
| Specification | Detail |
|---|---|
| Model | HG-957 |
| Power | 20W |
| Application Tank Size | 12~18 inches |
| Light Size | 30 x 10 x 2.2 cm (11.8 x 3.9 x 0.87 inches) |
| Input Voltage | AC100-240V |
| Output Voltage | DC15V |
| LED Quantity | 40 PCS (20 White, 4 Blue, 4 Red, 2 Green, 10 RGB) |
| Color Rendering Index (CRI) | 89 |
| Lumens | 927 |
| Color Temperature | 6500-10000K |
| Power Cord Length | 4.9 ft |
| Material | Aluminum alloy, Plastic |

Image: Diagram detailing the light's model, input/output voltage, LED quantity, rendering index, lumens, color temperature, and power cord length.
Setup Guide
- Unpack: Carefully remove all components from the packaging.
- Attach Brackets: Slide the extendable brackets onto both ends of the light unit.
- Position Light: Place the light unit on top of your aquarium, adjusting the brackets to fit the tank's width. Ensure the light is stable and centered.
- Connect Power: Connect the power adapter to the light unit, then plug the adapter into a suitable power outlet. Ensure the connection is secure.
- Initial Power On: The light will power on. The LCD display will show the current time and default settings.

Image: Diagram showing the dimensions of the light's mounting brackets.
Operating Modes
The hygger Aquarium Programmable LED Light offers four distinct operating modes to suit various aquarium needs.
1. Default Mode
This mode simulates a natural sunrise to sunset cycle with a night effect. The brightness and time settings are pre-programmed and cannot be manually adjusted in this mode.
- Light Composition: All-optical + Blue light (color can change).
- Cycle: Brightness gradually increases from sunrise, peaks during daylight, and dims to a moonlight effect before turning off.
- Default Schedule: All-optical period: 06:30-18:30, Blue light period: 18:00-23:30.

Image: Illustration of the Default Mode's light curve, showing sunrise, daylight, sunset, and moonlight phases.
2. DIY Mode
This mode allows for complete customization of the lighting schedule, suitable for planted tanks or specific aesthetic preferences.
- Light Composition: L1-L6: All-optical; L7-L8: Blue.
- Customization: You can set 8 distinct time stages. For each stage, you can adjust the brightness (10 levels) and the start/end time.
- Note: If fewer than 8 stages are desired, set the brightness of the unused stages to 00.

Image: Explanation of DIY Mode, highlighting its suitability for planted aquariums and customization options.
3. Gradient Mode
This mode cycles through various colors, providing a dynamic visual effect. The brightness and time settings are fixed in this mode.
- Colors: Cycles through dark blue, green, purple, light blue, yellow, and red.
- Control: Brightness and time cannot be set manually.

Image: Examples of colors displayed in Cycle Mode (Red, Dark Blue, Green, Purple, Cyan, Yellow).
4. All-day All-optical Mode
This mode provides continuous full-spectrum lighting. While the color temperature of the RGB light can be fine-tuned, the brightness and time cannot be set.
- Light Type: All-optical.
- Adjustments: Fine-tune RGB color temperature.
- Limitations: Brightness and time are not adjustable.
LCD Display and Operation
The light features an LCD display and four function keys for easy programming and control.
- Function Keys: Mode Setting, Up, Down, Light Setting/Return Back.
- Main Screen: Displays real-time local time (selectable 12-hour/24-hour format).
- Small Screens: Two program timers for setting day and night start/end times in various modes.
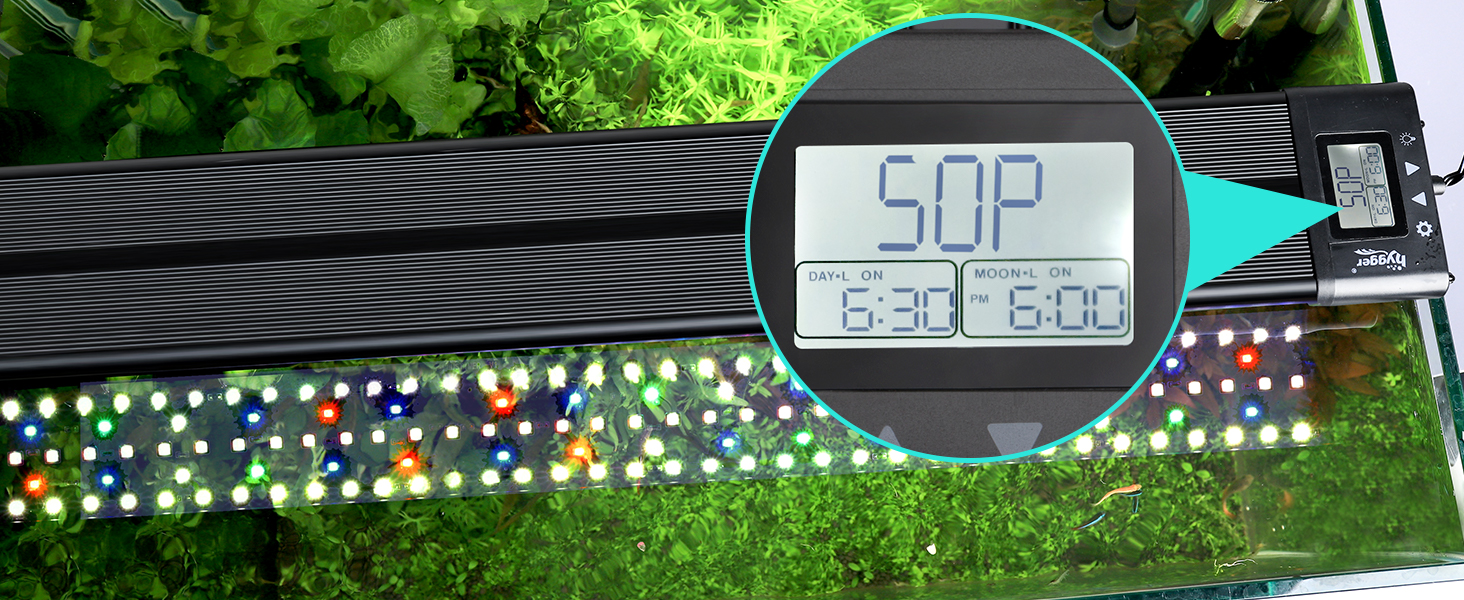
Image: Close-up view of the light's LCD display and control buttons, indicating local time and program timers.
Maintenance
- Cleaning: The lamp beads are IP68 waterproof, allowing for easy cleaning and wiping. Ensure the light is unplugged before cleaning. Use a soft, damp cloth to wipe the light unit. Do not submerge the entire unit or the control panel.
- Adapter Care: The separable adapter can be replaced if damaged, preventing the need to replace the entire light.
- Heat Dissipation: The aluminum alloy casing is designed for efficient heat dissipation. Ensure adequate airflow around the light to prevent overheating.
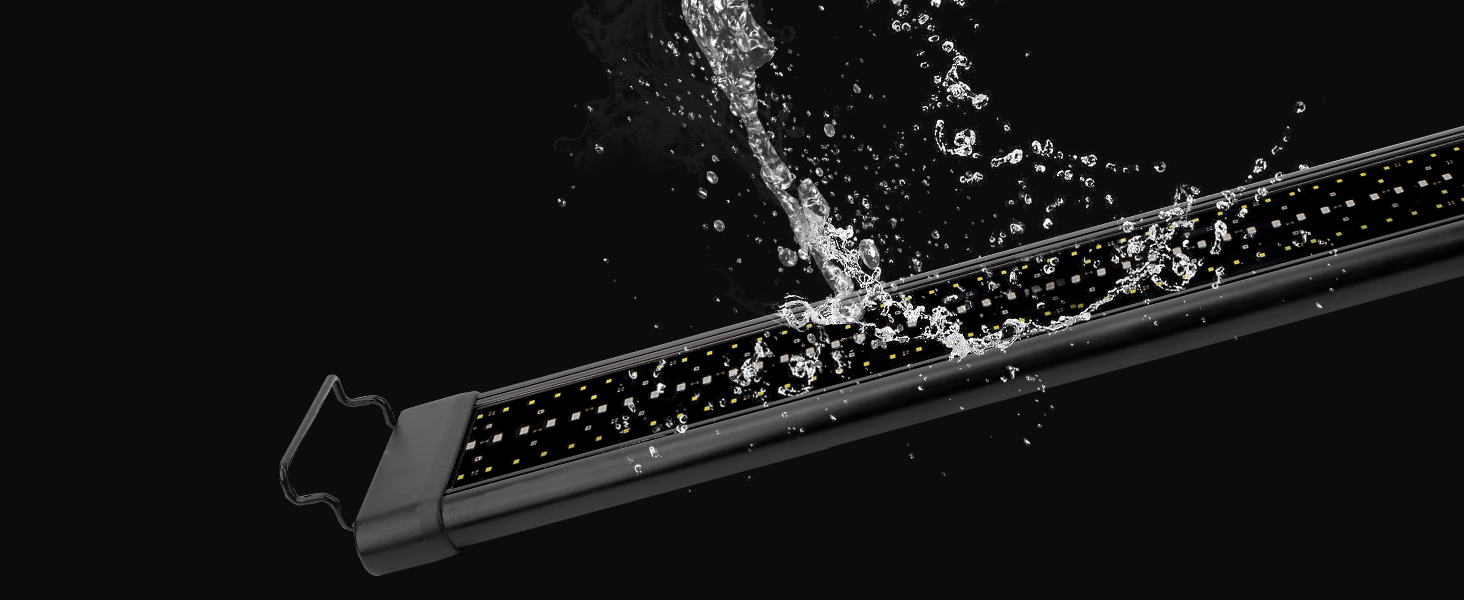
Image: Illustration demonstrating the waterproof capability of the light's lamp beads.
Troubleshooting
- Light Not Turning On: Check if the power adapter is securely connected to both the light unit and the power outlet. Verify the power outlet is functional.
- Incorrect Time Display: If the time resets or is incorrect after a power outage, manually reset the local time using the LCD display controls. The power-off memory function defaults the local time to 12 noon upon power restoration.
- Settings Not Saving: Ensure you are correctly saving your settings after making adjustments in DIY or other programmable modes. Refer to the LCD display operation section for detailed steps.
- Light Flickering: Check for loose connections. If flickering persists, contact customer support.
- Water Inside Control Panel: If water enters the control panel, immediately unplug the light and allow it to dry completely. Do not attempt to use it until fully dry. This component is not waterproof.
Warranty and Support
For warranty information or technical support, please refer to the product packaging or contact hygger customer service directly. Keep your purchase receipt as proof of purchase for any warranty claims.
You can visit the official hygger store for more information and support: hygger Official Store


