1. Introduction
This manual provides detailed instructions for the installation, operation, and maintenance of your MagLite G Headshell, Stylus, and Cartridge. This product is designed for use with compatible Sony turntable models including PSLX350H, PS11, PS11w, PS20f, and PS212. It features a mirror-finish gold-plated headshell, brass fittings, and a superior Blue M27BU Moving Magnet Cartridge with a diamond stylus. The oxygen-free copper (OFC) wires and gold-plated terminals ensure optimal sound transmission.
2. Product Components
The MagLite G Headshell, Stylus, and Cartridge assembly includes the following key components:
- Gold-plated headshell with brass fittings
- Blue M27BU Moving Magnet Cartridge
- Diamond stylus (pre-installed)
- Oxygen-free copper (OFC) connecting wires with gold-plated terminals

Figure 1: The complete MagLite G headshell and cartridge assembly, showing the black headshell, gold-plated brass screws, and the white cartridge body with a red stylus guard. The connecting wires are visible at the rear.
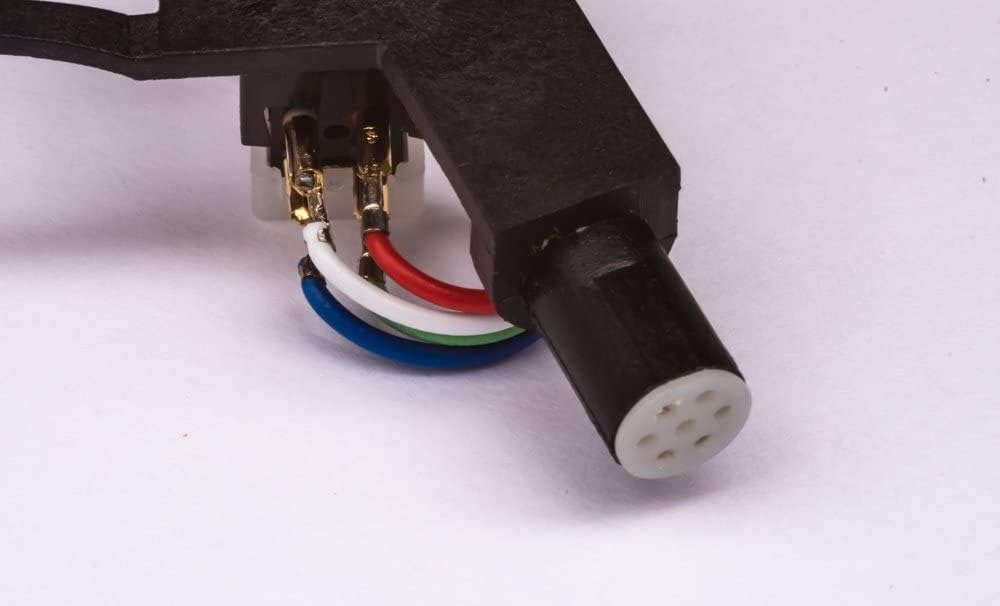
Figure 2: A close-up view of the cartridge's rear connections, illustrating the color-coded oxygen-free copper (OFC) wires (red, white, green, blue) connected to the gold-plated terminals, and the headshell's connection point.
3. Setup and Installation
Follow these steps to properly install your new headshell and cartridge onto your turntable's tonearm:
- Power Off: Ensure your turntable is powered off and unplugged from the mains electricity supply before beginning installation.
- Remove Old Headshell (if applicable): Carefully unscrew and remove the existing headshell from your turntable's tonearm. Store it safely if you intend to reuse it.
- Attach New Headshell: Gently screw the MagLite G headshell onto the tonearm. Rotate the locking collar clockwise until it is finger-tight. Do not overtighten.
- Connect Wires: The cartridge wires are color-coded. Connect them to the corresponding pins on the tonearm. The standard color code is:
- Red (R+): Right Channel Hot
- White (L+): Left Channel Hot
- Green (R-): Right Channel Ground
- Blue (L-): Left Channel Ground
- Balance Tonearm: Refer to your turntable's instruction manual for specific guidance on balancing the tonearm. This typically involves adjusting the counterweight until the tonearm floats level.
- Set Tracking Force: The recommended tracking force for this cartridge is 3.0g (with a range of 2.5g to 3.5g). Use a stylus force gauge (if available) or follow your turntable's instructions to set the tracking force accurately. Incorrect tracking force can cause damage to records and the stylus.
- Set Anti-Skate: Adjust the anti-skate setting on your tonearm according to your turntable's manual, typically matching the tracking force value.
4. Operating Instructions
Once installed and adjusted, your MagLite G headshell and cartridge are ready for use. Follow these general guidelines for playing records:
- Ensure records are clean and free of dust before playing.
- Use the tonearm lift mechanism to gently lower the stylus onto the record's lead-in groove. Avoid dropping the tonearm manually.
- When finished, use the tonearm lift to raise the stylus and return the tonearm to its rest.
- Always handle the tonearm and headshell with care to prevent damage to the stylus.
5. Maintenance
Proper maintenance will extend the life of your stylus and cartridge, ensuring optimal sound quality.
- Stylus Cleaning: Regularly clean the stylus using a soft stylus brush, brushing gently from back to front (in the direction of play). Do not brush side-to-side. Use a dedicated stylus cleaning fluid sparingly if necessary.
- Cartridge Body: Keep the cartridge body clean and free of dust. Use a soft, dry cloth.
- Stylus Replacement: The diamond stylus will wear over time, typically after 500-1000 hours of play, depending on record condition and tracking force. A worn stylus can damage records and degrade sound quality. Replace the stylus when signs of wear or degradation in sound are noticed. Replacement styli for the M27BU cartridge are available from audio retailers.
6. Troubleshooting
If you encounter issues, consider the following common problems and solutions:
- No Sound or Weak Sound:
- Check all wire connections between the cartridge, headshell, and tonearm. Ensure they are secure and correctly color-coded.
- Verify that the turntable is properly connected to your amplifier's phono input.
- Ensure the amplifier is set to the correct input.
- Distorted Sound or Skipping:
- Re-check the tracking force. It should be set to 3.0g.
- Verify the tonearm is properly balanced.
- Check the anti-skate setting.
- Inspect the stylus for dirt or damage. Clean or replace if necessary.
- Ensure records are clean and flat.
- Humming Noise:
- Ensure the turntable's ground wire is securely connected to your amplifier's ground terminal.
- Check for interference from other electronic devices.
7. Specifications
| Feature | Specification |
|---|---|
| Cartridge Type | Moving Magnet (M27BU) |
| Stylus Type | Diamond |
| Output Voltage (at 1kHz, 5 cm/sec) | 5.5 mV ± 3dB |
| Channel Balance (at 1kHz) | Below 1 dB |
| Channel Separation (at 1kHz) | More than 15 dB |
| Frequency Response | 20 ~ 20k Hz |
| Tracking Force | 3.0g (2.5 ~ 3.5g) |
| Headshell Material | Gold-plated with brass fittings |
| Wire Material | Oxygen-Free Copper (OFC) |
8. Warranty Information
Specific warranty details for this product are not provided in this manual. Please refer to the product packaging, the seller's website, or contact the manufacturer directly for information regarding warranty coverage and terms.
9. Support
For further assistance, technical support, or inquiries not covered in this manual, please contact the retailer from whom you purchased the product or the MagLite customer support team. Keep your purchase receipt and product details handy when seeking support.


