Introduction
This manual provides comprehensive instructions for the GROOVYPETS 1100 YD Remote Dog Training Shock Collar. This system is designed to assist in training dogs of various sizes (small, medium, large) by offering tone, vibration, and static stimulation. It also features an automatic anti-bark mode for effective bark control. The remote control allows for individual training of up to three dogs from a distance of 1100 yards.

Image: GROOVYPETS 1100 YD Remote Dog Training Shock Collar with Auto Anti Bark.
Package Contents
- Remote Dog Training Collar Controller/Transmitter with LCD display
- Small, lightweight, fully waterproof, and rechargeable training collar receiver(s) (2 for 2-Dog Set)
- Silicon rubber caps
- Two sets of metal prongs
- Adjustable collar straps
- Charging cable
- User Manual
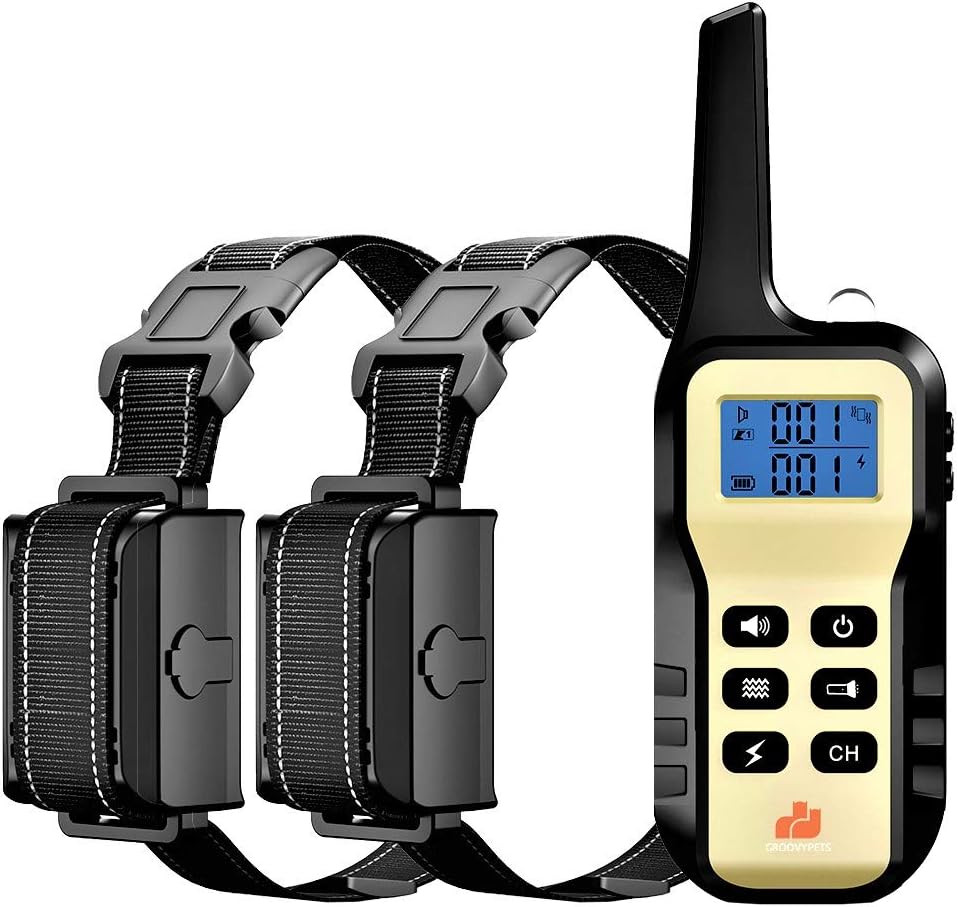
Image: Components of the GROOVYPETS 2-Dog Set.
Setup and Preparation
1. Charging the Devices
Before first use, fully charge both the remote transmitter and the receiver collar(s). The devices use Lithium Ion batteries. Connect the charging cable to the charging ports on both the remote and receiver, then plug into a suitable USB power source. An indicator light will show charging status and turn solid when fully charged.
2. Attaching Contact Points
Select the appropriate length of metal prongs based on your dog's coat thickness. For dogs with shorter coats, use the shorter prongs. For dogs with thicker coats, use the longer prongs to ensure proper contact with the skin. Optionally, attach the silicon rubber caps over the metal prongs to dampen static stimulation or for more gentle contact, especially during initial training or for sensitive dogs.
3. Fitting the Collar
Proper fit of the receiver collar is crucial for effective and humane operation. The collar should be snug enough to allow the contact points to touch the dog's skin, but not so tight as to cause discomfort or restrict breathing. You should be able to fit one or two fingers snugly between the collar strap and your dog's neck. The receiver should be positioned on the underside of the dog's neck, directly below the chin, for optimal contact.

Image: Proper collar fit on a dog.
4. Pairing the Remote and Receiver(s)
The devices typically come pre-paired. If re-pairing is needed or for adding additional receivers (up to 3 dogs), follow these steps:
- Ensure both the remote and receiver are powered off.
- Turn on the remote transmitter.
- Press and hold the power button on the receiver collar until the indicator light flashes rapidly.
- On the remote, select the desired channel (1, 2, or 3) using the 'CH' button.
- Press any stimulation button (Tone, Vibration, or Static) on the remote. The receiver light should become solid, indicating successful pairing.

Image: Training multiple dogs with one remote transmitter.
Operating the Training Collar
Remote Training Mode
The remote offers three correction modes: Tone, Vibration, and Static Stimulation. Each mode can be adjusted for intensity (Vibration and Static) from 1 to 100 levels. The large LCD display shows the selected level and battery status.
- Tone: Delivers an audible beep. Often used as a warning or positive reinforcement.
- Vibration: Provides a non-harmful vibration. Levels are adjustable.
- Static Stimulation: Delivers a humane static pulse. Levels are adjustable from 1 to 100. Start at the lowest level and increase gradually until your dog responds.
To activate a mode, press the corresponding button on the remote. The remote hibernates when not in use but wakes instantly with a button press, ensuring you can correct your dog without delay.
Video: Demonstrates the use of Tone, Vibration, and Static Stimulation modes for dog training.
Automatic Anti-Bark Mode
The receiver collar can be switched to an automatic anti-bark mode. In this mode, the collar will automatically deliver corrections (typically progressive tone, vibration, then static) when it detects excessive barking. This feature allows for bark control even when you are not actively using the remote.
To switch to automatic barking control mode, press the power button on the remote while the receiver is on. Refer to the remote's LCD display for confirmation of the mode change.
Humane Foolproof Safety-Lock Feature
For your dog's safety, the system is programmed to stop vibration or static stimulation if a button is pushed and held for more than 10 seconds. This prevents accidental over-stimulation and provides peace of mind whether your dog is in training or left alone with the collar on.

Image: Emphasizing the humane design and safety features.
Training Tips
This training collar is a tool to aid in behavior modification, not a substitute for proper training techniques and positive reinforcement. Always use the collar responsibly and humanely.
- Start Low: Begin with the lowest effective stimulation level for vibration and static. The goal is to get your dog's attention, not to cause pain.
- Consistency is Key: Use the collar consistently for specific behaviors you want to correct.
- Short Sessions: Keep training sessions short and positive.
- Positive Reinforcement: Always reward desired behaviors with praise, treats, or toys.
- Supervision: Never leave the collar on your dog unsupervised for extended periods.
- Avoid Over-Correction: Do not over-correct your dog. A single, well-timed correction is more effective than multiple, poorly timed ones.
- Not for Aggression: This collar is not intended for aggressive dogs. Consult a professional dog trainer or behaviorist for aggression issues.

Image: A dog wearing the training collar.
Maintenance
- Cleaning: Regularly clean the receiver collar and contact points with a damp cloth to prevent skin irritation. Ensure the collar is dry before charging.
- Battery Care: The devices use Lithium Ion batteries. Avoid leaving them on charge for extended periods after they are fully charged. Follow standard rechargeable battery care guidelines to prolong battery life.
- Waterproofing: The receiver collar is fully IPX7 waterproof/submersible. However, the remote is IPX5 water-resistant. Avoid prolonged submersion of the remote. Always ensure charging ports are sealed when not charging.
- Storage: Store the collar and remote in a cool, dry place when not in use.
- Inspection: Periodically inspect the collar for any signs of wear or damage. Replace worn parts as necessary.

Image: The collar's rugged and waterproof construction.
Troubleshooting
| Problem | Possible Cause | Solution |
|---|---|---|
| Collar not responding to remote. | Low battery on remote or receiver; not paired; out of range. | Charge both devices. Re-pair the remote and receiver. Ensure you are within the 1100-yard range. |
| Dog not responding to stimulation. | Collar too loose; contact points not touching skin; stimulation level too low. | Adjust collar fit. Ensure contact points are appropriate for coat length. Increase stimulation level gradually. |
| Collar activates without remote input (in remote mode). | Interference; accidental button press. | Move away from sources of strong electromagnetic interference. Ensure remote buttons are not accidentally pressed. |
| Auto Anti-Bark mode not working or over-correcting. | Collar not in Anti-Bark mode; sensitivity too low/high; external noises. | Confirm collar is in Anti-Bark mode. Adjust sensitivity settings if available (not explicitly stated but common). Ensure collar is not picking up other loud noises. |
| Skin irritation on dog's neck. | Collar too tight; worn for too long; improper contact point use. | Loosen collar slightly. Do not leave collar on for more than 12 hours a day. Clean contact points regularly. Use silicon caps if irritation persists. Consult a vet if severe. |
Specifications
- Brand: GROOVYPETS
- Model Number: GPT720
- Remote Range: Up to 1100 yards
- Stimulation Levels: 100 levels of Vibration and Static Stimulation
- Modes: Tone, Vibration, Static Stimulation, Automatic Anti-Bark
- Waterproof Rating (Receiver): IPX7 (fully submersible)
- Water Resistance (Remote): IPX5
- Battery Type: Lithium Ion (included)
- Standby Time: Up to 90 days (receiver)
- Target Audience: Dogs (Small, Medium, Large Breeds)
- Material: Plastic
- Color: Yellow, Black
- Item Weight: 12.7 ounces (total package)
- Item Dimensions (LxWxH): 7 x 6 x 2 inches (package)
Warranty and Support
GROOVYPETS stands behind the quality of its products. For warranty information, technical support, or any questions regarding the use and maintenance of your training collar, please refer to the contact information provided on the product packaging or the official GROOVYPETS website. Please retain your proof of purchase for warranty claims.