
1. Introduction
Thank you for choosing the BRAVE 30A 12V/24V LCD Solar Charge Controller. This device is designed to manage the power flow from your solar panel to your battery and load, ensuring efficient charging and discharge protection. It features an intuitive LCD display for monitoring and setting parameters, along with dual USB outputs for charging external devices. Please read this manual carefully before installation and operation to ensure optimal performance and safety.
2. Product Overview
The BRAVE CHARCON-30 is a high-performance solar charge controller with a 30A current capacity, automatically adapting to 12V or 24V battery systems. It incorporates advanced PWM charging technology and multiple protection features to extend battery life and ensure system stability.
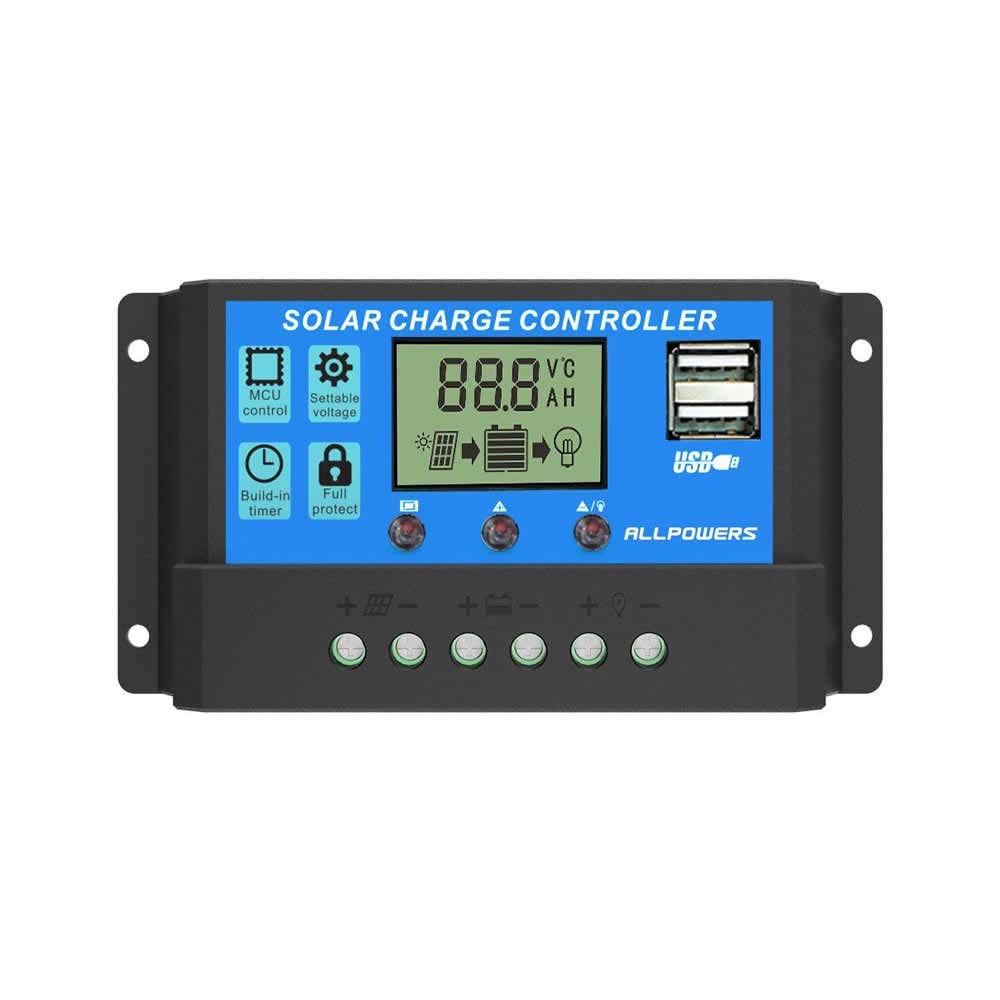
Figure 1: Front view of the BRAVE CHARCON-30 Solar Charge Controller, showing the LCD display, control buttons, and USB ports.
Key features include:
- Automatic identification of 12V/24V system voltage.
- Intuitive LCD graphic symbols for easy operation.
- Intelligent 3-stage PWM charging management.
- Dual USB 5V/2A output for charging mobile devices.
- Comprehensive protection against overcharge, over-discharge, overload, short circuit, and reverse polarity.
- Built-in timer for load control.
3. Safety Information
Please observe the following safety precautions during installation and operation:
- Ensure all connections are tight and correct to avoid loose connections that may cause excessive heat.
- Connect the battery to the controller FIRST, then the solar panel, and finally the load. Disconnect in reverse order.
- The controller is designed for indoor use. Avoid exposure to water, high humidity, or corrosive environments.
- Do not attempt to repair or modify the controller yourself. Refer to qualified personnel for service.
- Ensure adequate ventilation around the controller to prevent overheating.
4. Setup
Follow these steps to set up your solar charge controller:
4.1. Connection Order
It is crucial to connect the components in the correct order to prevent damage to the controller and other devices. Always connect the battery first, then the solar panel, and finally the load.

Figure 2: Connection diagram for the solar charge controller. Connect the battery first, then the solar panel, and finally the load.
4.2. Step-by-Step Installation
- Connect the Battery: Connect the positive and negative terminals of your battery to the corresponding battery terminals on the solar charge controller. Ensure a secure connection. The controller will automatically detect the battery voltage (12V or 24V).
Video 1: Demonstrates connecting the battery to the solar charge controller. This video shows the physical connection process and the controller powering on.
- Connect the Solar Panel: Connect the positive and negative terminals of your solar panel to the corresponding solar panel terminals on the controller. Ensure correct polarity.
- Connect the Load: Connect your DC load (e.g., LED lights, fan) to the load terminals on the controller. The controller will manage the power supply to the load based on your settings.

Figure 3: Examples of typical solar charge controller installations, showing connections to solar panels, batteries, and loads in different setups.
5. Operating Instructions
The controller features an LCD display and three buttons for operation: MENU, UP, and DOWN.
5.1. LCD Display Overview
The LCD displays various parameters of your solar system, including battery voltage, charging status, load status, and error codes.

Figure 4: Detailed view of the LCD display, illustrating different screens for main display, load voltage, working parameters, and reconnection voltage.
5.2. Navigating and Setting Parameters
- Browse Interface: Short press the MENU button to cycle through different display interfaces (e.g., main display, load voltage, working parameters).
- Enter Settings: From any interface, long press the MENU button for 3 seconds to enter the setting mode. The current parameter will start flashing.
- Adjust Parameters: Use the UP and DOWN buttons to adjust the flashing parameter value.
- Save Settings: Long press the MENU button again for 3 seconds to save the changes and exit the setting mode. If no operation is performed for 10 seconds, the controller will automatically save and exit.
Video 2: Demonstrates how to navigate the LCD display and adjust settings on the solar charge controller, including changing battery type and load control parameters.
5.3. USB Output
The controller features dual 5V/2A USB outputs for charging mobile phones, tablets, and other USB-powered devices. These ports are intelligently controlled to provide stable power.
6. Maintenance
Regular maintenance ensures the longevity and optimal performance of your solar charge controller:
- Cleaning: Periodically clean the controller's exterior with a dry cloth to remove dust and dirt. Do not use liquid cleaners.
- Connection Check: Annually inspect all wiring connections for tightness. Loose connections can cause resistance and heat buildup.
- Ventilation: Ensure the controller's ventilation openings are clear and not obstructed.
- Environmental Check: Verify that the installation environment remains within the specified operating temperature and humidity ranges.
7. Troubleshooting
If you encounter issues with your solar charge controller, refer to the following common problems and solutions:
| Problem | Possible Cause | Solution |
|---|---|---|
| No display on LCD | Battery not connected or low voltage. | Check battery connections and ensure battery voltage is above minimum operating level. |
| Battery not charging | Solar panel not connected, insufficient sunlight, or faulty panel/wiring. | Check solar panel connections, ensure adequate sunlight, and test panel voltage. |
| Load not working | Load disconnected, over-discharge protection active, or load current too high. | Check load connections, verify battery voltage, and ensure load current is within controller limits. |
| Error code displayed | Specific system fault (e.g., over-voltage, short circuit). | Refer to the controller's display for the specific error code and consult the full manual for detailed resolution steps. |
8. Specifications
| Feature | Value |
|---|---|
| Brand Name | BRAVE |
| Model | CHARCON-30 |
| Rated Current | 30A |
| System Voltage | 12V/24V Auto-adapt |
| Display Type | LCD |
| USB Output | Dual 5V/2A |
| Charging Type | PWM (3-stage) |
9. Warranty and Support
This BRAVE Solar Charge Controller comes with a standard manufacturer's warranty. For specific warranty terms, duration, and conditions, please refer to the product packaging or contact your retailer. If you require technical assistance, troubleshooting beyond this manual, or have questions about your product, please contact BRAVE customer support through the official website or your purchase channel.