1. Introduction
Thank you for choosing the HBN Digital Programmable Timer Socket. This device is designed to automate the switching of electrical appliances, helping you save energy and enhance convenience. It features an LCD display, 8 configurable ON/OFF programs, and a random function for security. Please read this manual carefully before use to ensure proper operation and safety.
2. Safety Instructions
- This timer socket is designed for indoor use only. Do not expose it to moisture, water, or extreme temperatures.
- Ensure the connected appliance's power consumption does not exceed the timer's maximum load capacity (16A / 3680W). Overloading can cause damage or fire.
- Do not disassemble or attempt to repair the device. Refer all servicing to qualified personnel.
- Keep out of reach of children.
- Always insert the plug fully into the socket.
- Unplug the timer from the wall socket before cleaning. Clean only with a dry, soft cloth.
3. Product Overview
Familiarize yourself with the components of your HBN Digital Programmable Timer Socket.

Figure 3.1: Front view of the timer socket, showing the LCD display, control buttons, and power outlet.

Figure 3.2: Back view of the timer socket, displaying the model number BND-50/SG3-VC and electrical ratings.
Control Buttons:

Figure 3.3: Detailed view of the control buttons and LCD display.
- CLOCK: Used to set the current time and exit programming mode.
- PROG: Enters and cycles through the 8 ON/OFF programming settings.
- R (Random): Activates or deactivates the random switching function.
- RESET: Clears all settings and resets the timer to factory defaults.
- WEEK: Selects the day(s) of the week for time and program settings.
- HOUR: Adjusts the hour for time and program settings.
- MIN: Adjusts the minute for time and program settings.
- ON/AUTO/OFF: Manually switches the timer to ON, AUTO (programmed mode), or OFF.
LCD Display:
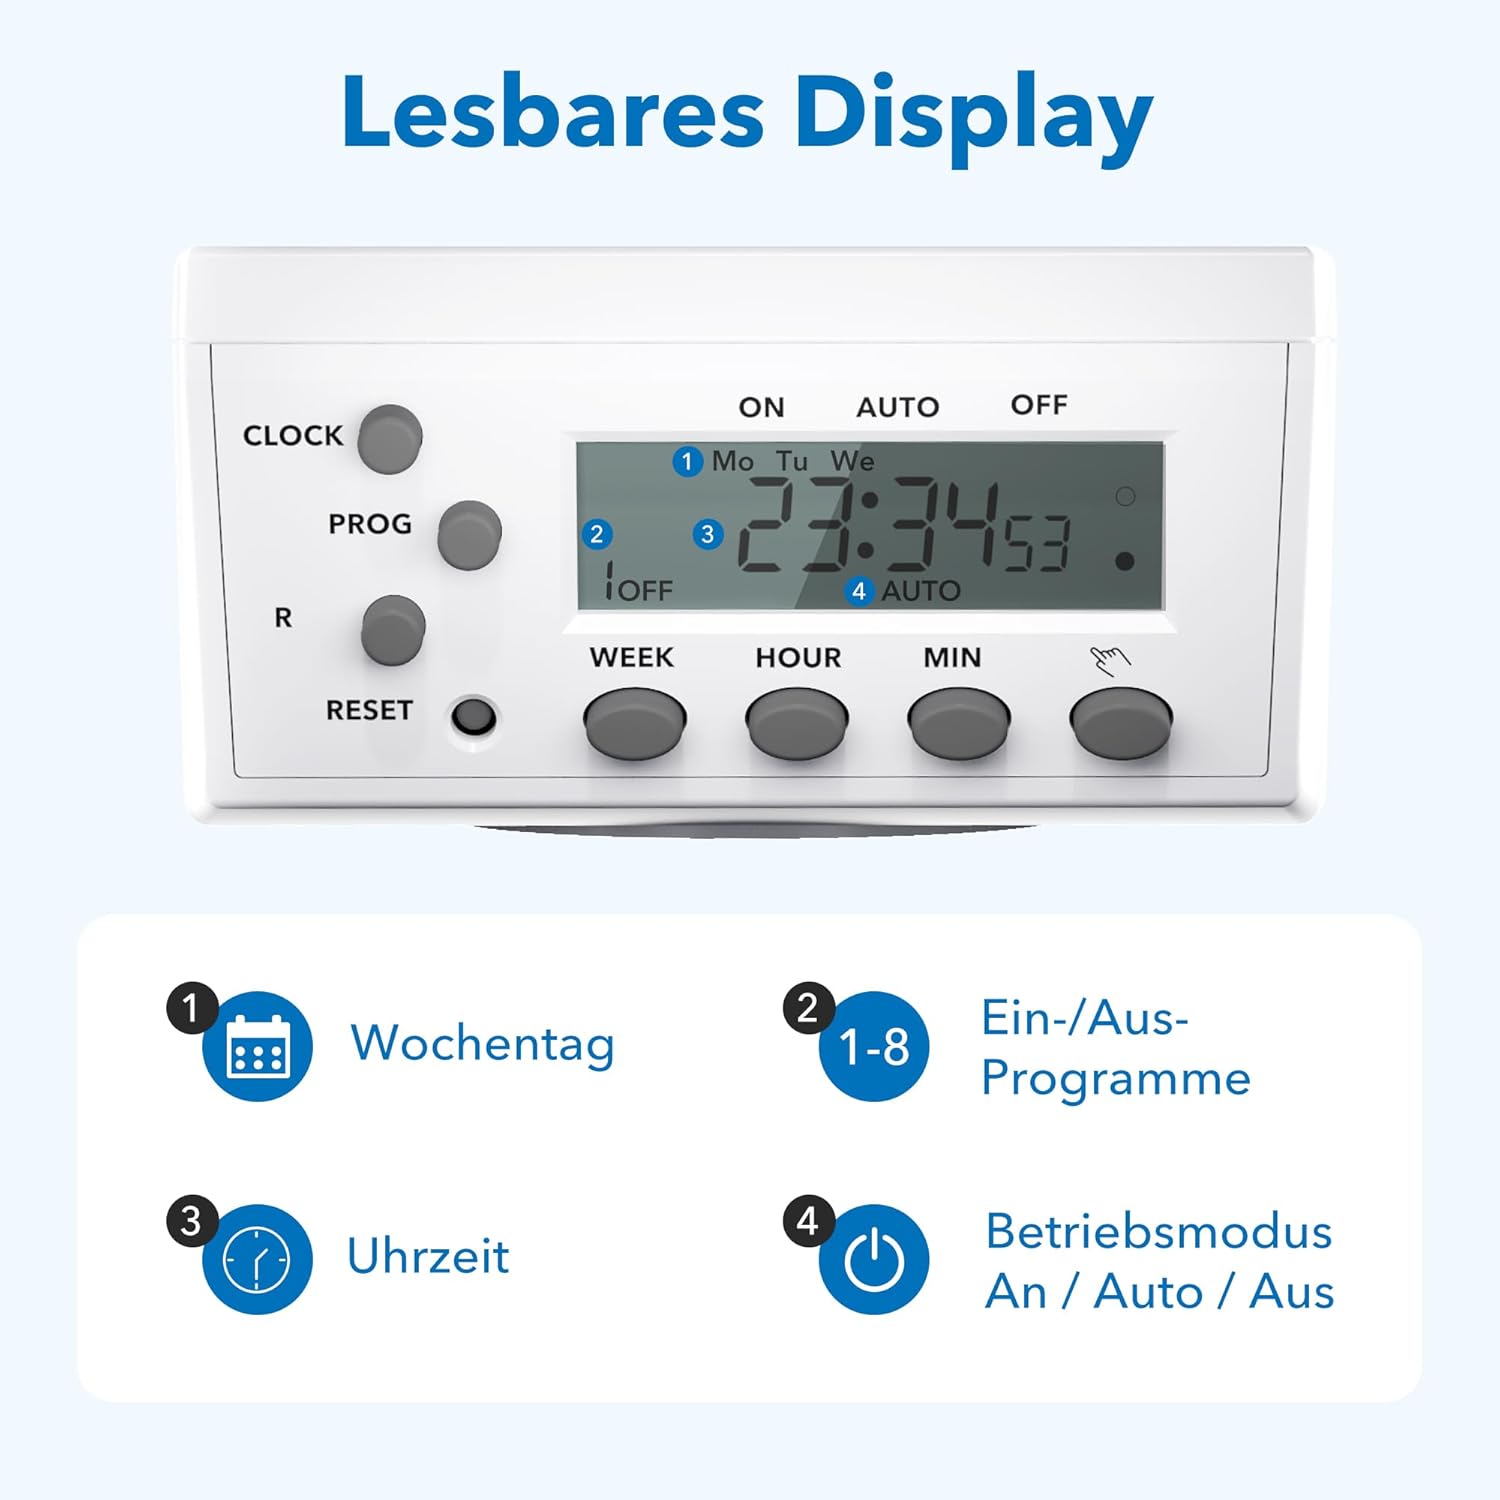
Figure 3.4: The LCD display shows current time, day, program status, and operating mode.
The LCD display provides clear information on the current time, day of the week, active program number, and the current operating mode (ON, AUTO, OFF).
4. Setup
4.1 Initial Charging and Reset
- Plug the timer socket into a live wall outlet for at least 15-30 minutes to charge its internal battery. This battery retains settings during power outages.
- After charging, use a pointed object (like a pen tip) to press the RESET button. This clears all previous settings and ensures a fresh start. The display will show '0:00'.
4.2 Setting the Current Time
- Press and hold the CLOCK button.
- While holding CLOCK, press the WEEK button repeatedly to select the current day of the week (Mo, Tu, We, Th, Fr, Sa, Su).
- While holding CLOCK, press the HOUR button repeatedly to set the current hour.
- While holding CLOCK, press the MIN button repeatedly to set the current minute.
- Release the CLOCK button. The current time is now set.
5. Operating Instructions
5.1 Programming ON/OFF Times
The timer allows for up to 8 distinct ON/OFF programs. Each program consists of an ON time and an OFF time.
- Press the PROG button once. The display will show '1 ON'.
- Press WEEK to select the desired day(s) for this program. Options include individual days, weekdays, weekends, or all days.
- Press HOUR to set the desired ON hour.
- Press MIN to set the desired ON minute.
- Press PROG again. The display will show '1 OFF'.
- Repeat steps 2-4 to set the desired OFF time for program 1.
- Press PROG again to move to '2 ON' and repeat the process for subsequent programs (up to 8).
- After setting all desired programs, press the CLOCK button to exit programming mode and return to the current time display.
5.2 Manual Override (ON/AUTO/OFF)
Press the ON/AUTO/OFF button to cycle through the operating modes:
- ON: The connected appliance is continuously ON, overriding all programs.
- AUTO: The timer operates according to the programmed ON/OFF times. This is the standard operating mode for automated control.
- OFF: The connected appliance is continuously OFF, overriding all programs.
5.3 Random Function
The random function provides a security feature by switching the connected appliance ON and OFF at irregular intervals (2 to 30 minutes delay) around the programmed times. This can simulate presence when you are away.
- To activate, press the R button. An 'R' indicator will appear on the display.
- To deactivate, press the R button again. The 'R' indicator will disappear.

Figure 5.1: Examples of versatile applications for the timer socket.
6. Maintenance
- Ensure the timer is unplugged from the power outlet before cleaning.
- Wipe the exterior with a soft, dry cloth. Do not use liquid cleaners or abrasive materials.
- Store the timer in a cool, dry place when not in use.
7. Troubleshooting
- Display is blank: Ensure the timer is plugged into a live outlet. If it has been unplugged for an extended period, the internal battery may be depleted. Plug it in for 15-30 minutes to recharge.
- Appliance does not switch ON/OFF as programmed:
- Check if the timer is in AUTO mode. If it's in ON or OFF mode, programs are overridden.
- Verify that the programmed ON/OFF times and days are correct.
- Ensure the current time is set accurately.
- Confirm the appliance itself is working and properly connected to the timer.
- Programs are lost after a power outage: The internal battery may not be fully charged or is at the end of its life. Ensure the timer is regularly plugged in to maintain battery charge.
- Timer is unresponsive: Press the RESET button with a pointed object to clear all settings and restart the device. Then, reprogram the time and desired schedules.
8. Specifications

Figure 8.1: Technical data and dimensions of the timer socket.
| Specification | Value |
|---|---|
| Model Number | BND-50/SG3-VC |
| Rated Voltage | 230 V |
| Rated Current | 16 A |
| Maximum Load | 3680 W |
| Minimum Switching Time | 1 Minute |
| Number of Programs | 8 ON/OFF Programs |
| Product Dimensions | 7.5 x 7.5 x 8 cm |
| Item Weight | 150 Grams |
| Material | Kunststoff (Plastic) |
| Color | White |
| Manufacturer | Ergo I&E CO.,LTD |
9. Warranty and Support
HBN products are manufactured to high-quality standards. For warranty information or technical support, please refer to the documentation provided with your purchase or contact your retailer. Keep your proof of purchase for warranty claims.


