
1. Product Overview
The ZOTAC MAGNUS EN51660T is a compact Mini Creator PC designed for demanding creative workloads and gaming. This barebones system requires the user to install an operating system, memory, and storage components to become fully functional. It features a 9th Gen Intel Core i5-9300H processor and NVIDIA GeForce GTX 1660 Ti graphics, offering robust performance in a small form factor.
Key Features:
- NVIDIA GeForce GTX 1660 Ti with 6GB GDDR6 memory.
- Intel Core i5-9300H quad-core processor (2.4 GHz, up to 4.1 GHz).
- Support for 4K resolution at 60 Hz and quad-display output.
- Connectivity includes 2x HDMI 2.0, DisplayPort 1.4, USB Type-C, 2x USB 3.1 (1x Type-C), and 4x USB 3.0 ports.
- Advanced networking with Wi-Fi 6 (Killer AX1650), Bluetooth 5, Gigabit LAN, and 2.5Gbps Killer Ethernet.
- Barebones system, allowing user customization of OS, RAM, and storage.

Figure 1: ZOTAC MAGNUS EN51660T Mini Creator PC and its retail packaging. The image displays the compact PC unit alongside its yellow and black box, highlighting its "Mini Creator PC" designation and "Barebone" nature, indicating user-installable memory and storage.
2. Package Contents
Verify that all items are present in the package before proceeding with the setup.
- ZOTAC ZBOX MAGNUS EN51660T Mini PC
- AC Adapter
- Power Cord (type may vary by region)
- 2 x Wi-Fi Antennas
- USB Flash Drive with O/S Driver (or Driver Disk)
- User Manual and Quick Install Guide

Figure 2: All items included in the ZOTAC MAGNUS EN51660T Mini PC package. This includes the main unit, two Wi-Fi antennas, a support DVD or USB flash drive, a power adapter, a power cable, a quick start guide, and the user manual.
3. Setup and Component Installation
As a barebones system, the ZOTAC MAGNUS EN51660T requires the installation of RAM, storage (M.2 SSD, 2.5-inch HDD/SSD), and an operating system before first use. Always ensure the device is powered off and unplugged before opening the chassis or installing components.
3.1 Installing Memory (RAM)
- Locate the SODIMM slots inside the chassis. The system supports up to 32GB DDR4 2666/2400 SODIMM memory.
- Align the notch on the SODIMM module with the notch in the slot.
- Insert the module at a 45-degree angle and gently push down until the retaining clips on both sides snap into place.
3.2 Installing Storage
The system supports M.2 SSD (PCIe x4 / SATA III), a 2.5-inch SATA 6.0 Gbps HDD/SSD, and Intel Optane memory.
3.2.1 M.2 SSD Installation
- Locate the M.2 slot (2242/2280) on the motherboard.
- Insert the M.2 SSD into the slot at an angle.
- Gently push down the SSD and secure it with the provided screw.
3.2.2 2.5-inch HDD/SSD Installation
- Locate the 2.5-inch drive bay.
- Mount the 2.5-inch drive into the bay using the provided screws.
- Connect the SATA data and power cables from the motherboard to the drive.
3.3 Connecting Peripherals
After installing internal components and closing the chassis, connect external devices.
- Display: Connect your monitor(s) to the HDMI, DisplayPort, or USB Type-C outputs. The system supports up to four displays.
- Keyboard and Mouse: Connect USB keyboard and mouse to any available USB 3.0 or USB 3.1 ports.
- Network: For wired internet, connect an Ethernet cable to one of the LAN ports. For wireless, attach the two Wi-Fi antennas to the connectors on the rear panel.
- Power: Connect the AC adapter to the DC IN port on the rear panel, then plug the power cord into an electrical outlet.

Figure 3: Rear panel of the ZOTAC MAGNUS EN51660T Mini PC, illustrating the various connectivity options including DC IN, Ethernet ports, USB 3.0 ports, DisplayPort, HDMI ports, USB Type-C, and Wi-Fi antenna connectors.
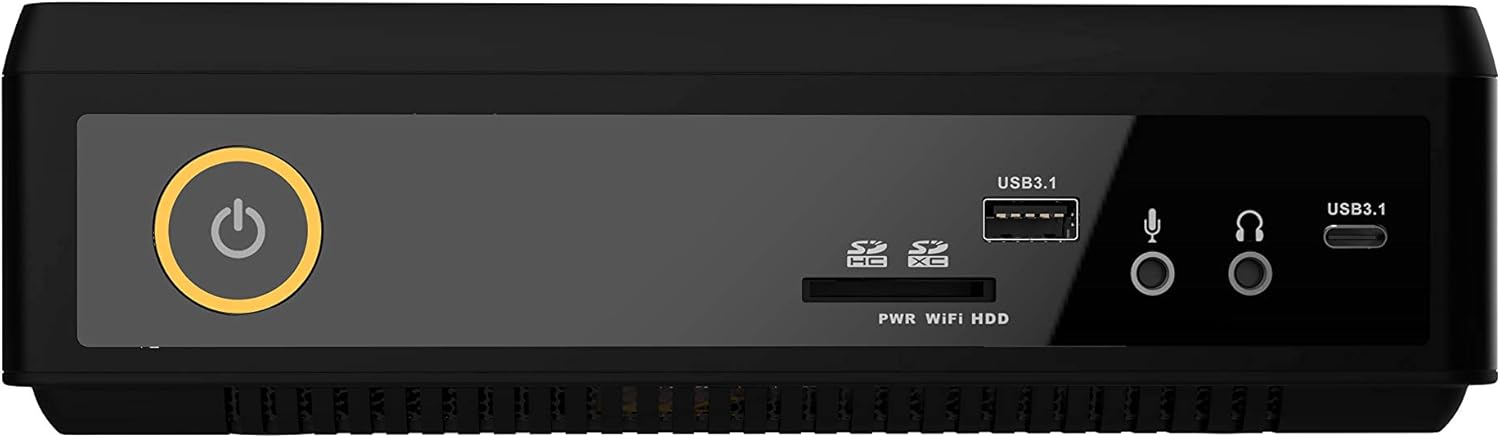
Figure 4: Front panel of the ZOTAC MAGNUS EN51660T Mini PC, displaying the power button, 3-in-1 card reader, microphone input, USB 3.1 port, USB 3.1 Type-C port, and LED indicators for power, Wi-Fi, and hard drive activity.
3.4 Operating System Installation
Since this is a barebones system, an operating system (e.g., Microsoft Windows 10 64-bit) must be installed. Refer to your chosen operating system's installation guide for detailed steps. You may use the provided USB flash drive or driver disk to install necessary drivers after the OS installation.
4. Operating Instructions
4.1 Powering On/Off
- Power On: Press the power button located on the front panel. The power LED will illuminate.
- Power Off: For normal shutdown, use the operating system's shutdown function. To force power off, press and hold the power button for approximately 5 seconds.
4.2 Using USB Ports
The system features multiple USB 3.0 and USB 3.1 (including Type-C) ports for connecting various peripherals such as external hard drives, USB flash drives, printers, and other USB-compatible devices.
4.3 Using the Card Reader
Insert compatible SD, SDHC, or SDXC memory cards into the 3-in-1 card reader on the front panel to access data from memory cards.
5. Maintenance
Proper maintenance ensures the longevity and optimal performance of your Mini PC.
5.1 Cleaning
- Always power off and unplug the device before cleaning.
- Use a soft, dry cloth to wipe the exterior surfaces.
- For dust accumulation in vents, use compressed air. Do not insert objects into the vents.
- Avoid using liquid cleaners or abrasive materials.
5.2 Environmental Considerations
- Operate the device in a well-ventilated area to prevent overheating.
- Keep the device away from direct sunlight, heat sources, and excessive moisture.
- Ensure proper airflow around the unit.
6. Troubleshooting
This section provides solutions to common issues you might encounter.
6.1 No Power
- Ensure the power adapter is securely connected to the device and the electrical outlet.
- Verify the electrical outlet is functional by plugging in another device.
- Check the power cord for any damage.
6.2 No Display Output
- Confirm that the monitor is powered on and the video cable (HDMI, DisplayPort, or USB-C) is securely connected to both the Mini PC and the monitor.
- Try a different video cable or port on the Mini PC.
- Ensure the monitor's input source is correctly selected.
- If you recently installed RAM or storage, ensure they are properly seated.
6.3 System Not Booting After Component Installation
- Double-check that RAM modules are correctly seated in their slots.
- Verify that the M.2 SSD or 2.5-inch HDD/SSD is properly installed and connected.
- Ensure the operating system installation media (USB drive) is properly prepared and connected.
6.4 Wi-Fi or Ethernet Connectivity Issues
- Wi-Fi: Ensure the Wi-Fi antennas are securely attached to the rear panel. Check if Wi-Fi is enabled in the operating system.
- Ethernet: Verify the Ethernet cable is securely connected to both the Mini PC and the router/modem. Check network settings in the operating system.
- Install or update network drivers using the provided driver disk/USB or by downloading from the manufacturer's website.
7. Technical Specifications
| Component | Specification |
|---|---|
| Model | ZBOX-EN51660T-U |
| Processor | Intel Core i5-9300H (Quad-core, 2.4 GHz, up to 4.1 GHz) |
| Graphics | NVIDIA GeForce GTX 1660 Ti (6GB GDDR6) |
| Memory | 2 x DDR4 2666/2400 SODIMM slots (up to 32GB) |
| Storage | M.2 SSD PCIE x4 / SATA III slot (2242/2280), 2.5-inch SATA 6.0 Gbps HDD/SSD bay, Intel Optane memory slot (2242/2280) |
| Display Outputs | 2 x HDMI 2.0b (3840x2160 @ 60Hz), DisplayPort 1.4 (4096x2160 @ 60Hz), USB Type-C |
| USB Ports | 1 x USB 3.1, 1 x USB 3.1 Type-C (front), 4 x USB 3.0 (rear) |
| Networking | 1 x 10/100/1000 Ethernet, 1 x Killer 2.5Gbps Ethernet, Killer Wi-Fi 6 (AX1650), Bluetooth 5 |
| Audio Outputs | Onboard 8 Channel Digital Audio via HDMI, Analog stereo output (front) |
| Card Reader | 3-in-1 (SD/SDHC/SDXC) |
| Operating System | No OS (User-installable) |
| Dimensions (L x W x H) | 210mm x 203mm x 62.2mm (8.27in x 7.99in x 2.45in) |
8. Warranty and Support
For detailed warranty information, please refer to the warranty card included with your product or visit the official ZOTAC website. Technical support is available through the manufacturer's support channels.
- Online Support: Visit the ZOTAC support website for FAQs, driver downloads, and contact information.
- Driver Updates: Regularly check the ZOTAC website for the latest drivers and firmware updates to ensure optimal performance and compatibility.