
1. Introduction
This manual provides essential information for the safe and efficient operation, installation, and maintenance of your Speed Queen TR5003WN 26-inch Top Load Washer. Please read this manual thoroughly before using the appliance and retain it for future reference.

Image 1.1: Front view of the Speed Queen TR5003WN 26-inch Top Load Washer. This white top-load washing machine features a control panel at the rear top with three large knobs and several indicator lights.
2. Safety Information
Always follow basic safety precautions when using this appliance to reduce the risk of fire, electric shock, or injury to persons.
- Read all instructions before using the appliance.
- Do not wash articles that have been previously cleaned in, washed in, soaked in, or spotted with gasoline, dry-cleaning solvents, or other flammable or explosive substances as they emit vapors that could ignite or explode.
- Do not allow children to play on or in the appliance. Close supervision of children is necessary when the appliance is used near children.
- Do not reach into the appliance if the tub or agitator is moving.
- Do not install or store this appliance where it will be exposed to the weather.
- Do not tamper with controls.
- Do not repair or replace any part of the appliance or attempt any servicing unless specifically recommended in this manual or in published user-repair instructions that you understand and have the skills to carry out.
- Always disconnect the appliance from the power supply before attempting any service or cleaning.
3. Product Overview
Key Features
- 3.2 cu. ft. Capacity
- 840 RPM Max Spin Speed
- Knob Control Console
- Durable Stainless Steel Tub
- Perfect Wash System
- Solid Mount Suspension System
- Advanced Cleaning Performance
- Durable Design
Control Panel
The control panel features three main knobs for Wash Temperature, Load Size, and Cycle Selection, along with a Start/Pause button and status indicators.
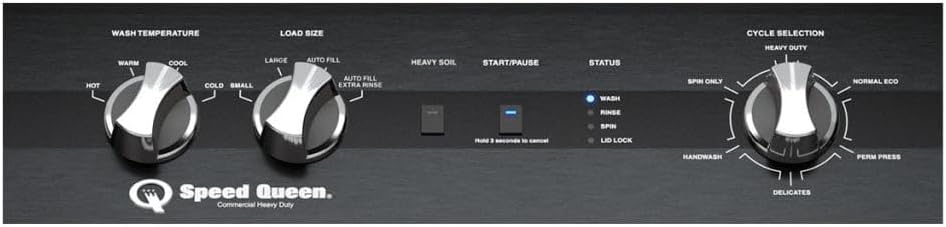
Image 3.1: Detailed view of the control panel. From left to right, the panel shows knobs for Wash Temperature (Cold, Cool, Warm, Hot), Options (Extra Rinse, Pre-Soak, Heavy Soil), Load Size (Small, Large, Auto Fill, Auto Fill Extra Rinse), Start/Pause button, Status indicators (Soak, Wash, Rinse, Spin, Lid Lock), and Cycle Selection (Spin Only, Delicate, Handwash, Normal Eco, Perm Press, Heavy Duty, Bulky/Sheet).
4. Setup and Installation
Proper installation is crucial for the performance and longevity of your washer. It is recommended to have the appliance installed by a qualified technician.
Location Requirements
- Ensure the installation area has a solid, level floor.
- Provide adequate space for water supply hoses, drain hose, and power cord.
- The washer should be placed in an area where the temperature will not fall below freezing.
Dimensions and Weight
Consider the following dimensions and weight for proper placement and installation:
- Width: 25.62 inches
- Height: 42.75 inches
- Depth: 28 inches
- Item Weight: 196 pounds
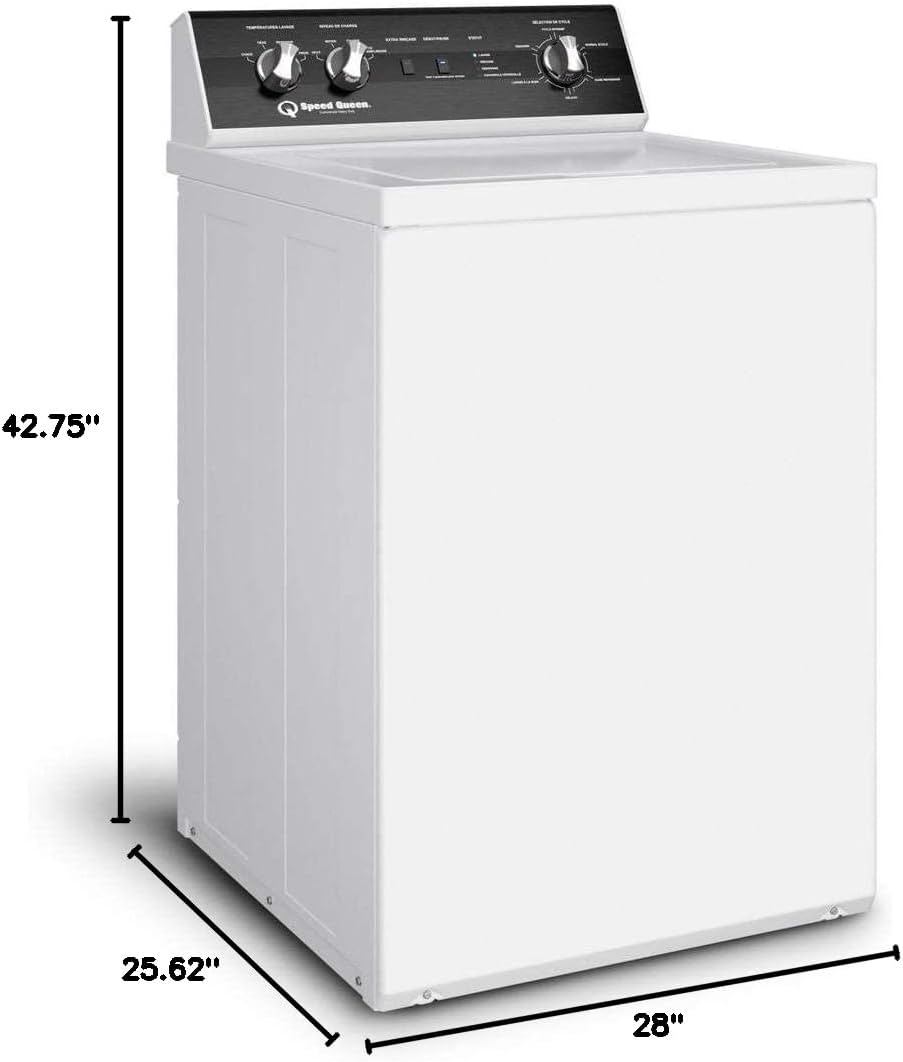
Image 4.1: Dimensional drawing of the Speed Queen TR5003WN washer, indicating a height of 42.75 inches, width of 25.62 inches, and depth of 28 inches.
Connections
- Connect to a 120 Volt electrical outlet.
- Ensure proper hot and cold water supply connections.
- Secure the drain hose to prevent leaks.
5. Operating Instructions
Follow these steps for effective use of your Speed Queen TR5003WN washer.
Loading the Washer
- Sort laundry by fabric type, color, and soil level.
- Load items loosely into the tub, distributing them evenly around the agitator. Do not overload.
- Add detergent and any other laundry additives according to product instructions.
Selecting Wash Settings
- Wash Temperature: Turn the left knob to select the desired water temperature (Cold, Cool, Warm, Hot) based on your fabric care labels.
- Options: The middle knob allows selection of additional options such as Extra Rinse, Pre-Soak, or Heavy Soil for enhanced cleaning.
- Load Size: Turn the second knob from the left to select the appropriate load size (Small, Large, Auto Fill). The 'Auto Fill Extra Rinse' option is also available for larger loads requiring an additional rinse.
- Cycle Selection: Turn the right knob to choose your wash cycle (e.g., Spin Only, Delicate, Handwash, Normal Eco, Perm Press, Heavy Duty, Bulky/Sheet).
Starting and Pausing a Cycle
- Press the Start/Pause button to begin the selected wash cycle.
- To pause the cycle, press the Start/Pause button again. The lid will unlock after a brief delay.
- To cancel a cycle, hold the Start/Pause button for 3 seconds.
Status Indicators
The status lights on the control panel indicate the current phase of the wash cycle: Soak, Wash, Rinse, Spin, and Lid Lock.
6. Maintenance
Regular maintenance helps ensure optimal performance and extends the life of your washer.
- Cleaning the Exterior: Wipe down the exterior with a soft, damp cloth and mild detergent.
- Cleaning the Tub: Periodically run a cleaning cycle with a washer cleaner or a mixture of vinegar and baking soda to remove residue and odors.
- Water Inlet Hoses: Inspect water inlet hoses for cracks or leaks every few months and replace them if necessary.
- Lint Filter: If your model has a removable lint filter, clean it after every few loads.
- Winterizing: If the washer is to be stored in an unheated area, follow the winterizing instructions in the full product manual to prevent damage from freezing.
7. Troubleshooting
Before contacting service, refer to the following common issues and solutions:
| Problem | Possible Cause | Solution |
|---|---|---|
| Washer does not start | Power cord unplugged; circuit breaker tripped; lid not closed properly. | Check power connection; reset breaker; ensure lid is fully closed and latched. |
| Washer not filling with water | Water supply turned off; inlet hoses kinked; water pressure too low. | Turn on water supply; straighten hoses; check household water pressure. |
| Excessive vibration or noise | Washer not level; load unbalanced; shipping bolts not removed. | Adjust leveling feet; redistribute laundry; ensure all shipping bolts are removed. |
| Lid will not unlock | Cycle in progress; safety lock engaged. | Wait for cycle to complete; press and hold Start/Pause for 3 seconds to cancel. |
8. Specifications
| Specification | Value |
|---|---|
| Brand | Speed Queen |
| Model Number | TR5003WN |
| Capacity | 3.2 Cubic Feet |
| Max Spin Speed | 840 RPM |
| Dimensions (D x W x H) | 28" x 25.62" x 42.75" |
| Item Weight | 196 Pounds |
| Installation Type | Freestanding |
| Control Console | Knob |
| Access Location | Top Load |
| Voltage | 120 Volts |
| Material (Tub) | Stainless Steel |
| Color | White |
9. Warranty and Support
Warranty Information
The Speed Queen TR5003WN Top Load Washer comes with a 3 Year Parts and Labor Warranty. Please refer to your warranty card or the official Speed Queen website for full terms and conditions.
Customer Support
For technical assistance, service requests, or to order replacement parts, please contact Speed Queen customer support. Contact information can typically be found on the manufacturer's website or in the documentation included with your appliance.


