Important Safety Instructions
Before beginning any installation or maintenance, always disconnect power to the refrigerator. Failure to do so can result in electrical shock, injury, or death. Wear appropriate personal protective equipment, such as gloves, to prevent injury. If you are unsure about any step, consult a qualified technician.
- Ensure the refrigerator is unplugged from the electrical outlet.
- Turn off the water supply to the refrigerator.
- Handle all components with care to avoid damage.
- Keep small parts away from children.
Package Contents
Verify that all components are present before starting the installation. The package should include the following:
- 1x 4317943 Refrigerator Ice Maker Assembly
- Various wiring harnesses/adapters
- Mounting bracket(s) and screws

Image: Complete package contents including the ice maker, wiring harnesses, and mounting hardware.
Installation Instructions
This replacement ice maker is compatible with Whirlpool ED5FTGXKT01 and W10190952 icemakers. Installation typically involves removing the old unit and installing the new one. Specific steps may vary slightly depending on your refrigerator model. Refer to your refrigerator's original service manual for detailed removal instructions if needed.
Step 1: Prepare the Refrigerator
- Disconnect Power: Unplug the refrigerator from the wall outlet.
- Turn Off Water Supply: Locate and turn off the water supply valve to the refrigerator.
- Access Ice Maker: Open the freezer door and remove the ice bucket. Locate the existing ice maker unit.
Step 2: Remove the Old Ice Maker
- Disconnect Wiring: Carefully disconnect the electrical wiring harness from the old ice maker. There may be a locking tab that needs to be pressed.
- Remove Mounting Screws: Unscrew the mounting screws that secure the ice maker to the freezer wall. Keep these screws if they are in good condition, or use new ones provided with the kit.
- Detach Water Line: If a water fill tube is directly connected to the ice maker, carefully detach it.
- Remove Unit: Gently pull the old ice maker unit out of the freezer compartment.
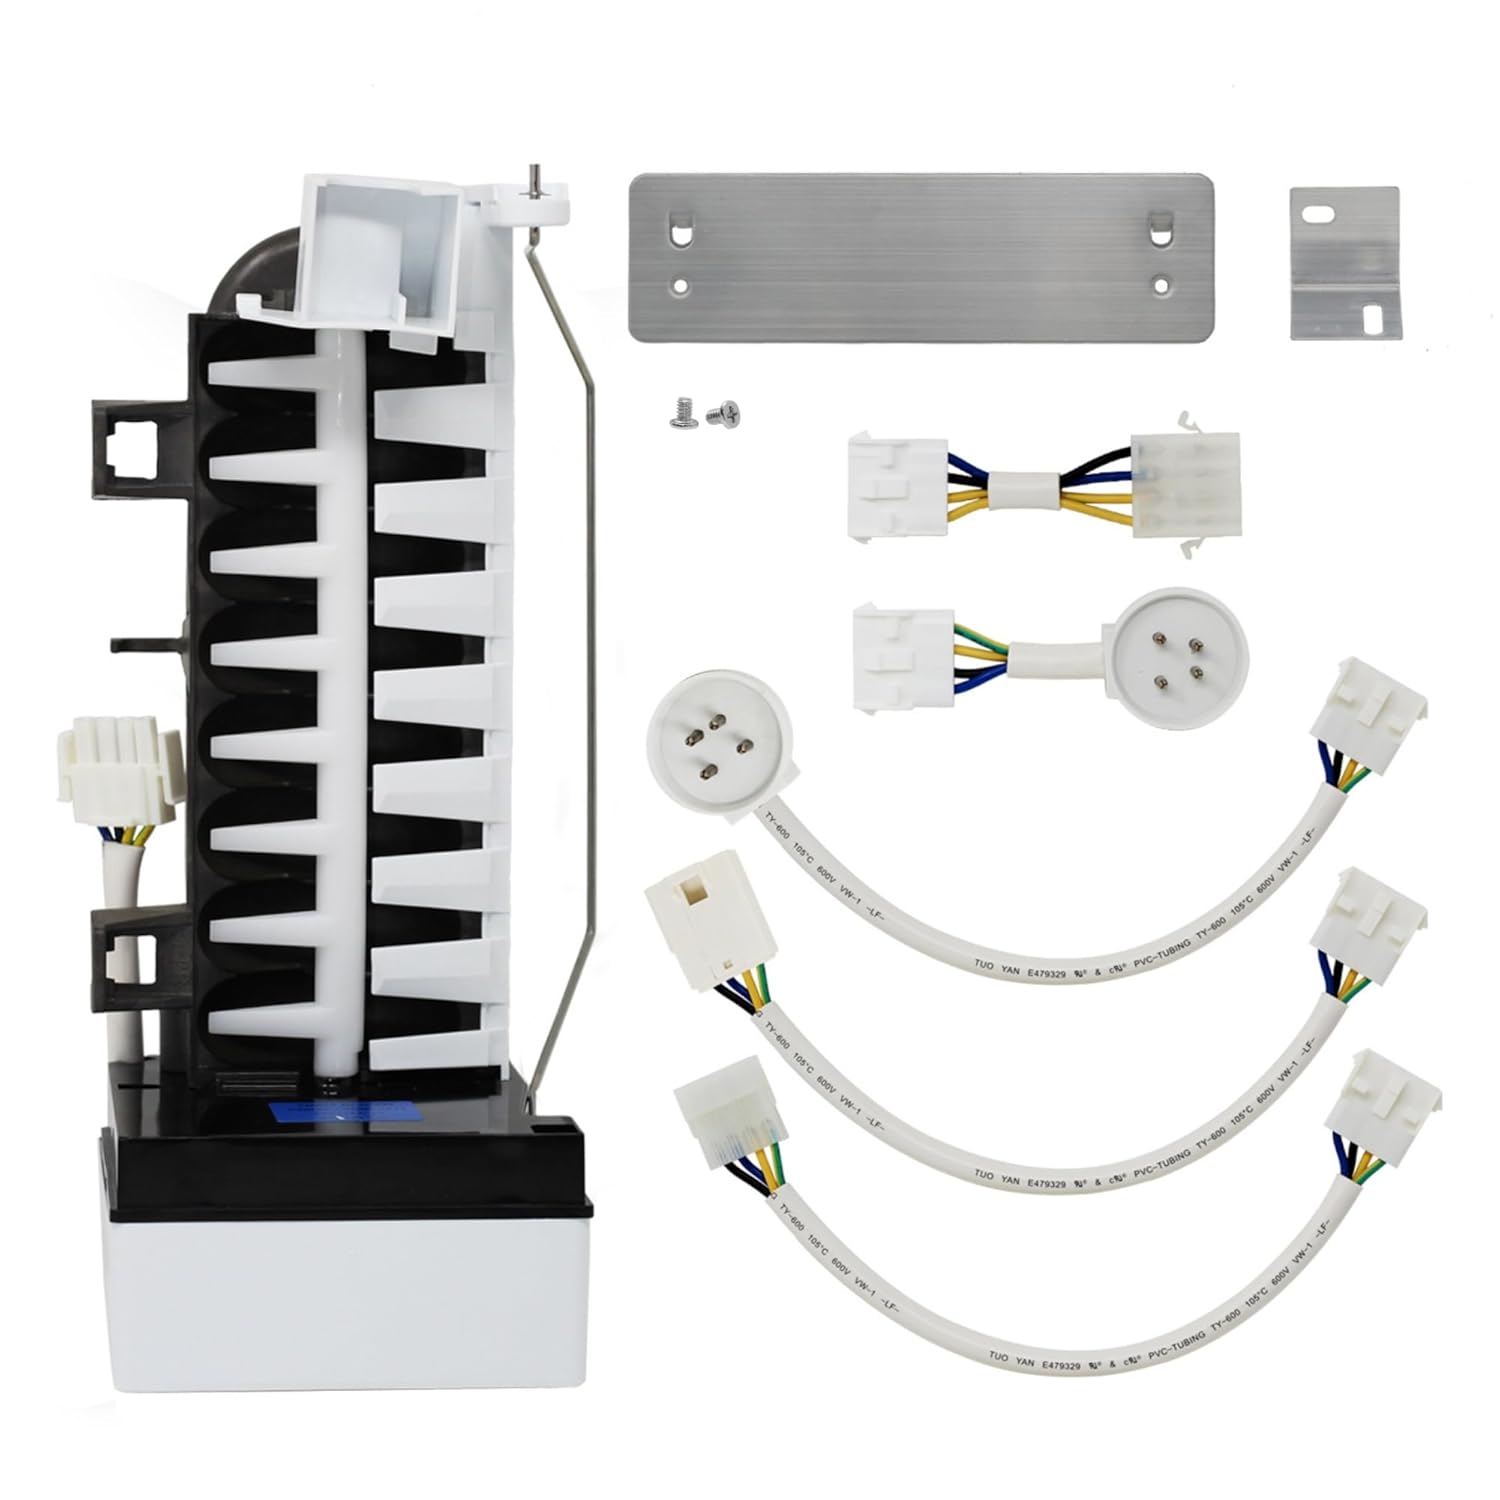
Image: Front-side view of the ice maker unit.
Step 3: Install the New Ice Maker
- Attach Mounting Bracket (if necessary): If your refrigerator requires a specific mounting bracket, attach it to the new ice maker using the provided screws.
- Position New Unit: Carefully slide the new ice maker into position in the freezer, aligning it with the mounting holes.
- Secure with Screws: Fasten the ice maker to the freezer wall using the mounting screws. Ensure it is securely attached.
- Connect Water Line: Reattach the water fill tube to the new ice maker, ensuring a snug fit to prevent leaks.
- Connect Wiring: Connect the electrical wiring harness to the new ice maker. Use the appropriate adapter harness if your refrigerator's connector differs from the ice maker's. Ensure the connection is firm and secure.

Image: Rear-side view of the ice maker unit, showing electrical connections.
Step 4: Final Steps
- Restore Water Supply: Turn the water supply valve back on. Check for any leaks around the water fill tube connection.
- Restore Power: Plug the refrigerator back into the electrical outlet.
- Replace Ice Bucket: Place the ice bucket back into its position.
Operating Instructions
After installation, the ice maker will begin its cycle. It may take several hours for the first batch of ice to be produced, and up to 24 hours for the ice maker to reach full production capacity and stable operation. Ensure the ice maker's control arm (bail arm) is in the down position to allow ice production.
- Initial Production: Discard the first few batches of ice to ensure any manufacturing residues are flushed out.
- Stopping Ice Production: To stop the ice maker from producing ice, lift the control arm to the up (off) position.
- Temperature: Ensure the freezer temperature is set correctly (typically 0°F / -18°C) for optimal ice production.
Maintenance
Regular maintenance helps ensure the longevity and efficient operation of your ice maker.
- Cleaning: Periodically remove the ice bucket and clean it with mild soap and warm water. Rinse thoroughly. Do not use abrasive cleaners.
- Check Water Line: Occasionally inspect the water supply line for kinks, leaks, or blockages.
- Clear Ice Bin: Prevent ice from building up excessively in the bin, which can obstruct the ice maker's operation.
Troubleshooting
If your ice maker is not functioning as expected, review the following common issues and solutions:
| Problem | Possible Cause | Solution |
|---|---|---|
| No ice production |
|
|
| Slow ice production |
|
|
| Small or hollow ice cubes |
|
|
If troubleshooting steps do not resolve the issue, contact the seller for further assistance.
Specifications
- Model Number: AP-4317943-DL709
- Part Number: 4317943
- Brand: UpStart Components
- Compatible with: Whirlpool ED5FTGXKT01, W10190952, and other listed part numbers (AP2984633, 4317943R, 4317943VP, 46000978556, 46004211173, AH358591, EA358591, ER4317943, J21791, J22241, M626687, PS358591, RIM943, TJ90RIM943, W10122496, W10190952, W10281545, W10632400)
Warranty and Support
This product is an UpStart Components Brand replacement part. Any warranties for this product are offered solely by UpStart Components and are not affiliated with or covered under any warranties offered by the original manufacturers mentioned for compatibility purposes.
For technical support, warranty claims, or questions regarding installation, please contact the seller directly. Keep your purchase receipt as proof of purchase.
Protection plans may be available for purchase separately through the retailer. Refer to the terms and conditions of any purchased protection plan for details.


