
1. Introduction
The eSSL F22 is a WiFi-enabled biometric device designed for efficient time attendance tracking and secure access control. This system utilizes advanced fingerprint recognition technology to manage employee clock-ins/outs and restrict access to designated areas. This manual provides essential information for the setup, operation, and maintenance of your F22 device.
2. Key Features
- Fingerprint Recognition: Accurate and reliable biometric identification for time attendance.
- Access Control: Restrict entry to specific areas based on user permissions.
- WiFi Connectivity: Seamless data transfer and remote management.
- Desktop Software: Lifetime software for comprehensive attendance data management and reporting.
- Compact Design: Ultra-thin and small form factor for discreet installation.
- Feather Touch Keypad: Responsive and durable keypad for user interaction.
- Multiple Verification Modes: Supports fingerprint, password, and card verification.
3. Setup
3.1 Unboxing and Components
Carefully unpack the eSSL F22 device and verify that all components are present. The standard package typically includes the F22 device, power adapter, mounting hardware, and a quick start guide.
3.2 Physical Installation
Select a suitable location for installation, ensuring it is secure and within reach of a power source and network connectivity. Mount the device firmly to a wall or surface using the provided mounting bracket and screws. Ensure the fingerprint sensor is at a comfortable height for users.

Figure 1: eSSL F22 device highlighting its ultra-thin design and feather touch keypad.
3.3 Wiring
Connect the power adapter to the device and a suitable power outlet. For network connectivity, you can use either the RJ45 Ethernet port or configure WiFi. For access control features, connect the device to door locks, exit buttons, and door sensors as per the wiring diagram provided in the detailed installation guide (not included in this manual).
3.4 Initial Power On and Network Configuration
After connecting power, the device will boot up. Follow the on-screen prompts to set the initial administrator password and configure network settings. To connect to WiFi, navigate to the network settings menu on the device, select your WiFi network, and enter the password.
3.5 Software Installation
The eSSL F22 includes desktop software for managing attendance data and device settings. This software can be downloaded from the official eSSL support portal. For access to the software and additional details, please refer to the link provided via the QR code below.
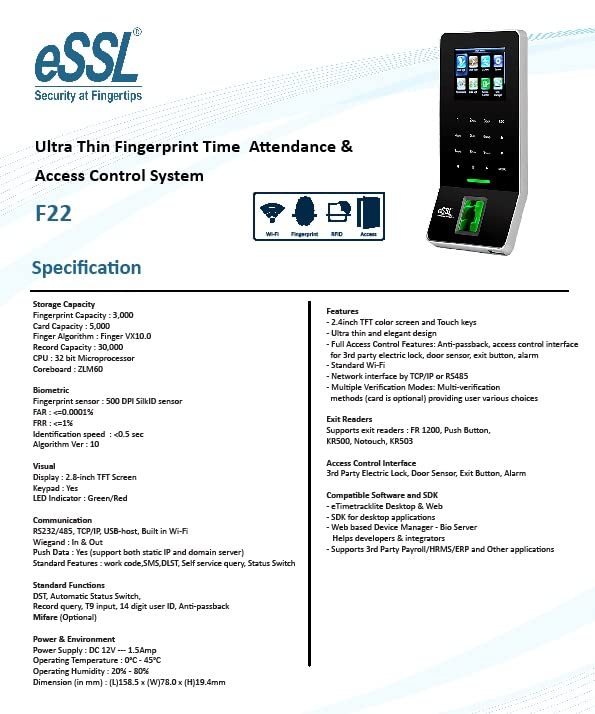
Figure 2: Scan this QR code to access the eSSL software download page and additional product details. The direct link is https://linko.page/sjhmp2d2h6xi.
4. Operating Instructions
4.1 User Enrollment
- Access the device's main menu using the administrator password or fingerprint.
- Navigate to the 'User Management' section.
- Select 'Add User' and enter the user's ID and name.
- Register the user's fingerprint by placing their finger on the sensor multiple times as prompted.
- Optionally, register a password or RFID card for additional verification methods.
4.2 Time Attendance
To clock in or out, users simply place their registered finger on the fingerprint sensor. The device will confirm the successful attendance record with an audible and visual prompt. Ensure the date and time settings on the device are accurate for correct attendance logging.
4.3 Access Control
When integrated with an electronic door lock, users can gain access by successfully verifying their identity (fingerprint, password, or card). The device will send a signal to unlock the door for a pre-configured duration. Access permissions can be configured per user in the device settings or through the desktop software.
4.4 Administrator Functions
Administrators can access the device's full menu to perform tasks such as:
- Adding, editing, or deleting users.
- Downloading attendance logs.
- Configuring device settings (e.g., time zones, access control parameters).
- Generating basic reports directly from the device.
For advanced reporting and comprehensive management, utilize the provided desktop software.
5. Maintenance
5.1 Cleaning the Fingerprint Sensor
Regularly clean the fingerprint sensor surface with a soft, dry, lint-free cloth. Avoid using abrasive materials, liquids, or chemical cleaners, as these can damage the sensor.
5.2 Data Backup
Periodically back up attendance logs and user data from the device to your computer using the desktop software. This ensures data integrity and prevents loss in case of unforeseen issues.
5.3 Firmware Updates
Check the eSSL website or software for available firmware updates. Keeping the device firmware updated ensures optimal performance, security, and access to new features. Follow the update instructions carefully to avoid damaging the device.
6. Troubleshooting
- Device Not Powering On: Ensure the power adapter is correctly connected and the power outlet is functional.
- Fingerprint Not Recognized: Ensure the finger is clean and dry. Try re-enrolling the fingerprint if the issue persists. Ensure the sensor is clean.
- WiFi Connection Issues: Verify the WiFi password and network availability. Check the device's network settings. Ensure the device is within range of the WiFi router.
- Data Transfer Failure: Check network connectivity between the device and the computer running the desktop software. Ensure the software is correctly configured to communicate with the device.
- Access Control Not Working: Verify wiring to the door lock and exit button. Check user access permissions in the device settings.
For more complex issues, consult the detailed software manual or contact eSSL technical support.
7. Specifications
| Feature | Specification |
|---|---|
| Fingerprint Capacity | 3,000 |
| Card Capacity | 5,000 |
| Record Capacity | 30,000 |
| Display | 2.4-inch TFT Color Screen |
| Communication | RS232/485, TCP/IP, USB-Host, Built-in Wi-Fi |
| Power Source | Corded Electric (DC 12V ~ 1.5Amp) |
| Operating Temperature | 0°C - 45°C |
| Dimensions (L x W x H) | 15.8 x 7.8 x 1.9 Centimeters |
| Sensor Technology | Optical |
8. Warranty and Support
For warranty information and technical support, please refer to the documentation provided with your purchase or contact your authorized eSSL reseller. Specific warranty terms may vary based on region and purchase channel. An optional 1-year extended warranty may be available for purchase from certain sellers.


