1. Introduction
This manual provides detailed instructions for the proper use and care of your WORKPRO Laminate Wood Flooring Installation Kit. This 33-piece kit is designed to assist in the efficient and precise installation of various flooring types, including laminate, LVP (Luxury Vinyl Plank), LVT (Luxury Vinyl Tile), vinyl plank, and hardwood flooring. The kit includes essential tools: a reinforced double-faced mallet, a heavy-duty pull bar, a solid tapping block, and 30 plastic spacers.

Figure 1: Overview of the WORKPRO 33-Pack Laminate Wood Flooring Installation Kit, showing the mallet, pull bar, tapping block, and spacers.
2. Kit Components
Familiarize yourself with the individual components of your installation kit:
- Reinforced Double-Faced Mallet: Constructed from cast iron with chrome plating and a durable PVC head. Features an American hickory handle for lightweight yet tough performance.
- Heavy Duty Pull Bar: Made from premium A3 steel with a matte coating for enhanced strength and corrosion resistance. Designed with soft pads on the back to protect flooring from scratches.
- Solid Tapping Block: Manufactured from solid polypropylene for sturdiness and durability.
- 30-Piece Spacers: Plastic spacers with non-slip slots, essential for maintaining expansion gaps.

Figure 2: All components of the WORKPRO installation kit displayed on a wooden floor, ready for use.
3. Setup and Preparation
Before beginning your flooring installation, ensure the following preparatory steps are completed:
- Acclimatization: Allow your flooring materials to acclimatize to the room's temperature and humidity for at least 48-72 hours prior to installation, as recommended by the flooring manufacturer.
- Subfloor Preparation: Ensure the subfloor is clean, dry, level, and free of debris. Repair any imperfections.
- Underlayment: Install appropriate underlayment if required by your flooring type.
- Room Layout: Plan your flooring layout, determining the starting wall and direction of planks.
- Safety Gear: Wear appropriate safety gear, including eye protection and knee pads, during installation.
4. Operating Instructions
Follow these steps for effective use of the WORKPRO installation kit:
4.1. Using Spacers
Spacers are crucial for maintaining the required expansion gap between the flooring and the walls. This gap allows the flooring to expand and contract with changes in temperature and humidity without buckling.
- Place the 30-Piece Spacers along the perimeter of the room, against the walls, before laying the first row of planks.
- Ensure the spacers provide a consistent gap, typically 1/4 inch to 1/2 inch, as specified by your flooring manufacturer. You may need to stack two spacers to achieve a 1/4 inch gap if your flooring requires it.
- Remove all spacers after the flooring installation is complete and before installing baseboards or trim.

Figure 3: The 30-piece plastic spacers, featuring a non-slip design for stable placement during flooring installation.
4.2. Using the Tapping Block
The tapping block is used to gently tap planks into place, ensuring a tight fit without damaging the plank edges.
- Position the Solid Tapping Block against the tongue or groove edge of the plank you are installing.
- Use the Reinforced Double-Faced Mallet to gently tap the tapping block. This transfers the force evenly across the plank edge, helping it lock securely with the adjacent plank.
- Avoid direct impact with the mallet on the plank itself to prevent damage.

Figure 4: The solid tapping block, illustrating its robust construction compared to hollow alternatives, with dimensions provided.
4.3. Using the Pull Bar
The pull bar is essential for installing the last row of planks or planks in tight spaces where a tapping block cannot be used effectively.
- Place the hooked end of the Heavy Duty Pull Bar against the edge of the plank, ensuring the long flat section rests on the installed flooring.
- Use the Reinforced Double-Faced Mallet to strike the opposite end of the pull bar. This action pulls the plank tightly into position against the previous row or wall.
- The soft pads on the pull bar protect the finished floor from scratches during use.
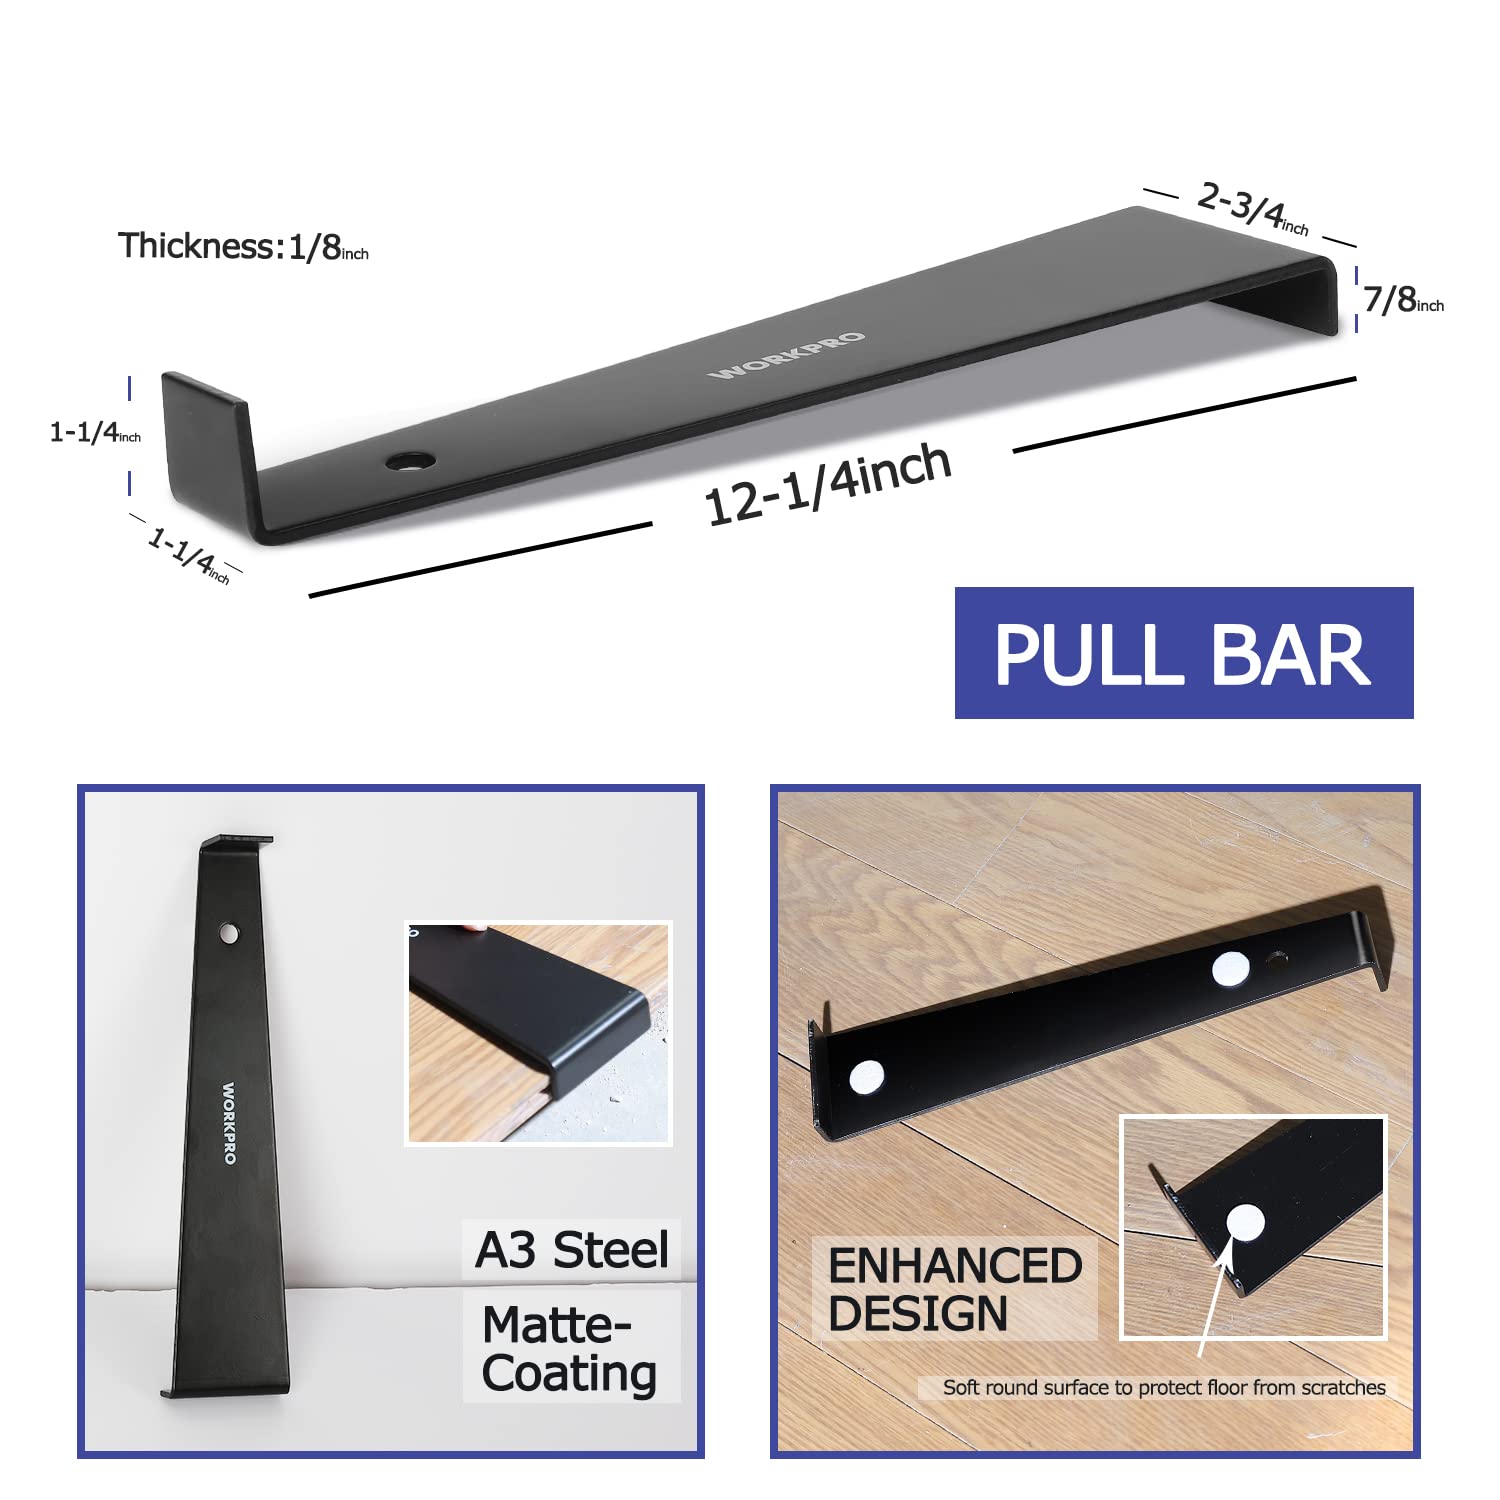
Figure 5: The heavy-duty pull bar, highlighting its A3 steel construction, matte coating, and soft pads for floor protection.
4.4. Using the Mallet
The mallet is designed for controlled impacts, primarily with the tapping block and pull bar.
- The Reinforced Double-Faced Mallet features two PVC heads: one yellow (softer) and one black (firmer). Use the appropriate head based on the force required and the sensitivity of the material. For most flooring applications, the softer yellow head is recommended.
- Strike the tapping block or pull bar with controlled, firm taps, rather than heavy blows, to avoid damaging the tools or the flooring.
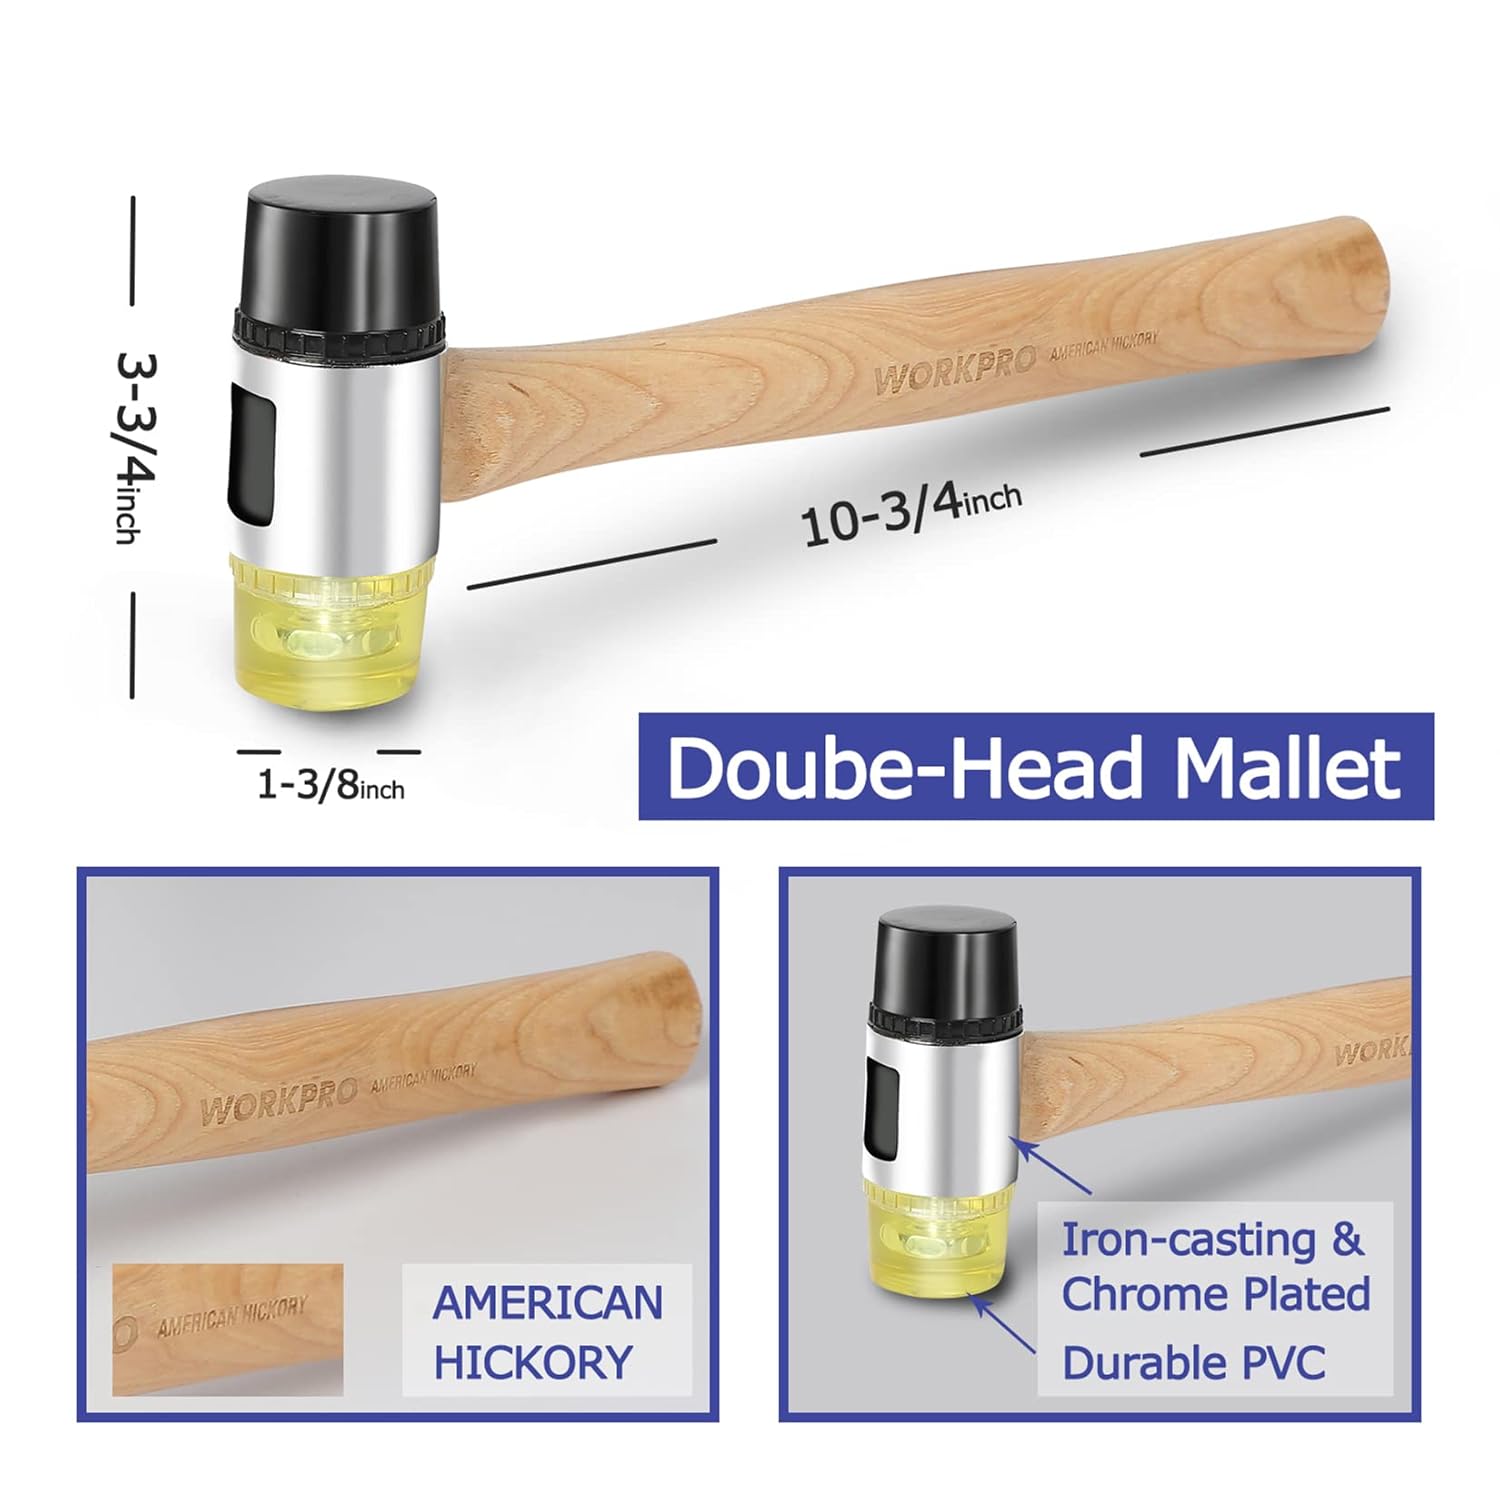
Figure 6: The double-faced mallet, showing its dimensions, American hickory handle, and iron-casting with chrome-plated PVC heads.

Figure 7: Visual guide demonstrating the correct application of the pull bar and tapping block with the mallet during flooring installation.
5. Maintenance
Proper maintenance ensures the longevity and performance of your WORKPRO installation tools:
- Cleaning: After each use, wipe down the pull bar and tapping block with a dry cloth to remove any dust or debris.
- Storage: Store all components in a dry place, away from extreme temperatures and moisture, to prevent corrosion or material degradation.
- Inspection: Periodically inspect the mallet heads for wear and tear. While durable, PVC heads can degrade over time with heavy use.
- Pull Bar Pads: Check the soft pads on the pull bar for damage or detachment. Replace if necessary to continue protecting your flooring.
6. Troubleshooting
Here are some common issues encountered during flooring installation and potential solutions:
- Planks Not Locking Tightly:
- Ensure the tongue and groove are properly aligned before tapping.
- Apply firm, consistent taps with the mallet on the tapping block or pull bar.
- Check for debris in the tongue or groove that might prevent a tight fit.
- Gaps Appearing Between Planks:
- This often indicates insufficient tapping. Re-tap the affected planks using the tapping block or pull bar.
- Ensure the first row is perfectly straight and securely installed, as subsequent rows build upon it.
- Flooring Buckling or Warping:
- Verify that adequate expansion gaps were maintained around the perimeter using the spacers. Insufficient gaps are a common cause of buckling.
- Ensure the flooring was properly acclimatized before installation.
- Tools Damaging Flooring:
- Always use the tapping block or pull bar to distribute force; avoid direct mallet contact with planks.
- Ensure the pull bar's felt pads are intact and clean to prevent scratches.
- Use the softer PVC head of the mallet for most applications.
7. Specifications
| Component | Specification |
|---|---|
| Reinforced Double-Faced Mallet |
|
| Heavy Duty Pull Bar |
|
| Solid Tapping Block |
|
| 30-Piece Spacers |
|
| Overall Product Dimensions | 10.75"L x 3.75"W x 1.37"Th (packaging/kit) |
| Manufacturer | HANZGHOU GREATSTAR INDUSTRIAL CO.LTD |
| First Available Date | March 16, 2020 |
8. Warranty Information
Specific warranty details for the WORKPRO Laminate Wood Flooring Installation Kit are not provided in the product information. Please refer to the manufacturer's official website or contact WORKPRO customer service for current warranty terms and conditions.
9. Support
For technical assistance, product inquiries, or to report any issues with your WORKPRO installation kit, please visit the official WORKPRO website or contact their customer support department. Contact information can typically be found on the product packaging or the brand's official online presence.


