
1. Introduction
This manual provides comprehensive instructions for the installation, operation, and maintenance of your Aramox Rear Upper Suspension Camber Control Arm Kit. Please read this manual thoroughly before installation and retain it for future reference. Proper installation and maintenance are crucial for optimal performance and safety.
2. Product Overview
The Aramox Rear Upper Suspension Camber Control Arm Kit is designed to allow for adjustable rear camber settings, which can help resolve tire rubbing issues and accommodate wider wheels and tires. The components are manufactured from high-quality forged CNC machined aluminum alloy for durability and stable performance.

Image 2.1: Overview of the Aramox Rear Upper Suspension Camber Control Arm Kit, including two control arms, adjustment rods, washers, and circlips.

Image 2.2: A pair of Aramox Rear Upper Suspension Camber Control Arms, showcasing their design and construction.
3. Specifications
| Feature | Detail |
|---|---|
| Brand | Aramox |
| Model Number | Aramox2oud3ietng |
| Material | Aluminum Alloy |
| Color | Silver |
| Auto Part Position | Rear Upper |
| Fit Type | Vehicle Specific Fit |
| Item Weight | 6.27 pounds (approx. 2.85 kg) |
| Product Dimensions | 15.75 x 9.84 x 1.97 inches (approx. 40 x 25 x 5 cm) |

Image 3.1: Control arm with approximate dimensions: 36.5cm (14.37in) length, 6.5cm (2.55in) width, and 4cm (1.57in) end diameter.
4. Fitment
This Rear Upper Suspension Camber Control Arm Kit is designed for specific vehicle models. It is compatible with 06-15 1.8 vehicles. Users are advised to verify compatibility with their specific vehicle model and year before purchase and installation. If unsure, consult a professional mechanic or refer to your vehicle's service manual.
5. Installation (Setup)
The installation of the Aramox Rear Upper Suspension Camber Control Arm Kit is a direct bolt-on process, designed as a direct replacement for the original components. While the installation is straightforward, professional installation is strongly recommended to ensure proper alignment and vehicle safety.
5.1. Required Tools (Not Included)
- Socket wrench set
- Torque wrench
- Jack and jack stands
- Wheel chocks
- Appropriate lubricants (if necessary)
5.2. Installation Steps
- Safety First: Park the vehicle on a level surface, engage the parking brake, and place wheel chocks. Use a jack to lift the rear of the vehicle and secure it with jack stands.
- Remove Wheel: Carefully remove the rear wheel(s) to access the suspension components.
- Locate Original Control Arm: Identify the existing rear upper control arm.
- Loosen Fasteners: Using appropriate tools, loosen and remove the bolts securing the original control arm to the vehicle chassis and the wheel hub assembly.
- Remove Original Control Arm: Carefully detach and remove the old control arm.
- Install New Control Arm: Position the Aramox adjustable control arm in place. Insert the bolts through the mounting points. Do not fully tighten yet.
- Adjust Camber (if necessary): If specific camber settings are desired, adjust the length of the control arm using the integrated adjustment mechanism. This step often requires specialized alignment equipment.
- Tighten Fasteners: Once the control arm is correctly positioned and any adjustments are made, tighten all bolts to the vehicle manufacturer's specified torque settings. Refer to your vehicle's service manual for exact torque values.
- Reinstall Wheel: Mount the wheel back onto the hub and tighten the lug nuts to the manufacturer's specifications.
- Lower Vehicle: Carefully lower the vehicle from the jack stands.
- Professional Alignment: After installation, it is critical to have a professional wheel alignment performed. This ensures correct camber, toe, and caster settings, which are essential for vehicle handling, tire wear, and safety.
Warning: Incorrect installation or alignment can lead to severe handling issues, premature tire wear, and potential safety hazards. If you are not experienced with automotive suspension work, seek professional assistance.
6. Operation
The Aramox Rear Upper Suspension Camber Control Arm Kit functions as a critical component of your vehicle's suspension system. Once installed and properly aligned, it allows for precise adjustment of the rear wheel's camber angle. This adjustment helps optimize tire contact with the road, improving handling, stability, and tire longevity, especially when using aftermarket wheels or suspension modifications.
The 'operation' of this component is passive; it maintains the set camber angle. Regular checks during vehicle maintenance are recommended to ensure the adjustment mechanism remains secure and the bushings are in good condition.
7. Maintenance
To ensure the longevity and optimal performance of your Aramox Rear Upper Suspension Camber Control Arm Kit, follow these maintenance guidelines:
- Regular Inspection: Periodically inspect the control arms, bushings, and adjustment mechanisms for any signs of wear, damage, or corrosion. Check for loose bolts or nuts.
- Cleanliness: Keep the components free from excessive dirt, mud, and road salt, which can accelerate wear.
- Lubrication: If the control arms feature grease fittings, lubricate them according to the manufacturer's recommendations (if applicable).
- Alignment Checks: Have your vehicle's wheel alignment checked annually or after any significant suspension work or impact.
- Bushing Replacement: Over time, the bushings may wear out. If excessive play or noise is detected, replace the bushings or the entire control arm assembly as needed.
8. Troubleshooting
If you experience issues after installing the Aramox Rear Upper Suspension Camber Control Arm Kit, consider the following:
8.1. Uneven Tire Wear
- Cause: Incorrect camber or toe settings.
- Solution: Immediately have a professional wheel alignment performed. Ensure all suspension components are properly torqued.
8.2. Vehicle Pulling to One Side
- Cause: Misalignment, uneven tire pressure, or damaged suspension components.
- Solution: Check tire pressures. Have a professional wheel alignment performed. Inspect control arms and other suspension parts for damage.
8.3. Clunking or Squeaking Noises from Rear Suspension
- Cause: Loose fasteners, worn bushings, or interference with other components.
- Solution: Inspect all mounting bolts for proper torque. Check bushings for cracks or excessive play. Ensure no components are rubbing.
For any persistent issues or concerns, it is recommended to consult a qualified automotive technician.
9. Package Contents
The Aramox Rear Upper Suspension Camber Control Arm Kit typically includes the following items:
- 2 x Rear Upper Camber Arms
- 1 x Accessories Bag (containing adjustment rods, washers, and circlips)
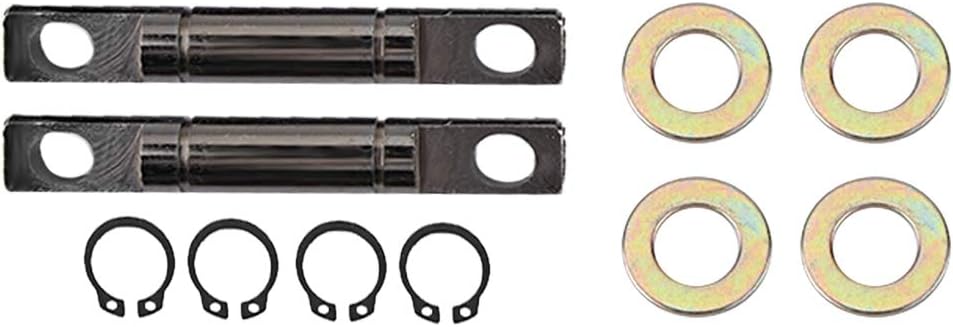
Image 9.1: Close-up of the included accessories: two adjustment rods, four washers, and four circlips.