Introduction
Thank you for choosing the A West Bend Homestyle Automatic Bread Maker Machine 41055. This manual provides essential information for the safe and efficient operation of your new appliance. Please read all instructions carefully before first use and retain this manual for future reference.
Important Safety Instructions
When using electrical appliances, basic safety precautions should always be followed, including the following:
- Read all instructions.
- Do not touch hot surfaces. Use handles or knobs.
- To protect against electric shock, do not immerse cord, plugs, or appliance in water or other liquid.
- Close supervision is necessary when any appliance is used by or near children.
- Unplug from outlet when not in use and before cleaning. Allow to cool before putting on or taking off parts.
- Do not operate any appliance with a damaged cord or plug or after the appliance malfunctions or has been damaged in any manner.
- The use of accessory attachments not recommended by the appliance manufacturer may cause injuries.
- Do not use outdoors.
- Do not let cord hang over edge of table or counter, or touch hot surfaces.
- Do not place on or near a hot gas or electric burner, or in a heated oven.
- Extreme caution must be used when moving an appliance containing hot oil or other hot liquids.
- To disconnect, turn any control to "off", then remove plug from wall outlet.
- Do not use appliance for other than intended use.
Product Overview
The A West Bend Homestyle Automatic Bread Maker Machine 41055 is designed to simplify the bread-making process. It features a durable stainless steel construction and offers multiple programs for various bread types.
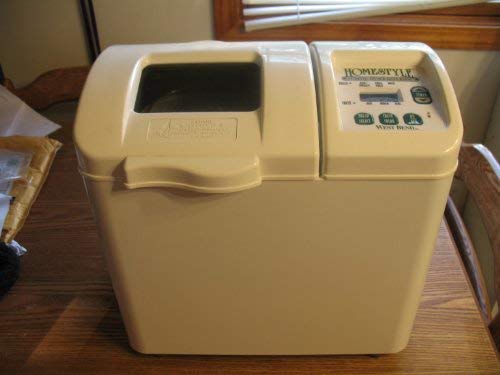
Figure 1: Front view of the A West Bend Homestyle Automatic Bread Maker Machine 41055. This image displays the compact design and the control panel located on the top front of the appliance.
Components:
- Main Unit: Houses the motor, heating element, and control panel.
- Baking Pan: Removable non-stick pan for baking bread.
- Kneading Paddle: Detachable paddle for mixing and kneading dough.
- Measuring Cup & Spoon: For accurate ingredient measurement.
- Control Panel: Features buttons for program selection, start/stop, and time adjustment.
- Lid with Viewing Window: Allows monitoring of the baking process.
Setup
1. Unpacking:
- Carefully remove the bread maker and all accessories from the packaging.
- Remove any protective films or stickers from the appliance.
2. Initial Cleaning:
- Wash the baking pan and kneading paddle with warm, soapy water. Rinse thoroughly and dry completely.
- Wipe the exterior of the bread maker with a damp cloth. Do not immerse the main unit in water.
- Ensure all parts are dry before assembly.
3. Placement:
- Place the bread maker on a stable, flat, heat-resistant surface.
- Ensure there is adequate ventilation around the appliance, keeping it away from walls or cabinets.
- Plug the power cord into a grounded electrical outlet.
Operating Instructions
1. Adding Ingredients:
- Attach the kneading paddle to the shaft inside the baking pan.
- Add liquid ingredients first, followed by dry ingredients. Ensure yeast is added last and kept separate from liquids and salt until mixing begins.
- Place the baking pan into the bread maker and twist to lock it securely.
- Close the lid.
2. Selecting a Program:
The bread maker offers 3 distinct programs. Refer to your recipe for the recommended program.
- Press the "Menu" button repeatedly to cycle through the available programs. The selected program number will display on the control panel.
- Adjust crust color (light, medium, dark) and loaf size (if applicable) using the dedicated buttons.
3. Starting the Baking Cycle:
- Once the desired program, crust color, and loaf size are selected, press the "Start/Stop" button.
- The bread maker will begin the preheating, kneading, rising, and baking cycles automatically.
4. Removing the Bread:
- When the cycle is complete, the bread maker will beep. Press and hold the "Start/Stop" button to stop the machine.
- Carefully open the lid and, using oven mitts, remove the baking pan by twisting it counter-clockwise and lifting it out.
- Invert the pan onto a wire rack to release the bread. If the kneading paddle remains in the bread, remove it carefully.
- Allow the bread to cool on a wire rack before slicing.
Maintenance and Cleaning
Regular cleaning ensures the longevity and optimal performance of your bread maker.
1. Cleaning the Baking Pan and Kneading Paddle:
- After each use, remove the baking pan and kneading paddle.
- Wash them with warm, soapy water using a soft sponge. Do not use abrasive cleaners or metal scouring pads, as this can damage the non-stick coating.
- Rinse thoroughly and dry completely before storing or next use.
2. Cleaning the Main Unit:
- Ensure the bread maker is unplugged and completely cool.
- As per product care instructions, wipe the exterior with a dry cloth. For stubborn stains, a slightly damp cloth can be used, followed by a dry cloth.
- Do not immerse the main unit in water or any other liquid.
- Clean the interior of the baking chamber with a damp cloth, ensuring no crumbs or residue remain.
3. Storage:
Store the bread maker in a clean, dry place when not in use. Ensure all components are clean and dry before storage.
Troubleshooting
If you encounter issues with your bread maker, refer to the following common problems and solutions:
| Problem | Possible Cause | Solution |
|---|---|---|
| Bread does not rise. | Expired or inactive yeast; incorrect water temperature; too much salt or sugar. | Check yeast expiration date and activity; use water at recommended temperature (around 105-115°F / 40-46°C); ensure correct ingredient measurements. |
| Bread is too dense. | Too much flour; not enough liquid; incorrect program selected. | Measure ingredients accurately; ensure proper liquid-to-flour ratio; select appropriate program for the recipe. |
| Kneading paddle stuck in bread. | Common occurrence, especially with certain dough types. | Allow bread to cool slightly, then carefully remove the paddle using a non-metallic utensil. |
| Machine not starting. | Not plugged in; lid not closed properly; "Start/Stop" button not pressed. | Ensure power cord is securely plugged in; close the lid firmly; press the "Start/Stop" button once to begin. |
If the problem persists after attempting these solutions, please contact customer support.
Specifications
- Model: 41055
- Brand: A
- Material: Stainless Steel
- Color: White or Stainless Steel
- Number of Programs: 3
- Product Care Instructions: Wipe with Dry Cloth
- UPC: 600138651619
- ASIN: B085WC2J23
- First Available Date: March 13, 2020
Warranty and Support
This product is covered by a manufacturer's warranty. Please refer to the warranty card included with your purchase for specific terms and conditions. For technical support, replacement parts, or warranty claims, please contact the manufacturer's customer service department.
Contact Information: (Please refer to your product packaging or manufacturer's website for current contact details.)


