1. Introduction
This manual provides comprehensive instructions for the PowMr 60A Solar Charge Controller. This device is designed to manage the power flow from your solar panels to your battery bank and DC loads, ensuring efficient charging and protection for your system. It is compatible with 12V and 24V systems and features an LCD display for monitoring and adjustable parameters.
2. Safety Instructions
- Ensure all connections are correct and secure before operation. Incorrect wiring can damage the controller and other components.
- Always connect the battery to the controller first, then the solar panels, and finally the DC load. The disconnection sequence is the reverse: DC load, then solar panels, then battery.
- Verify that the battery voltage is within the acceptable range for the controller (9V-15V for 12V systems, 18V-30V for 24V systems) for proper system recognition.
- Do not connect an inverter (DC/AC) directly to the solar controller. Inverters should always be connected to the battery.
- Install the charge controller as close to the battery as possible to minimize voltage drop and power loss.
- Avoid exposing the controller to direct sunlight or high temperatures to prevent overheating.
- Keep children away from the battery and controller.
- Do not open the heat sink of the solar controller without authorization.
3. Product Features
The PowMr 60A Solar Charge Controller offers a range of features for effective solar power management:
- System Compatibility: Automatically recognizes 12V and 24V systems.
- Charging Capacity: Supports up to 780W input for 12V systems and 1560W for 24V systems.
- PWM Charging: Features 4-stage PWM charge management (Boost, ABS, Equalization, Float) for optimal battery health.
- Dual USB Output: Provides two 5V 2A USB ports for charging mobile devices.
- LCD Display: Backlit LCD shows PV, battery, and load charge/discharge parameters.
- Adjustable Parameters: Floating voltage, Low Voltage Disconnection (LVD), Low Voltage Reconnection (LVR), and load timer settings are adjustable.
- Data Recording: Records charge and discharge current and energy.
- Battery Compatibility: Suitable for Lead-acid batteries (OPEN, AGM, GEL types).
- Comprehensive Protections: Includes dual MOSFET reverse current protection, overheat protection, under-voltage discharge protection, short-circuit protection, open-circuit protection, over-load protection, over-charging protection, and power-off memory protection.

Image: Front view of the PowMr 60A Solar Charge Controller, highlighting its key features such as 12V/24V auto recognition, complete electronic protections, PWM high-efficiency charge, dual USB 2A output, three load modes, three battery types, and dual MOS reverse current protection.
4. Package Contents
Upon opening the package, please verify that all items are present:
- 1 x PowMr 60A Solar Charge Controller
- 1 x English User Manual
5. Setup and Installation
Follow these steps for proper installation of your solar charge controller:
- Connect the Battery: Always connect the battery to the charge controller first. Ensure correct polarity (+ to + and - to -). The controller will automatically detect the system voltage (12V or 24V).
- Connect the Solar Panels: After the battery is connected, connect the solar panels to the controller. Ensure correct polarity.
- Connect the DC Load: Finally, connect your DC loads to the controller.
Disassembly Sequence: To disconnect the system, follow the reverse order: first disconnect the DC load, then the solar panels, and finally the battery.
Important Notes:
- The solar controller will stop output when the battery voltage drops below 10.7V (adjustable) to protect the battery. The LCD will go blank if the battery voltage drops below 8V. Output will resume when the battery reaches 12.6V (adjustable).
- If the solar input power is significantly smaller than the power consumption from loads, the controller may not function optimally. Consider increasing PV wattage or reducing load operating hours.
- Improper handling of the battery may lead to self-discharging problems. Avoid storing batteries outdoors.
- The LCD display may have an error of 0.2V-0.3V, which is considered normal.
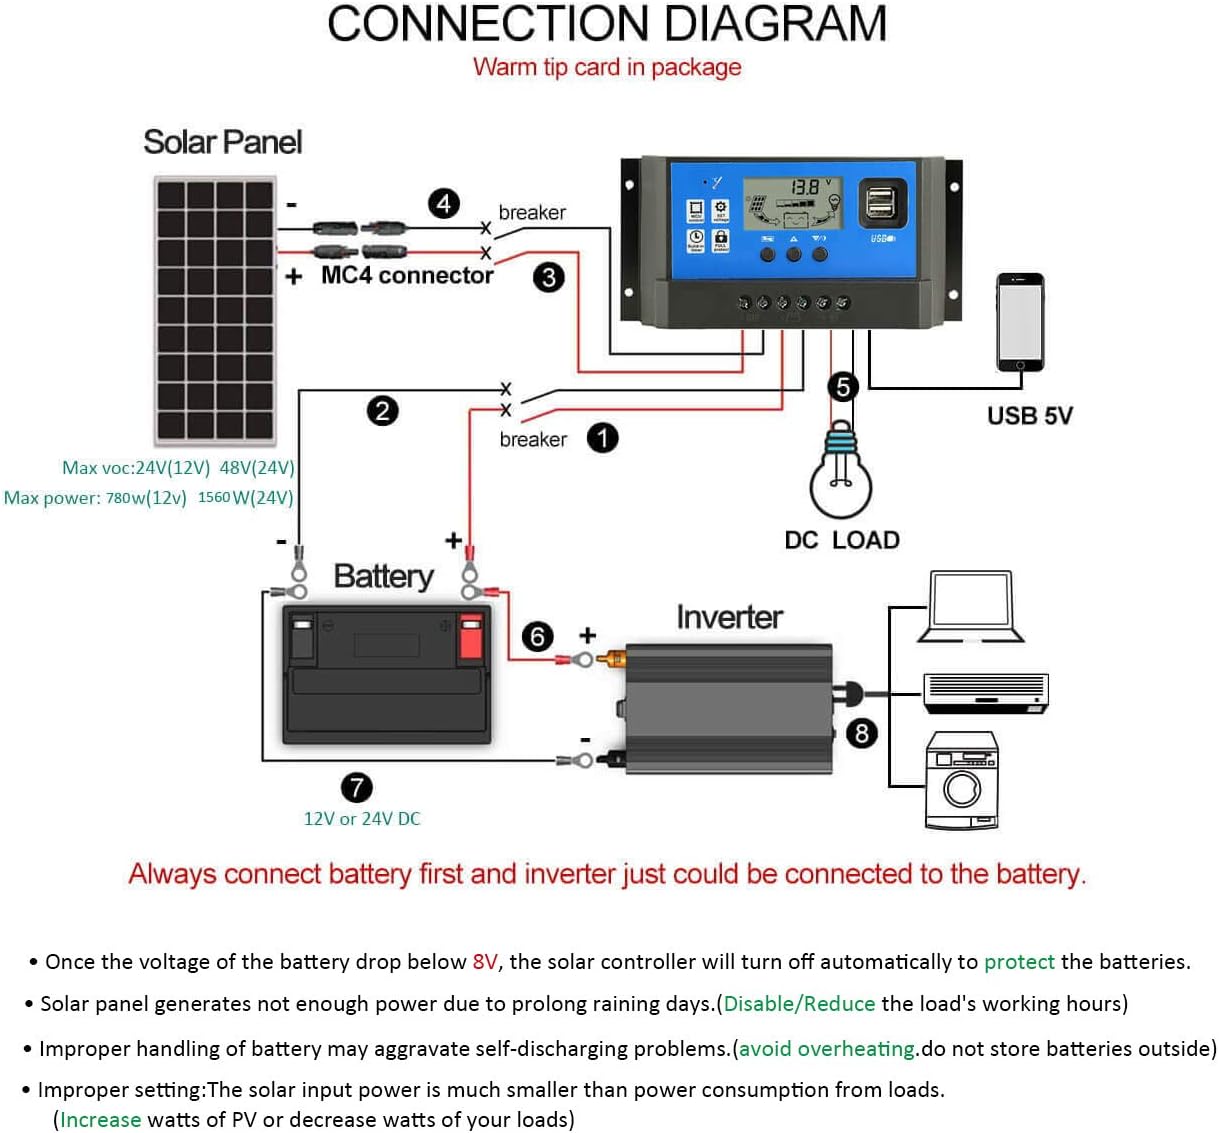
Image: A detailed connection diagram showing the proper wiring order for the solar panel, battery, DC load, and optional inverter with the PowMr solar charge controller. The diagram emphasizes connecting the battery first, then solar panels, then DC load, and that inverters connect directly to the battery, not the controller.
Video: An official PowMr video demonstrating the physical connections and initial setup of the solar charge controller with a battery. This visual guide helps in understanding the wiring process.
6. Operating Instructions
The controller features an LCD display and buttons for monitoring and adjusting settings.
6.1. Browsing Interface
Press the [DOWN] button to cycle through different display interfaces:
- Main Display / Battery Voltage
- Solar Panel Charging Current (PV Current)
- Load Discharge Current
- Accumulated Charging Power (Ah)
- Accumulated Discharging Power (Ah)
- Low Voltage Disconnection (LVD) Setting
- Low Voltage Reconnection (LVR) Setting
- Load Working Mode Setting
6.2. Parameter Settings
To enter the setting mode for adjustable parameters (e.g., Floating voltage, LVD, LVR, Load Timer):
- From the main display, long press the [SET] button for 3 seconds to enter the setting mode. The current parameter will start flashing.
- Use the [UP] and [DOWN] buttons to change the value.
- Once the desired value is set, long press the [SET] button for 3 seconds again to save the setting and exit the setting mode.
Parameter Setting Rules: Floating voltage should be greater than Low Voltage Reconnect, which should be greater than Low Voltage Discharge.
6.3. Load Working Modes
There are three options for the load working mode:
- [24HR]: Load output is active for 24 hours.
- [1-23HR]: Load turns on after sunset and turns off after the set number of hours (1-23 hours).
- [0H]: Dusk to Dawn mode. The load turns on at dusk and turns off at dawn.
You can manually turn the load ON/OFF by pressing the [DOWN] button on the main display. This manual control is not available when the controller is in a light control state (e.g., [1-23HR] or [0H] modes).

Image: A visual guide to the LCD display interface, showing how to browse different screens (main display, charging current, discharge current, accumulated power) and how to enter and adjust parameters like Low Voltage Disconnection and Low Voltage Reconnection.
7. Maintenance
To ensure the longevity and optimal performance of your PowMr 60A Solar Charge Controller, consider the following maintenance tips:
- Regularly inspect all wiring connections to ensure they are tight and free from corrosion.
- Keep the controller clean and free from dust and debris. Use a dry cloth for cleaning.
- Ensure adequate ventilation around the controller to prevent overheating. Do not block the heat sink.
- Periodically check battery terminals for corrosion and clean if necessary.
- Monitor the LCD display for any error codes or unusual readings.
8. Troubleshooting (Common Q&A)
Here are answers to some common questions and issues you might encounter:
- Q: What battery types are supported?
A: This controller is suitable only for lead-acid batteries: OPEN, AGM, GEL. It is not compatible with nickel hydride, lithium, ions, or other battery types. - Q: Why does the LCD screen become blank?
A: If the battery voltage is too low (typically ≦ 8V), the controller will stop output and the LCD will turn off to protect the battery. Output will resume when the battery voltage recovers to 12.6V (adjustable). - Q: Why does the controller display 14.4V or 14.5V?
A: If the solar charge controller is set for a 12V system, it will stop charging when the battery voltage reaches 14.4V or 14.5V. This is a protective measure to prevent overcharging. This indicates the battery is fully charged and the controller is in float mode or has stopped charging. - Q: How do I set it to charge during the day and turn on the load at dusk?
A: Use the load working mode settings. Select Mode 3: [0H] for Dusk to Dawn operation. Note that manual load switching is not available in light control modes.
9. Specifications
Detailed technical specifications for the PowMr 60A Solar Charge Controller:
| Parameter | Value (60A Model) |
|---|---|
| Battery Voltage | 12V/24V auto |
| Recognize Range | 9V-15V for 12V system, 18V-30V for 24V system |
| Max Charge Current | 60A |
| Max Discharge Current | 60A |
| Max Input Power (12V) | 780W |
| Max Input Power (24V) | 1560W |
| Max Solar Input (12V) | Max 23V |
| Max Solar Input (24V) | Max 46V |
| Equalization Voltage | 14.4V (adjustable) |
| Float Charge Voltage | 13.7V (adjustable) |
| Stop Charge Voltage | 10.7V (default, adjustable) |
| Over Discharge Recover Voltage | 12.6V (default, adjustable) |
| Voltage of Open Light | Solar panel 8V (Light Lights delay) |
| USB Output | Dual USB output, 5V / 2.5A (Max) |
| Terminal Size | #4 AWG |
| Battery Type | b01 (OPEN), b02 (GEL), b03 (Flooded) |
| Self-Consume | <10mA |
| Operating Temperature | -31°F ~ +140°F (-35°C ~ +60°C) |
| Size / Weight | 7.6"L x 2.01"W x 3.86"H / 10.6 ounces |
Note: The default setting values are for GEL batteries. For other battery types, adjust parameters accordingly.
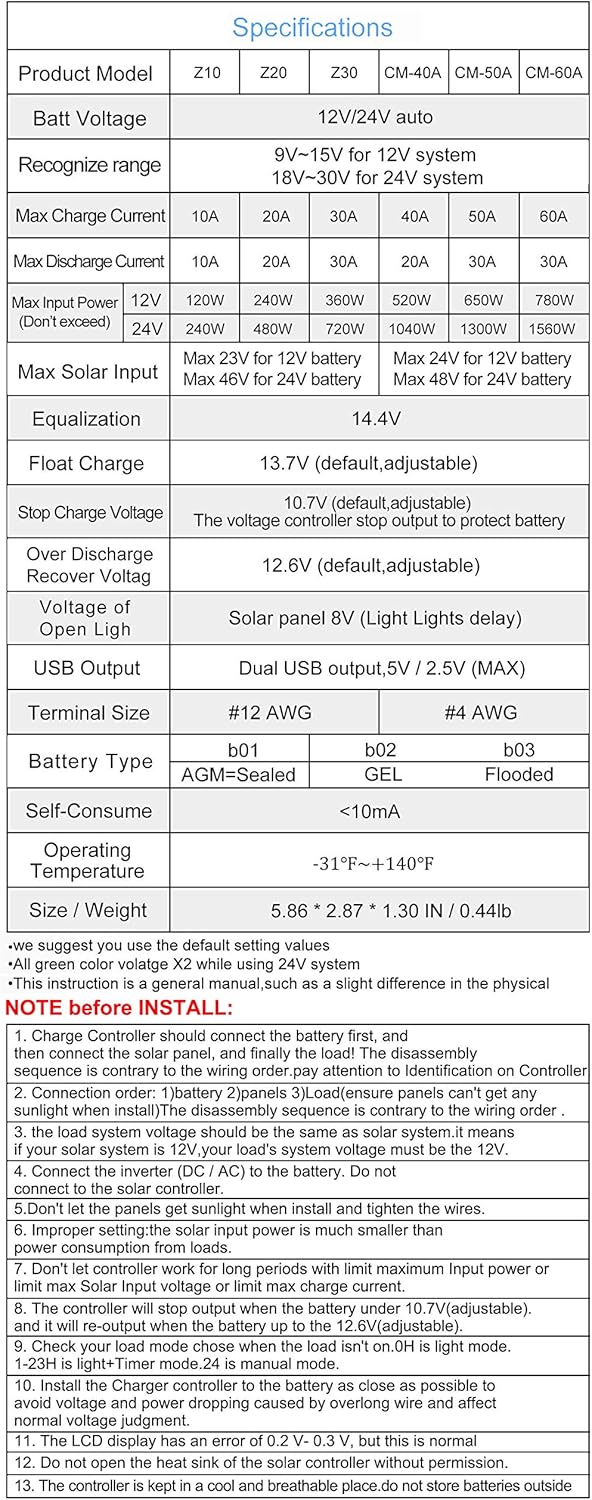
Image: A table detailing the specifications for various PowMr charge controller models, including the 60A version. It lists battery voltage, current ratings, input power, float voltage, and other technical parameters.
10. Warranty and Support
PowMr is committed to customer satisfaction. For any questions, technical assistance, or warranty inquiries regarding your 60A Solar Charge Controller, please contact PowMr customer support through the official channels provided at the point of purchase or on the PowMr website. Please have your product model and purchase details ready when contacting support.


