1. Introduction
The innomaker CAM-MIPI327RAW is an industrial camera module designed for seamless integration with Raspberry Pi boards. It features the STARVIS IMX327LQR Color CMOS Sensor, providing 2.13 Megapixels for high-quality imaging. This module connects directly to the CSI-2 Pi camera interface, enabling raw-sensor data acquisition. It is compatible with various Raspberry Pi models, including Pi 5, 4, 3B+, 3B, A+, CM3+, CM3, and CM4, and supports Bullseye libcamera.

Figure 1: The innomaker CAM-MIPI327RAW Industrial Camera Module, showing the camera board with the lens assembly and the attached ribbon cable.
2. Setup and Installation
This section provides instructions for setting up your CAM-MIPI327RAW camera module with a Raspberry Pi. The Raspberry Pi OS includes built-in drivers for the CAM-IMX327RAW module, requiring only a few configuration steps.
2.1 Hardware Connection
Ensure your Raspberry Pi is powered off before connecting the camera module. Connect the provided 15PIN 1.0mm FPC cable from the camera module to the CSI connector on your Raspberry Pi board. Ensure the cable is inserted correctly with the silver contacts facing the correct direction (typically towards the Ethernet port on most Pi models).

Figure 2: The camera module connected to a Raspberry Pi board, illustrating its wide compatibility with various Raspberry Pi models including Pi 4, 3B+, 3B, 3, 2, B+, A, and Zero.
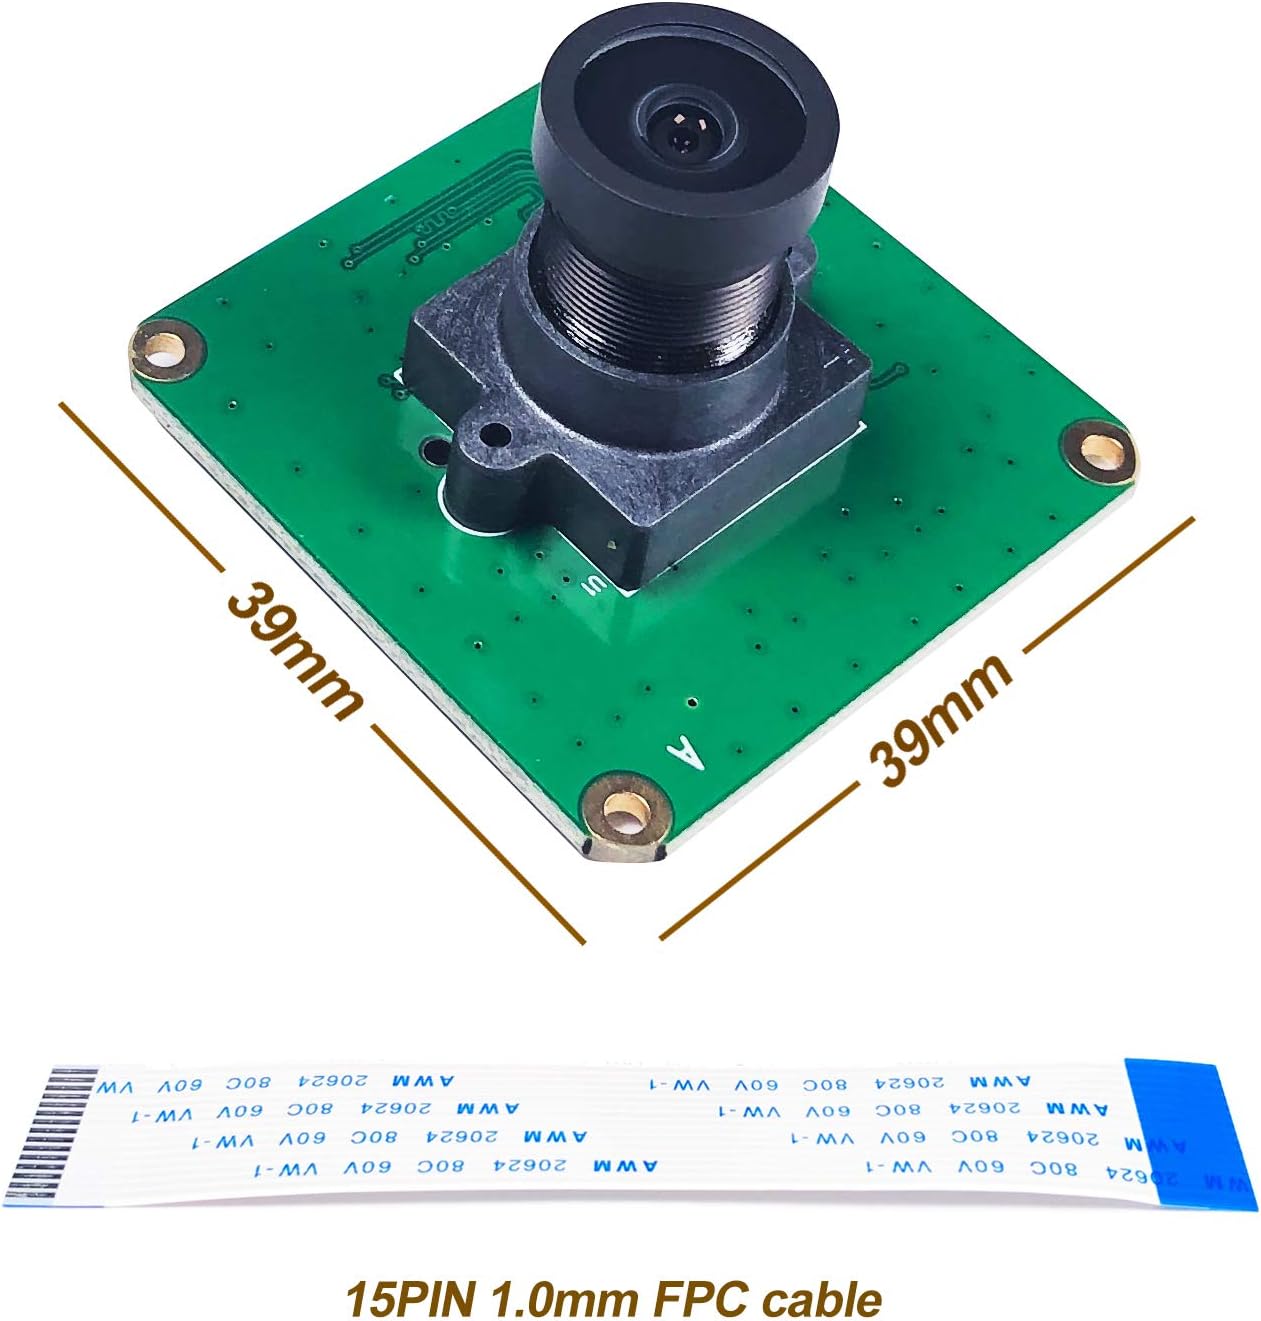
Figure 3: Physical dimensions of the camera module (39mm x 39mm) and details of the 15PIN 1.0mm FPC cable used for connection.
2.2 Software Configuration (Raspberry Pi OS)
Follow these steps to configure your Raspberry Pi for the camera module:
- Edit
config.txt:Open the terminal and execute the command:
sudo nano /boot/config.txtAdd the following line to the file and save it:
dtparam=i2c_vc=on,dtoverlay=imx327,clock-frequency=74250000 - Edit
cmdline.txt:Open the terminal and execute the command:
sudo nano /boot/cmdline.txtAdd
cma=128Mto the end of the existing line. Do not add a new line. Save the file. - Reboot Raspberry Pi:
Reboot your Raspberry Pi for the changes to take effect:
sudo reboot - Verify Device:
After reboot, check if the video device is recognized:
ls /dev/video*You should see
/dev/video0. If not, review the previous steps for any errors. - Frame Rate Test (Optional):
To test the frame rate, use the command:
v4l2-ctl --stream-mmap --stream-count=-1 -d /dev/video0 --stream-to=/dev/nullPress
Ctrl+Cto stop the test. - Real-time Preview (Advanced):
For real-time preview using innomaker's program, download it from their official wiki. Navigate to the downloaded directory and execute:
cd cam-mipi327rawchmod -R a+rwx *cd cam-mipi327raw/tools./vcmipidemo-1028 -s 500 -g 0x68 -a -w '67 115 70' -f
3. Operation
The CAM-MIPI327RAW module is designed for various imaging applications, including surveillance, night vision, industrial, and astronomical uses. Its primary function is to capture raw sensor data via the CSI-2 interface.
3.1 Lens Adjustment and Replacement
The camera module comes with a wide-angle fisheye lens. This lens is replaceable, allowing for customization based on specific application needs. To adjust focus, gently rotate the lens. For replacement, unscrew the current lens and screw in a compatible one.
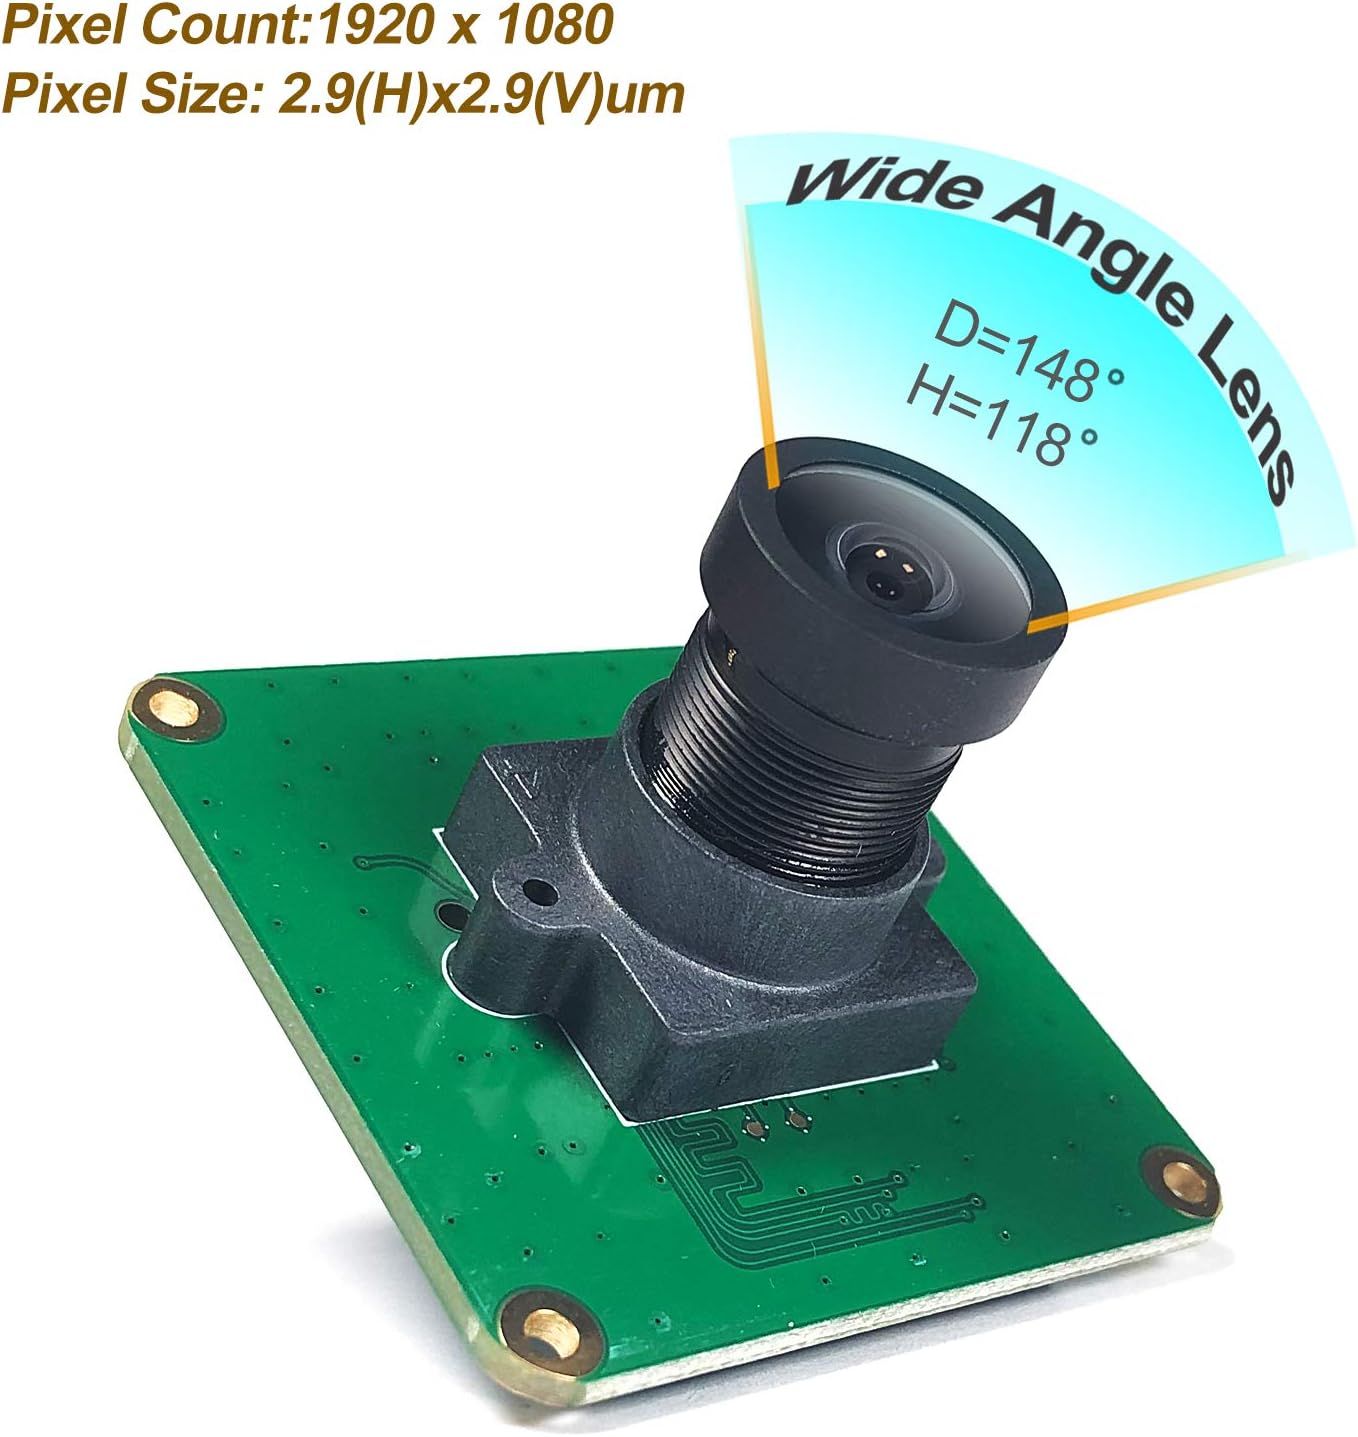
Figure 4: Illustration of the wide-angle fisheye lens, showing a diagonal field of view (D) of 148 degrees and a horizontal field of view (H) of 118 degrees. Pixel count is 1920x1080 with a pixel size of 2.9(H)x2.9(V)um.

Figure 5: Demonstrates the replaceable lens feature. The lens can be unscrewed from the camera module, and the module has lens holes of 20mm with 2xD2.0mm mounting holes.
3.2 CSI-2 Output
The camera module utilizes a CSI-2 interface for data output. It supports 2 lanes with RAW10 or RAW12 data formats. The default CSI-2 speed is 891Mbps per lane, operating in streaming mode.
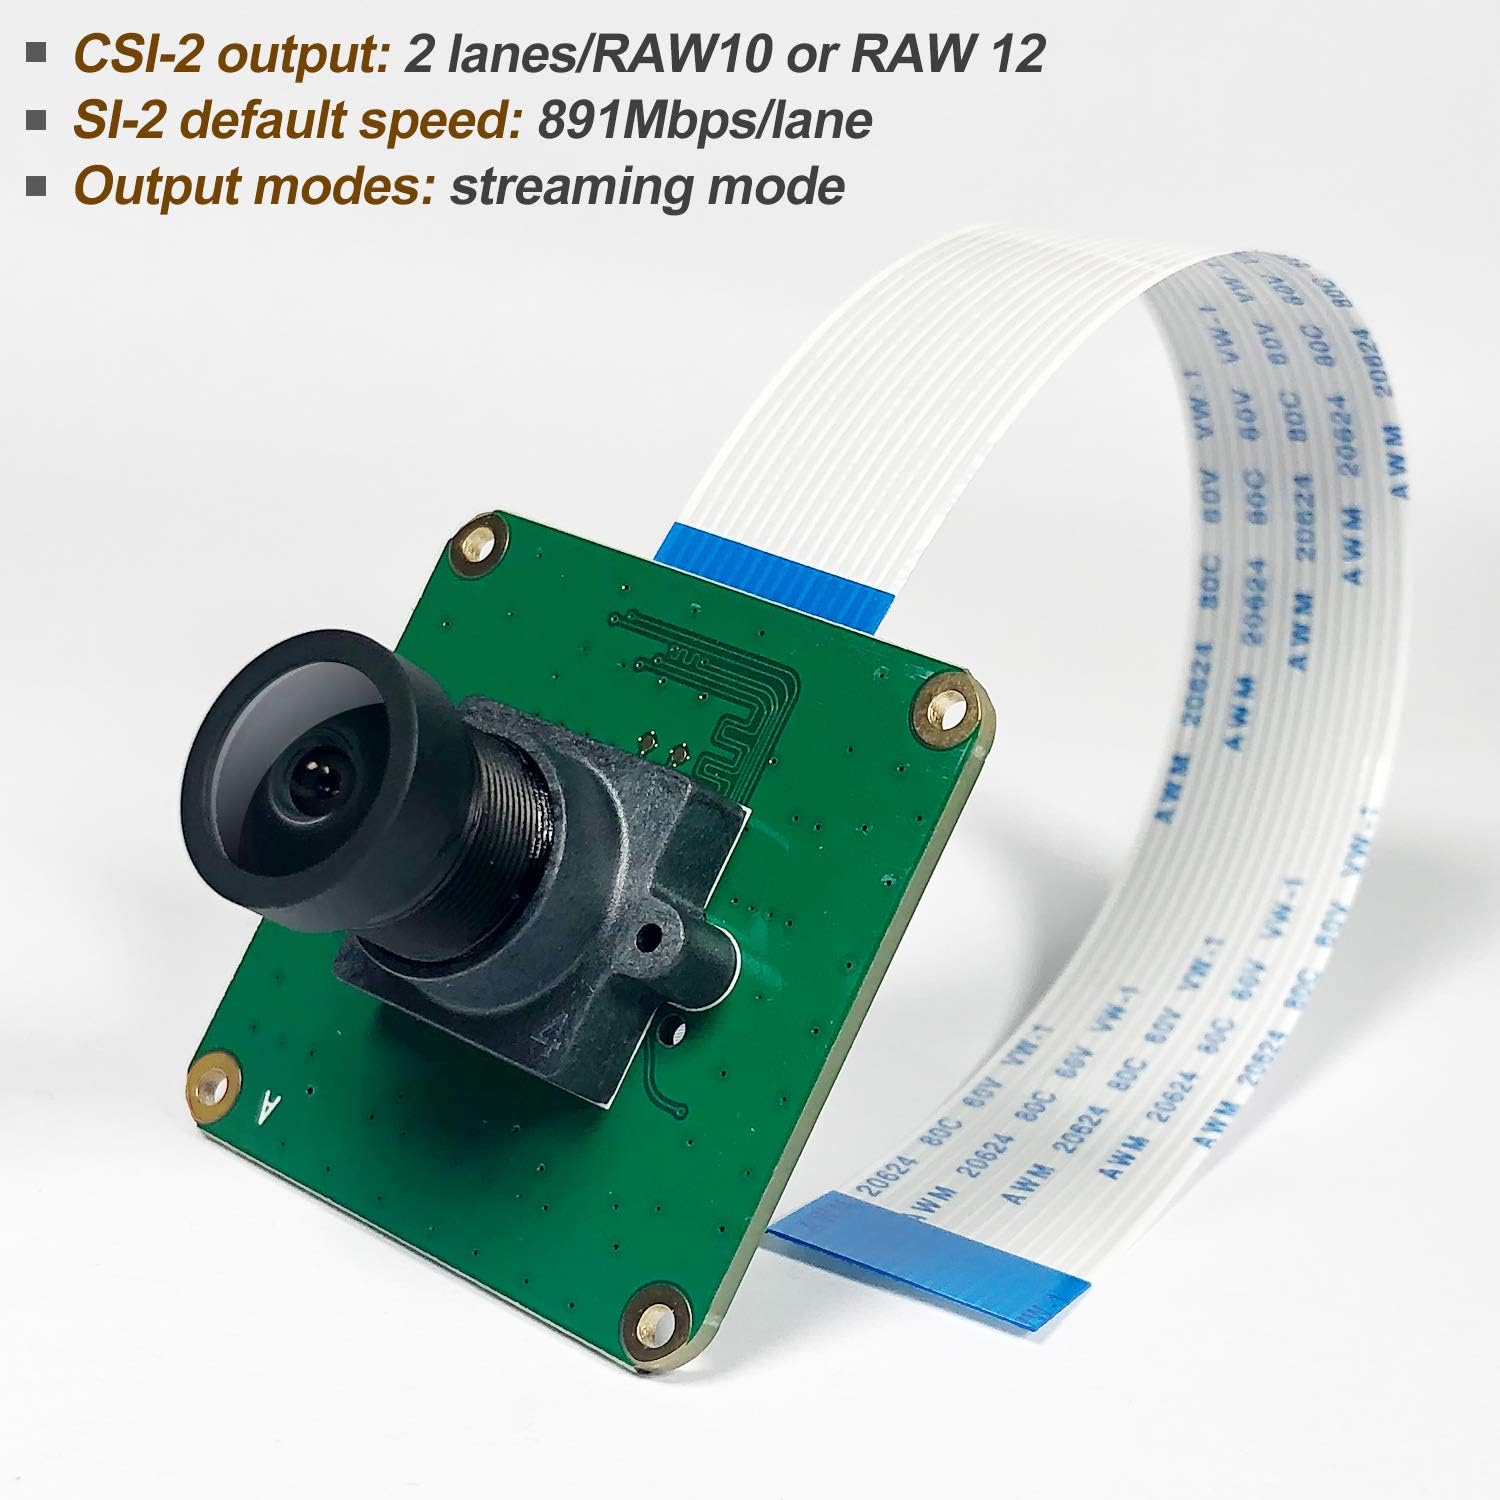
Figure 6: Details of the CSI-2 output, including 2 lanes/RAW10 or RAW12, a default speed of 891Mbps/lane, and support for streaming mode.
4. Maintenance
To ensure optimal performance and longevity of your camera module, follow these general maintenance guidelines:
- Cleaning: Gently clean the lens and sensor surface with a soft, lint-free cloth or a specialized lens cleaning pen. Avoid using abrasive materials or harsh chemicals.
- Handling: Always handle the camera module by its edges to avoid touching the lens or sensor. Static electricity can damage electronic components, so take precautions (e.g., use an anti-static wrist strap) when handling.
- Storage: Store the module in a dry, dust-free environment, away from direct sunlight and extreme temperatures.
- Environmental Conditions: Avoid exposing the module to excessive moisture, dust, or corrosive substances.
5. Troubleshooting
This section addresses common issues you might encounter with the CAM-MIPI327RAW module.
- Issue: Camera not detected (
ERROR: *** no cameras available ***) Possible Causes & Solutions:
- Incorrect Cable Connection: Ensure the FPC cable is securely and correctly inserted into both the camera module and the Raspberry Pi's CSI connector. Verify the silver contacts are facing the correct direction.
- Configuration File Errors: Double-check the edits made to
/boot/config.txtand/boot/cmdline.txt. Even a small typo can prevent detection. Ensuredtparam=i2c_vc=on,dtoverlay=imx327,clock-frequency=74250000is correctly added toconfig.txtandcma=128Mis appended to the single line incmdline.txt. - Insufficient Power: Ensure your Raspberry Pi has a stable and sufficient power supply, especially if other peripherals are connected.
- Outdated OS/Firmware: While the module supports Bullseye libcamera, ensure your Raspberry Pi OS is up-to-date. Run
sudo apt update && sudo apt full-upgrade. - Hardware Fault: If all software and connection checks fail, the module or the Raspberry Pi's CSI port might be faulty.
- Issue: Poor image quality or unexpected colors
Possible Causes & Solutions:
- Lens Focus: The lens is manually adjustable. Rotate the lens gently to achieve proper focus for your desired distance.
- Lighting Conditions: Ensure adequate lighting for your application. While the STARVIS sensor performs well in low light, extreme darkness without IR illumination will still result in poor images.
- Software Settings: Adjust camera parameters like exposure, gain, and white balance through your imaging software (e.g., libcamera commands) to optimize image quality for your specific environment.
- Dirty Lens/Sensor: Clean the lens and sensor as described in the Maintenance section.
- Issue: Low frame rate or lag
Possible Causes & Solutions:
- Raspberry Pi Model: Older or less powerful Raspberry Pi models (e.g., Pi Zero, Pi 1, Pi 2) may struggle with high-resolution, high-frame-rate video processing. Consider using a Pi 3B+, Pi 4, or Pi 5 for demanding applications.
- Software Overhead: The complexity of your application or other background processes on the Raspberry Pi can affect performance. Minimize unnecessary processes.
- CSI-2 Speed: Ensure the CSI-2 interface is operating at its optimal speed. The default is 891Mbps/lane.
6. Specifications
Key technical specifications for the innomaker CAM-MIPI327RAW Industrial Camera Module:
| Feature | Detail |
|---|---|
| Model Number | CAM-MIPI327RAW |
| Sensor | STARVIS IMX327LQR Color CMOS Active Pixel Sensor |
| Effective Pixels | 2.13 Megapixels (1920x1080) |
| Sensor Size | Diagonal 6.46 mm (Type 1/2.8) |
| Pixel Size | 2.9(H) x 2.9(V) µm |
| Sensor ADC Resolution | 10Bit/12Bit |
| CSI-2 Output | 2 lanes / RAW10 or RAW12 |
| CSI-2 Default Speed | 891Mbps/lane |
| Output Modes | Streaming mode |
| Lens Type | Wide Angle Fisheye Lens (Replaceable) |
| Field of View (FOV) | Diagonal=148°, Horizontal=118° |
| Lens Holes | 20mm, 2xD2.0mm |
| Mounting Holes | 4xD2.2mm |
| Dimensions | 39mm x 39mm (Board) |
| FPC Cable | 15PIN 1.0mm |
| Operating System Support | Linux (Raspberry Pi OS, Bullseye libcamera) |

Figure 7: Detailed view of the IMX327LQR color CMOS sensor, highlighting its 2.07M pixel count, diagonal size of 6.46 mm (Type 1/2.8), and Sensor ADC Resolution of 10Bit/12Bit.
7. Warranty Information
The product comes with a standard return policy allowing for refund or replacement within 30 days of purchase. For specific warranty terms and conditions, please refer to the purchase documentation or contact innomaker customer support.
8. Support and Resources
For further assistance, detailed user manuals, drivers, and source codes, please refer to the official innomaker wiki or contact their support team via email.
- Official Wiki: Consult the innomaker wiki for comprehensive documentation and downloads.
- Email Support: For technical inquiries or support, contact innomaker directly via email.
- Customized Production Service: innomaker also offers customized production services for specific project requirements.
Note: Specific links to the wiki or email addresses are typically provided in the product packaging or official website.


