1. Introduction
This manual provides detailed instructions for the safe and efficient installation, operation, and maintenance of your LogiLink BP0100 Aluminium Monitor Desk Stand. This desk mount is designed for 17-32 inch touch screens, offering a full range of motion for optimal positioning. It features a gas lift mechanism for easy height adjustment and balancing of monitor weight. Please read this manual thoroughly before assembly and use.
2. Safety Information
- Ensure all components are present and undamaged before assembly. Do not use if any parts are missing or faulty.
- Verify that the desk surface can support the combined weight of the stand and your monitor.
- Do not exceed the maximum load capacity of 10 kg (22 lbs).
- Always follow the assembly steps in the correct order. Incorrect installation may result in injury or equipment damage.
- Keep children and pets away during installation. Small parts may be a choking hazard.
- Adjust the gas spring tension carefully according to your monitor's weight to ensure stable positioning.
- Periodically check all screws and connections to ensure they remain secure.
3. Package Contents
Please check the package for the following items:
- 1 x LogiLink BP0100 Touchscreen Monitor Desk Stand
- 1 x Screw Pack (various screws for monitor attachment)
- 1 x User Manual (this document)
- Necessary tools for assembly (e.g., Allen keys)
4. Specifications
| Model | BP0100 |
| Compatible Devices | Monitors (17-32 inches) |
| Material | Aluminum |
| Mounting Type | Table Mount |
| Load Capacity | Max. 10 kg (22 lbs) |
| VESA Compatibility | 75x75 mm, 100x100 mm |
| Tilt Range | -90° to +90° |
| Swivel Range | -40° to +40° |
| Rotation Range | -180° to +180° |
| Product Dimensions (L x W x H) | 38.2 x 30.6 x 32.5 cm |
| Item Weight | 3.96 kg |
5. Setup and Installation
Follow these steps to assemble and install your monitor desk stand:
- Attach the Base: Place the stand base on a stable desk surface. Ensure it is positioned securely and does not wobble.
- Prepare the Monitor: Lay your monitor face down on a soft, clean surface to prevent scratches. Locate the VESA mounting holes on the back of your monitor.
- Attach VESA Plate to Monitor: Align the VESA mounting plate from the stand with the VESA holes on your monitor (75x75mm or 100x100mm). Use the appropriate screws from the provided screw pack to secure the plate to the monitor. Do not overtighten.
- Mount Monitor to Arm: Carefully lift the monitor with the attached VESA plate and slide it onto the arm's mounting head. Ensure it clicks into place or is secured with the provided locking mechanism.


- Cable Management: Route your monitor cables through the integrated cable management channels on the stand arm to keep your workspace tidy.

6. Operating and Adjustments
The LogiLink BP0100 stand offers various adjustments for optimal viewing comfort:
- Height Adjustment (Gas Lift): The integrated gas lift allows for smooth and effortless vertical positioning of your monitor. Gently push or pull the monitor to the desired height. If the monitor drifts or is difficult to move, adjust the gas spring tension using the provided tool (usually an Allen key) at the designated adjustment point on the arm.

- Tilt Adjustment: Tilt your monitor forward or backward to reduce glare and find the best viewing angle. The stand supports a tilt range of -90° to +90°.


- Swivel Adjustment: Swivel the monitor left or right to share your screen with others or adjust your viewing position. The stand allows for a swivel range of -40° to +40°.
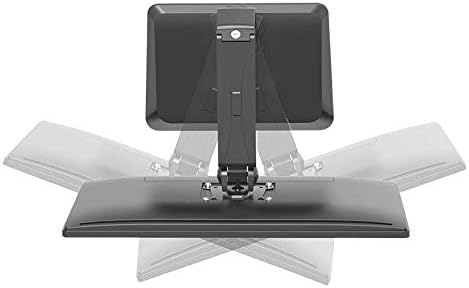
- Rotation Adjustment: Rotate your monitor 360° to switch between landscape and portrait orientations. This is particularly useful for coding, document viewing, or specific applications. The stand supports a rotation range of -180° to +180°.

The stand is also ideal for touchscreen use, allowing easy interaction with the display.

7. Maintenance
- Cleaning: Use a soft, damp cloth to clean the stand. Avoid abrasive cleaners or solvents that could damage the finish.
- Inspection: Periodically inspect all mounting hardware and connections to ensure they are tight and secure. Retighten any loose screws as necessary.
- Gas Spring: The gas spring is designed for long-term use and generally requires no maintenance. If you notice a significant change in its performance, refer to the troubleshooting section or contact support.
8. Troubleshooting
| Problem | Possible Cause | Solution |
|---|---|---|
| Monitor sags or does not stay at desired height. | Gas spring tension is too low for monitor weight. | Adjust the gas spring tension using the provided Allen key. Turn clockwise to increase tension for heavier monitors, counter-clockwise for lighter monitors. |
| Monitor is difficult to move up or down. | Gas spring tension is too high for monitor weight. | Adjust the gas spring tension using the provided Allen key. Turn counter-clockwise to decrease tension. |
| Stand feels unstable or wobbly. | Mounting screws are loose or desk surface is uneven. | Ensure all assembly screws are tightened. Verify the desk surface is flat and stable. |
9. Warranty Information
For specific warranty details regarding your LogiLink BP0100 Monitor Desk Stand, please refer to the warranty card included with your product or visit the official LogiLink website. Keep your proof of purchase for warranty claims.
10. Customer Support
If you have any questions, require technical assistance, or need to report a problem with your LogiLink BP0100 Monitor Desk Stand, please contact LogiLink customer support through their official website or the contact information provided in your product packaging.


