
1. Introduction
This manual provides instructions for the proper setup, operation, and maintenance of the Accuris Instruments W3200-1200 Precision Balance. This instrument is designed for accurate weighing in laboratory and industrial settings, offering a readability of 0.001g and a maximum capacity of 1200g.
The W3200-1200 features a large, backlit LCD screen and advanced software supporting multiple weighing modes, including standard weighing, piece counting, percent deviation, and check weighing.
2. Safety Information
- Always operate the balance on a stable, level surface free from vibrations.
- Avoid exposing the balance to extreme temperatures, humidity, or direct sunlight.
- Do not overload the balance beyond its maximum capacity of 1200g.
- Ensure the power supply matches the specified voltage (115V for this model).
- Keep the balance clean and free from dust and corrosive substances.
- Disconnect the power before cleaning or moving the instrument.
- Only use accessories and parts approved by Accuris Instruments.
3. Package Contents
Verify that all components are present and undamaged upon unpacking:
- Accuris Instruments W3200-1200 Precision Balance unit
- Weighing pan
- Draft shield (if applicable to your model variant)
- Power adapter (115V, US Plug)
- User Manual (this document)
4. Setup
4.1 Unpacking and Placement
- Carefully remove the balance from its packaging.
- Place the balance on a firm, level, and vibration-free surface. Avoid locations near air currents, heating/cooling vents, or direct sunlight.
4.2 Assembly
- Place the weighing pan onto the pan support. Ensure it is seated correctly and stably.
- If your model includes a draft shield, carefully assemble it around the weighing pan according to the diagrams provided in the separate assembly guide (if applicable).
4.3 Power Connection
- Connect the power adapter to the power input port on the rear of the balance.
- Plug the power adapter into a grounded 115V AC power outlet.
4.4 Initial Power-On
- Press the [ON/OFF] button to power on the balance.
- Allow the balance to warm up for at least 30 minutes for optimal stability and accuracy.
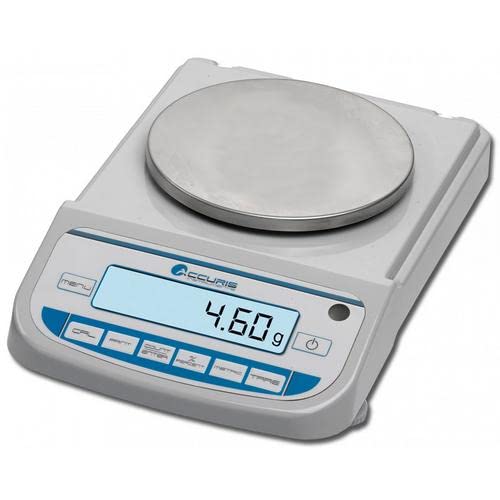
Figure 1: Accuris Instruments W3200-1200 Precision Balance. This image shows the balance unit with its weighing pan and digital display, illustrating its compact design for laboratory use.
5. Operating Instructions
5.1 Power On/Off
- To turn on: Press the [ON/OFF] button.
- To turn off: Press and hold the [ON/OFF] button until the display turns off.
5.2 Tare Function
The tare function sets the current weight on the pan to zero, allowing for subsequent measurements to be taken without including the weight of the container.
- Place the empty container (e.g., beaker, weighing boat) on the weighing pan.
- Wait for the display to stabilize.
- Press the [TARE] button. The display will show 0.000g.
- Add the sample to the container; the display will show the net weight of the sample.
5.3 Weighing Modes
The W3200-1200 supports several weighing modes. Use the [MODE] button to cycle through them.
5.3.1 Standard Weighing
This is the default mode for measuring the absolute weight of a sample.
- Ensure the balance is tared (display shows 0.000g).
- Place the sample directly on the pan or in a tared container.
- Read the stable weight displayed on the screen.
5.3.2 Piece Counting Mode
This mode allows for counting a large number of identical items by weighing a small sample.
- Enter Piece Counting mode using the [MODE] button.
- The display will prompt for a sample size (e.g., 10, 20, 50 pieces).
- Place the specified number of pieces on the pan.
- Confirm the sample size. The balance will calculate the average piece weight.
- Add the bulk quantity of items; the display will show the total count.
5.3.3 Percent Deviation Mode
This mode measures the weight of a sample as a percentage deviation from a reference weight.
- Enter Percent Deviation mode using the [MODE] button.
- Place the reference sample on the pan and confirm its weight as 100%.
- Remove the reference sample.
- Place subsequent samples on the pan; the display will show their weight as a percentage of the reference.
5.3.4 Check Weighing Mode
This mode is used for component inspection, comparing a sample's weight against predefined upper and lower limits.
- Enter Check Weighing mode using the [MODE] button.
- Set the upper and lower weight limits according to the instructions on the display.
- Place items on the pan; the balance will indicate if the weight is within, above, or below the set limits.
5.4 In-Lab Calibration
Regular calibration ensures the accuracy of your balance. The W3200-1200 features an easy in-lab calibration function.
- Ensure the balance is stable and warmed up.
- Access the calibration menu (refer to the balance's on-screen prompts or a dedicated calibration button, if present).
- The balance will prompt you to place a specific calibration weight (e.g., 500g, 1000g) on the pan. Use a certified calibration weight.
- Follow the on-screen instructions to complete the calibration process.
- Upon successful calibration, the balance will return to weighing mode.
5.5 RS232 Port for Data Output
The balance is equipped with an RS232 port for connecting to a computer or printer for data logging and output.
- Connect a compatible RS232 cable from the balance to your computer or printer.
- Ensure the communication settings (baud rate, data bits, parity, stop bits) on both the balance and the connected device are matched. Refer to the balance's system settings for configuration.
- Use appropriate software on your computer to receive data, or configure your printer to print weighing results.
6. Maintenance
6.1 Cleaning
- Always disconnect the power cord before cleaning.
- Wipe the exterior of the balance with a soft, damp cloth. Use a mild detergent if necessary.
- Do not use abrasive cleaners, solvents, or harsh chemicals, as these can damage the finish or internal components.
- Ensure no liquids enter the balance housing or display.
- The weighing pan can be removed and cleaned separately with water and mild soap. Dry thoroughly before reattaching.
6.2 Storage
- When not in use for extended periods, store the balance in a clean, dry, and dust-free environment.
- Keep the original packaging for safe transport or storage.
7. Troubleshooting
| Problem | Possible Cause | Solution |
|---|---|---|
| Balance does not power on | No power supply; faulty power adapter; power button issue | Check power cord connection; verify outlet functionality; try a different power adapter (if available); contact support. |
| Inaccurate readings | Not level; vibrations; temperature fluctuations; needs calibration; dirty pan | Ensure balance is level; move to a stable location; allow warm-up time; perform calibration; clean weighing pan. |
| Display shows 'OVERLOAD' | Weight exceeds maximum capacity | Remove excess weight immediately. Do not exceed 1200g. |
| Display shows 'UNSTABLE' | Vibrations; air currents; unstable surface | Relocate balance to a more stable environment; close draft shield; ensure no air currents. |
| RS232 data not transmitting | Incorrect cable; mismatched communication settings; software issue | Verify cable connection; check and match baud rate, data bits, parity, stop bits; consult software documentation. |
8. Specifications
| Feature | Specification |
|---|---|
| Model | W3200-1200 |
| Brand | Accuris Instruments |
| Maximum Capacity | 1200g |
| Readability | 0.001g |
| Power Supply | 115V AC, US Plug |
| Sensor Type | Gold plated ceramic capacitance |
| Display | Large, backlit LCD |
| Communication Port | RS232 |
| Weighing Modes | Standard, Piece Counting, Percent Deviation, Check Weighing |
| Material (Sensor) | Ceramic |
9. Warranty and Support
Accuris Instruments products are manufactured under strict quality control. For warranty information, please refer to the warranty card included with your product or visit the official Accuris Instruments website. For technical support, service, or to order replacement parts, please contact Accuris Instruments customer service through their official channels.