
1. Introduction and Safety Information
This manual provides essential instructions for the safe and effective use of your Valberg FRS-75 EL Fire Resistant Safe. Please read this manual thoroughly before installation and operation to ensure proper functionality and to prevent damage or injury. Keep this manual for future reference.
Important Safety Precautions:
- Always keep keys and digital codes in a secure location, separate from the safe itself.
- Do not store the safe keys inside the safe.
- Ensure the safe is installed on a level, stable surface.
- For maximum security, anchor the safe to the floor as instructed.
- Regularly check the battery level for the digital lock and replace as needed.
2. Product Overview
The Valberg FRS-75 EL is a fire-resistant safe designed to protect valuable documents and items. It features a dual-locking mechanism, combining a digital electronic lock with a traditional key lock for enhanced security. The safe's construction includes two inter-welded walls filled with fire-resistant concrete, providing fire resistance rated LFS 60P according to EN 15659 and 90 minutes according to GOST R 50862. Four solid metal locking bolts secure the door on all four sides.
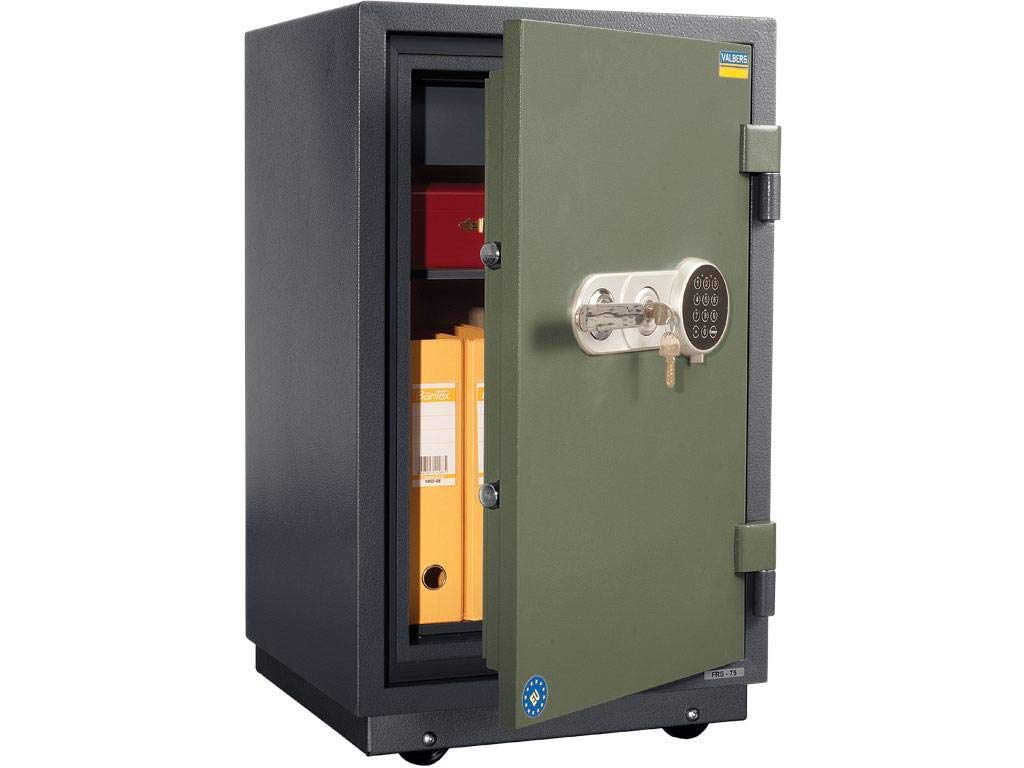
Figure 2.1: The Valberg FRS-75 EL Fire Resistant Safe with its door open, revealing the interior storage space, including a small cash office compartment and a removable shelf. The door displays both the digital keypad and the key lock mechanism.
Key Features:
- Fire Resistance: LFS 60P (EN 15659) and 90 minutes (GOST R 50862).
- Locking System: EL - Digital lock combined with Key locks.
- Construction: Double-walled body and door filled with fire-resistant concrete.
- Security: Four solid metal locking bolts.
- Interior: One adjustable shelf and an internal cash office compartment.
- Anchoring: Provision for anchoring to the floor.
3. Setup and Installation
3.1 Unpacking and Placement
- Carefully remove the safe from its packaging. Inspect for any shipping damage.
- Place the safe in its desired location. Ensure the surface is level and capable of supporting the safe's weight (109 kg).
- Keep the safe away from excessive moisture or extreme temperatures.
3.2 Battery Installation for Digital Lock
The digital lock requires batteries for operation. Locate the battery compartment, typically on the inside of the safe door or behind the keypad. Insert the required batteries (usually AA or AAA, refer to the lock unit for specific type) ensuring correct polarity. Close the compartment securely.
3.3 Anchoring the Safe (Optional but Recommended)
For enhanced security, it is recommended to anchor the safe to the floor. The safe is equipped with pre-drilled holes for this purpose.
- Mark the drilling points on the floor through the pre-drilled holes inside the safe.
- Move the safe and drill holes in the marked positions using an appropriate drill bit for your floor type (concrete, wood, etc.).
- Position the safe back over the drilled holes.
- Secure the safe using appropriate anchor bolts (not included) through the safe's base and into the floor. Tighten all bolts firmly.
4. Operating Instructions
The Valberg FRS-75 EL safe utilizes a dual-locking system: a digital electronic lock and a traditional key lock. Both must be used to open and secure the safe.
4.1 Initial Opening
Upon first use, the safe may be in an unlocked state or require the factory default code and key. Refer to the specific instructions provided with your lock unit for the factory default code. Typically, you will use the override key first to open the safe.
4.2 Setting Your Digital Code
- With the safe door open, locate the reset button on the inside of the door or on the lock mechanism.
- Press the reset button. The lock will emit a beep, and an indicator light will illuminate.
- Within a few seconds, enter your desired personal code (typically 4-8 digits) on the keypad.
- Confirm the code by pressing the '#' or 'ENTER' button. The lock will beep again, confirming the new code is set.
- Test the new code several times with the door open before closing it.
4.3 Opening the Safe
- Insert the key into the key lock and turn it to the open position.
- Enter your personal digital code on the keypad, followed by the '#' or 'ENTER' button.
- If the code is correct, the lock will emit a signal, and you will have a short period to turn the handle (if present) or pull the door open.
4.4 Closing and Locking the Safe
- Close the safe door firmly.
- Turn the handle (if present) to extend the locking bolts.
- Turn the key in the key lock to the locked position and remove it.
- The digital lock will automatically engage after a few seconds, or you may need to press a specific button (e.g., '#') to lock it.
5. Maintenance
5.1 Cleaning
Clean the exterior of the safe with a soft, damp cloth. Do not use abrasive cleaners or solvents, as these can damage the finish or the electronic components.
5.2 Battery Replacement
When the battery power is low, the digital lock will typically indicate this with a warning light or a series of beeps. Replace all batteries promptly to avoid being locked out. Use only new, high-quality batteries of the specified type.
5.3 Key Lock Maintenance
Periodically check the key lock for smooth operation. If the lock feels stiff, a small amount of graphite lubricant can be applied to the key and inserted into the lock. Do not use oil-based lubricants.
6. Troubleshooting
Problem: Safe does not open with digital code.
- Solution: Check if the batteries are low or depleted. Replace them if necessary.
- Solution: Ensure you are entering the correct code. Try re-entering slowly and carefully.
- Solution: Make sure the key lock is turned to the open position before attempting to use the digital lock.
Problem: Safe door will not close or lock.
- Solution: Check for any obstructions preventing the door from closing fully.
- Solution: Ensure the locking bolts are retracted before attempting to close the door.
- Solution: Verify that the key lock is functioning correctly and can be turned to the locked position.
Problem: Forgotten digital code.
- Solution: If you have the override key, use it to open the safe. Once open, you can reset the digital code following the instructions in Section 4.2. If the override key is also unavailable, contact Valberg customer support.
7. Specifications
| Feature | Specification |
|---|---|
| Model | FRS-75 EL |
| Fire Resistance | LFS 60P (EN 15659); 90 min (GOST R 50862) |
| Lock Type | Digital Lock + Key Locks |
| External Dimensions (H*W*D) | 811 mm * 485 mm * 450 mm |
| Internal Dimensions (H*W*D) | 607 mm * 346 mm * 301 mm |
| Cash Office Dimensions (H*W*D) | 85 mm * 343 mm * 267 mm |
| Weight | 109 kg |
| Capacity | 64 liters (safe) / 8 liters (cash office) |
| Number of Shelves | 1 (adjustable) |
| Plinth + Wheels Height | 67 mm |
| Color | Brown with a hint of hammer enamel doors - shade of green with hammer effect |
8. Warranty and Support
8.1 Warranty Information
Valberg products are manufactured to high-quality standards. For specific warranty terms and conditions, please refer to the warranty card included with your purchase or visit the official Valberg website. Keep your proof of purchase for warranty claims.
8.2 Customer Support
If you encounter any issues not covered in this manual or require further assistance, please contact Valberg customer support. Contact details can typically be found on the product packaging, the official Valberg website, or your retailer's support page.

