
1. Introduction
Thank you for choosing the ATUMTEK ATMS034 Dual Monitor Arm. This product is designed to enhance your workspace ergonomics and free up valuable desk space by securely mounting two computer monitors. This manual provides detailed instructions for proper installation, operation, and maintenance to ensure safe and efficient use of your monitor arm.
The ATMS034 is compatible with most LCD monitors ranging from 13 to 27 inches, supporting VESA mounting patterns of 75x75mm and 100x100mm, with a weight capacity of up to 17.6 lbs (8 kg) per arm.
2. Safety Information
- Read all instructions carefully before installation and use.
- Ensure your desk surface is strong enough to support the combined weight of the monitor arm and two monitors.
- Do not exceed the maximum weight capacity of 17.6 lbs (8 kg) per arm.
- Ensure all screws are securely tightened during installation to prevent accidental detachment.
- Keep children and pets away from the installation area.
- If you encounter any difficulties during installation, consult a qualified professional.
3. Package Contents
Please verify that all components are present before beginning installation:
- Monitor Arm Assembly (Main Pole, Horizontal Arm with VESA plates)
- C-Clamp Base
- Grommet Base Components
- VESA Screws (M4x12, M4x30, M5x12, M5x30)
- Washers and Spacers
- Hex Keys (various sizes)
- Cable Clips
- Instruction Manual
4. Setup and Installation
The ATUMTEK ATMS034 offers two mounting options: C-Clamp and Grommet. Choose the method best suited for your desk.
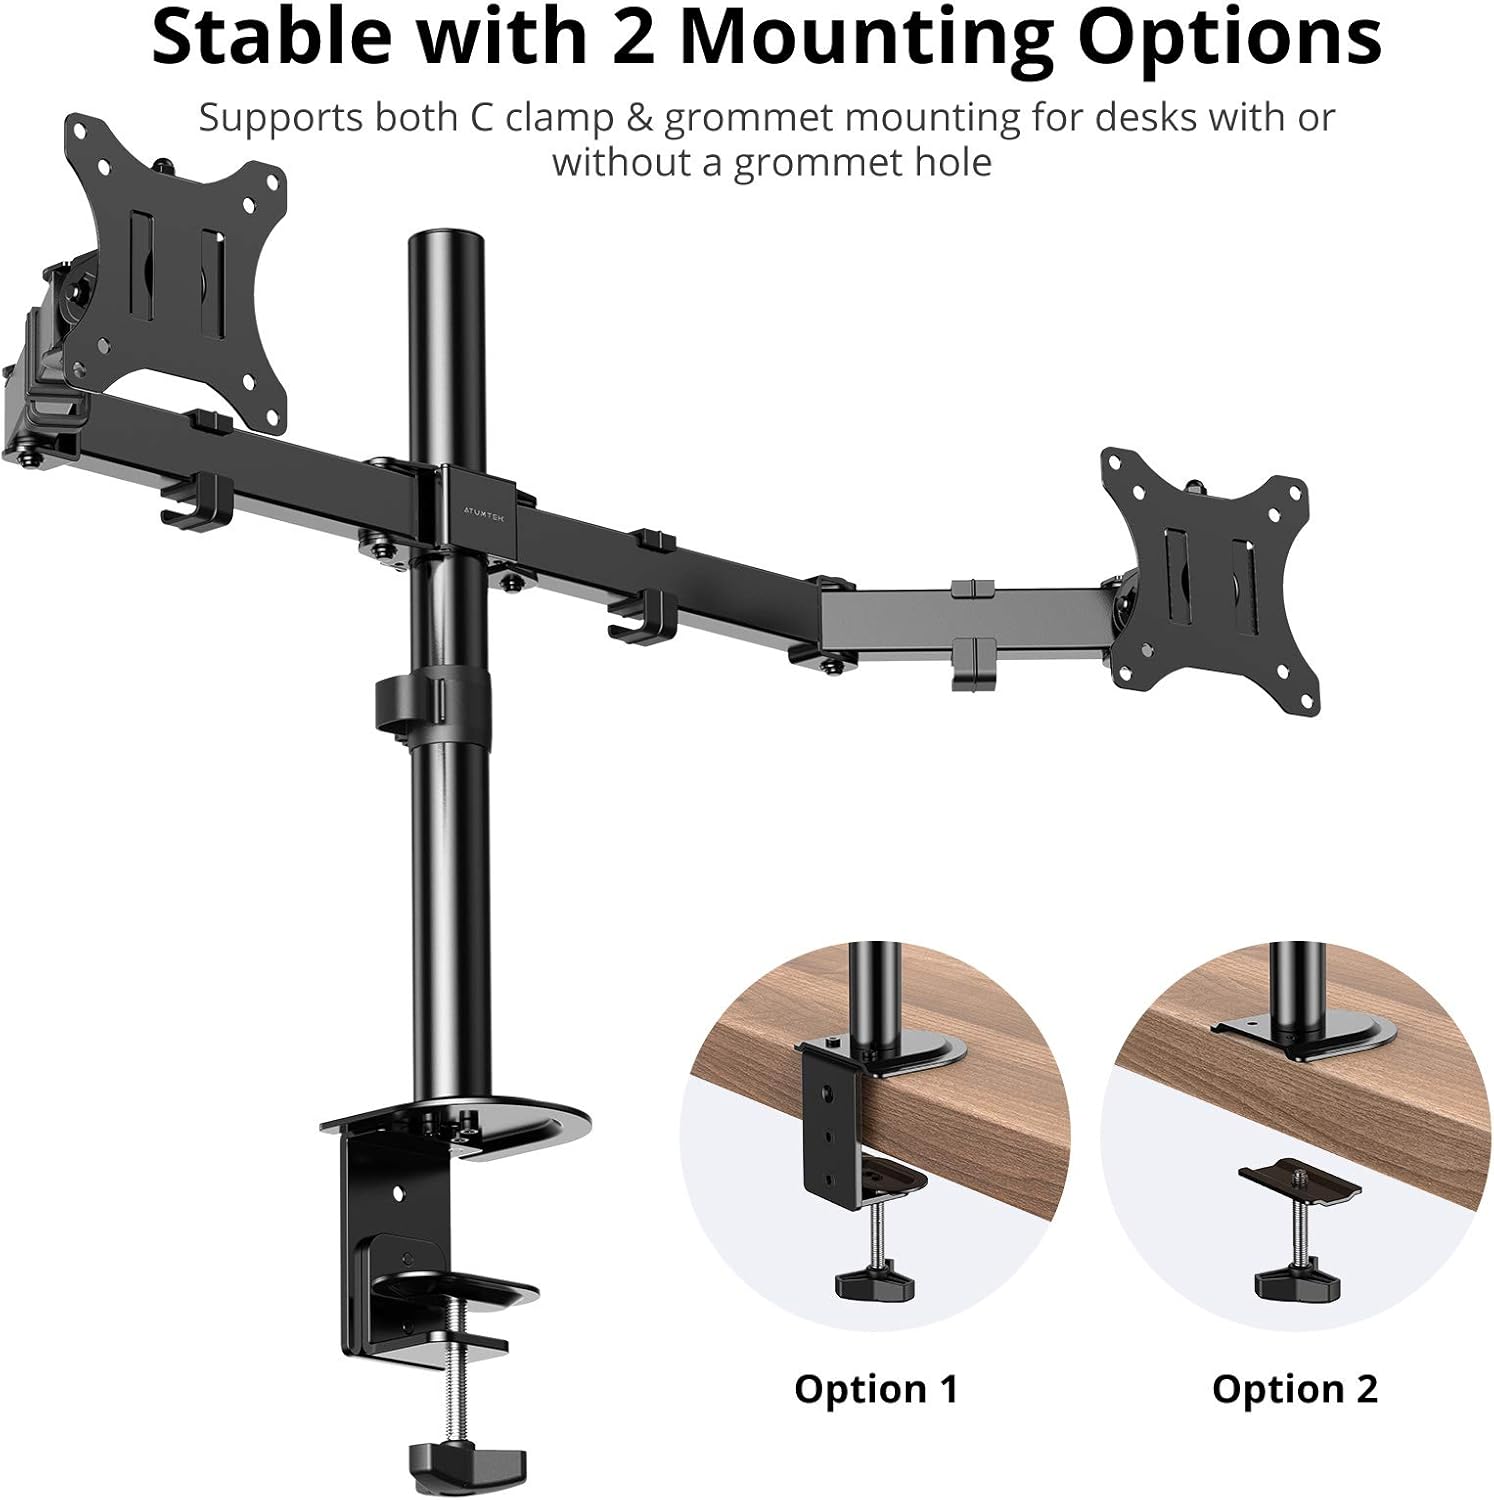
Image: The ATUMTEK ATMS034 Dual Monitor Arm illustrating both C-clamp and grommet mounting methods for desk attachment.
4.1. C-Clamp Installation
- Attach the C-clamp base to the bottom of the main pole.
- Position the main pole assembly at the desired location on your desk.
- Tighten the C-clamp screw until the mount is securely fastened to the desk. Ensure the desk thickness does not exceed 2.4 inches (6 cm).
- Slide the horizontal arm onto the main pole and secure it at the desired height using the provided hex key.
4.2. Grommet Installation
- If your desk has a grommet hole, remove the grommet cover.
- Assemble the grommet base components according to the diagram in the included quick start guide.
- Insert the main pole through the grommet hole and secure the base from underneath the desk using the provided plate and screw.
- Slide the horizontal arm onto the main pole and secure it at the desired height using the provided hex key.
4.3. Attaching Monitors
- Carefully attach the VESA plates to the back of your monitors using the appropriate VESA screws (75x75mm or 100x100mm). Use washers and spacers if necessary to ensure a secure fit without overtightening.
- Slide the monitors (with VESA plates attached) onto the ends of the horizontal arms. Ensure they click into place or are secured with the locking mechanism.
- Adjust the tension of the arm joints using the hex keys to support the weight of your monitors. This will prevent sagging or unwanted movement.
5. Operating and Adjustments
The ATUMTEK ATMS034 offers extensive adjustability for optimal viewing comfort.

Image: The ATUMTEK ATMS034 Dual Monitor Arm demonstrating its full range of motion, including tilt, swivel, and 360-degree rotation.
5.1. Tilt, Swivel, and Rotation
- Tilt: Monitors can be tilted from -35° to +90° to reduce glare and find the perfect vertical angle.
- Swivel: Each monitor arm can swivel from -90° to +90°, allowing you to share your screen or adjust viewing angles horizontally.
- Rotation: Monitors can be rotated a full 360°, enabling quick switching between landscape and portrait orientations.

Image: Two monitors mounted on the ATUMTEK ATMS034, one in portrait mode (90° rotation) and the other in landscape mode (180° rotation), illustrating ergonomic viewing flexibility.
5.2. Height Adjustment
The horizontal arm can be adjusted vertically along the main pole to achieve the desired monitor height. Loosen the securing screw on the main pole, slide the arm to the new position, and retighten the screw firmly.
6. Cable Management
The ATMS034 features integrated cable clips along the arms and main pole to keep your workspace tidy and organized.

Image: A monitor mounted on the ATUMTEK ATMS034, demonstrating how cables are neatly routed through the integrated cable clips on the arm, contributing to a clean desk setup.
Route your monitor power and video cables through these clips to prevent clutter and ensure a clean aesthetic. The clips are detachable for easy cable insertion and removal.
7. Specifications
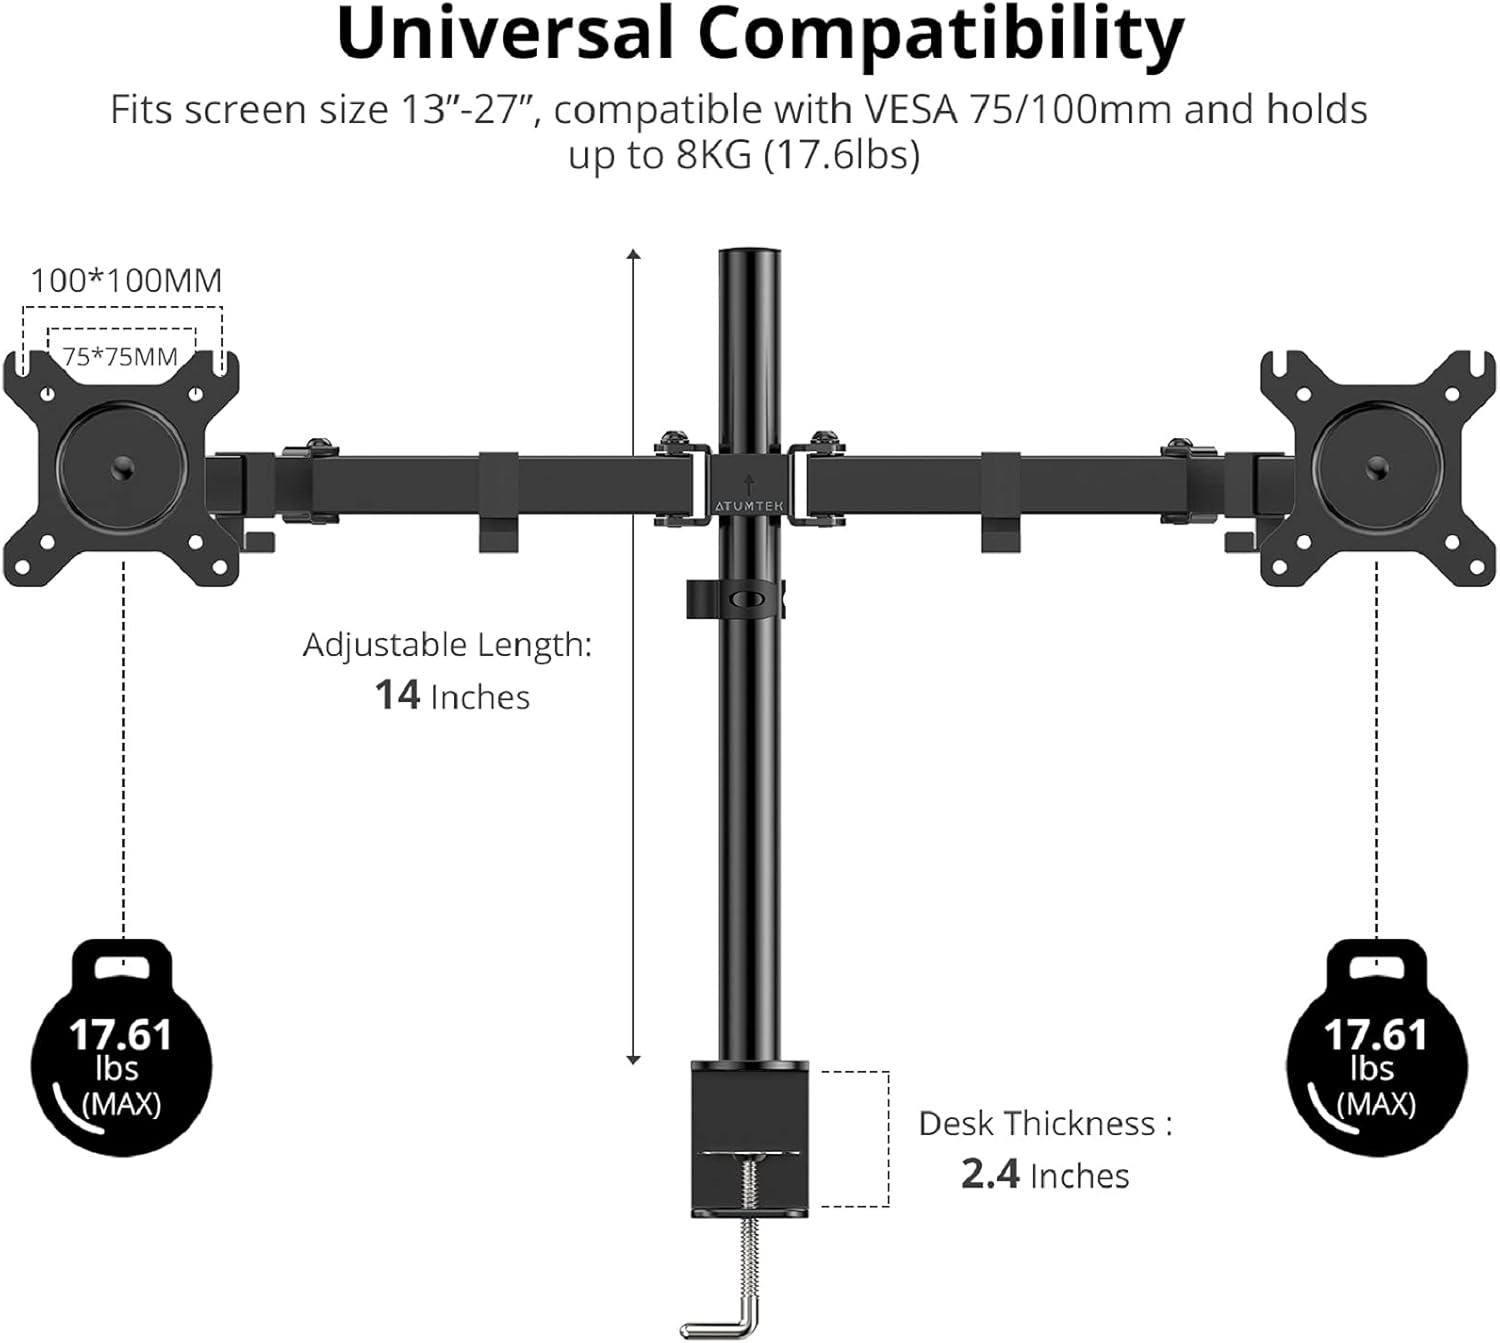
Image: A diagram illustrating the universal compatibility of the ATUMTEK ATMS034 Dual Monitor Arm, showing supported screen sizes (13-27 inches), VESA patterns (75x75mm, 100x100mm), weight capacity (17.6 lbs per arm), adjustable length (14 inches), and maximum desk thickness (2.4 inches).
| Feature | Specification |
|---|---|
| Model | ATMS034 |
| Compatible Monitor Size | 13" - 27" (33-69 cm) |
| Weight Capacity per Arm | Up to 17.6 lbs (8 kg) |
| VESA Compatibility | 75x75mm, 100x100mm |
| Tilt Range | -35° to +90° |
| Swivel Range | -90° to +90° |
| Rotation Range | 360° |
| Height Adjustment Range | 14 inches (along main pole) |
| Maximum Desk Thickness | 2.4 inches (6 cm) |
| Mounting Options | C-Clamp or Grommet |
| Material | Metal |
| Product Dimensions | 54 x 23 x 8 cm (packaged) |
| Item Weight | 3.27 kg |
8. Troubleshooting
- Monitors are sagging or not holding position: Ensure the tension screws on the arm joints are tightened sufficiently for the weight of your monitors. Use the provided hex keys to adjust.
- Mount feels unstable: Double-check that the C-clamp or grommet base is securely tightened to the desk. Ensure the desk surface is flat and sturdy.
- Difficulty attaching VESA plate: Verify that you are using the correct VESA screw size (M4 or M5) and length for your monitor. Use spacers if the monitor's back is uneven.
- Arm does not move smoothly: Check for any obstructions. If the arm feels too stiff or too loose, adjust the tension screws on the joints.
9. Care and Maintenance
- Regularly check all screws and connections to ensure they remain tight.
- Clean the monitor arm with a soft, damp cloth. Avoid abrasive cleaners or solvents.
- Do not apply excessive force when adjusting the arms; use the tension adjustments as needed.
10. Warranty and Customer Support
ATUMTEK stands behind the quality of its products. The ATMS034 Dual Monitor Arm comes with a 10 Years Product Quality Guarantee. If you encounter any issues or have questions regarding your product, please do not hesitate to contact our friendly customer service team. We are committed to providing excellent support and ensuring your satisfaction.
For assistance, please refer to the contact information provided on the ATUMTEK official website or your purchase documentation.