1. Introduction
This manual provides essential information for the proper installation, operation, and maintenance of your JVC KD-X470BHS Bluetooth Car Stereo Receiver. The KD-X470BHS is a single-DIN digital media receiver featuring Bluetooth connectivity for hands-free calling and audio streaming, a front USB port, an auxiliary input, and Amazon Alexa compatibility. It includes an AM/FM tuner with HD Radio, MP3 playback capabilities, and a 13-band equalizer for enhanced audio control.
Please read this manual thoroughly before using the product to ensure safe and optimal performance. Keep this manual for future reference.
2. Package Contents
Before installation, verify that all items are present in the package:
- JVC KD-X470BHS Receiver
- Wiring Harness
- Microphone
- Mounting Hardware (Screws, Removal Keys)
- Instruction Manual and Warranty Card

Image: JVC KD-X470BHS package contents, showing the main unit, wiring, microphone, and manuals.
3. Setup and Installation
3.1 Safety Precautions
- Disconnect the vehicle's negative battery terminal before installation to prevent electrical shorts.
- Ensure proper wiring connections to avoid damage to the unit or vehicle.
- Consult a professional installer if you are unsure about any part of the installation process.
3.2 Physical Installation
The KD-X470BHS is designed for single-DIN dash openings. The installation size is approximately 7-3/16" (182mm) W x 2-1/8" (53mm) H x 3-15/16" (100mm) D. Ensure adequate space behind the dash for wiring and ventilation.
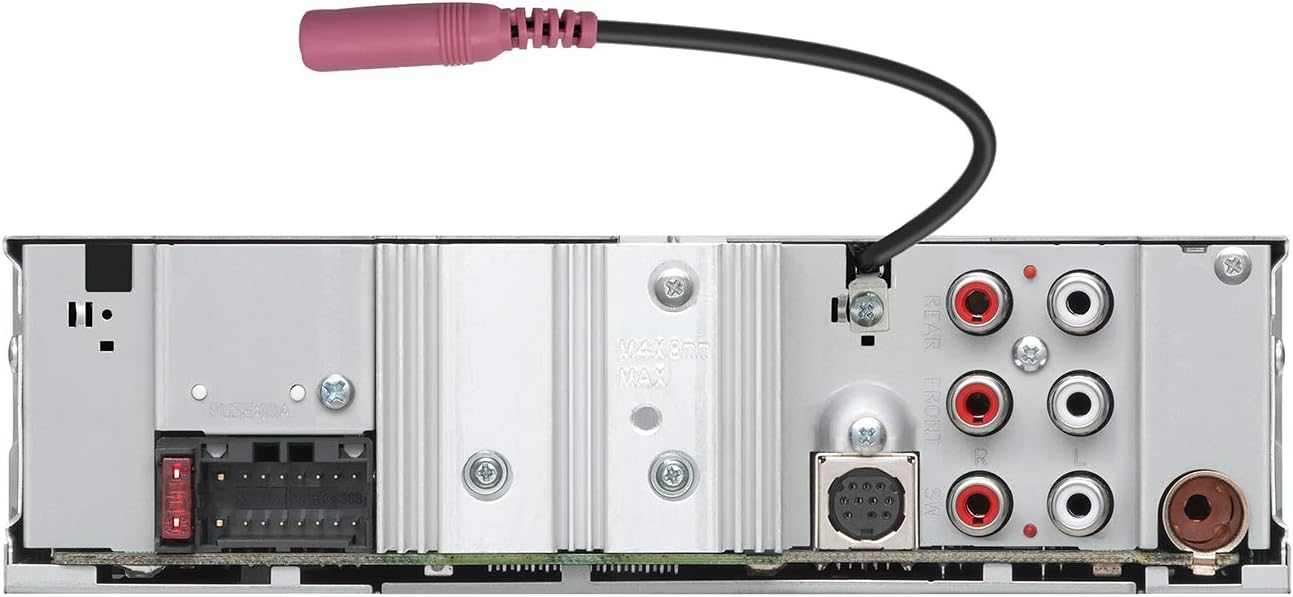
Image: Side view of the JVC KD-X470BHS showing the mounting bracket and microphone input.
3.3 Wiring Connections
Connect the included wiring harness to your vehicle's wiring. Pay close attention to power, ground, speaker, and accessory wire connections. The unit features a front USB port (1.5A) and a front auxiliary input for external devices. For audio output, it provides 6-channel preamp outputs (5-volt front, rear, subwoofer).

Image: Rear panel of the JVC KD-X470BHS, illustrating the wiring harness connection point, RCA pre-outs, and antenna input.
4. Operating Instructions
4.1 Basic Operation
The KD-X470BHS features a 1.5-line display and 2-zone variable color button illumination. Use the main rotary knob for volume control and menu navigation. The SRC button cycles through audio sources (AM/FM, Bluetooth, USB, AUX).

Image: Front panel of the JVC KD-X470BHS showing the display, control knob, and illuminated buttons.
4.2 Bluetooth Connectivity
Pair your smartphone via Bluetooth for hands-free calling and audio streaming. The unit supports the Streaming DJ feature, allowing up to five Bluetooth audio source devices to be connected simultaneously, enabling multiple users to contribute to the music playlist.
4.3 USB and Auxiliary Input
Connect USB memory devices to the front USB port to play audio files. This port also provides 1.5A charging for compatible devices. The front auxiliary input allows connection of portable audio players using a 3.5mm stereo cable.
4.4 Amazon Alexa Integration
The KD-X470BHS is Amazon Alexa compatible. Press the dedicated Alexa button on the front panel to activate voice control. You can use Alexa to play music, make calls, listen to audiobooks, get news, check weather, control smart home devices, and more, all hands-free.

Image: JVC receiver highlighting Amazon Alexa compatibility, showing the unit and a smartphone with the Alexa app.
4.5 Audio Settings
Utilize the 13-band equalizer to customize your sound. Digital time alignment helps optimize the soundstage for your vehicle's interior. JVC's K2 technology enhances the digital sound quality for all music sources.
5. Maintenance
To ensure the longevity and optimal performance of your KD-X470BHS receiver, follow these maintenance guidelines:
- Cleaning the Faceplate: Gently wipe the faceplate with a soft, dry cloth. Avoid using abrasive cleaners, solvents, or chemical sprays, as these can damage the surface.
- Avoiding Liquids: Do not expose the unit to water or other liquids. If liquid enters the unit, disconnect power immediately and consult a service professional.
- Temperature Extremes: Avoid leaving the unit in direct sunlight or in areas subject to extreme temperatures, as this can affect electronic components.
- Ventilation: Ensure that the unit's ventilation openings are not blocked to prevent overheating.
6. Troubleshooting
If you encounter issues with your KD-X470BHS, refer to the following common problems and solutions:
| Problem | Possible Cause | Solution |
|---|---|---|
| No power | Incorrect wiring, blown fuse | Check power and ground connections. Inspect and replace any blown fuses. |
| No sound | Incorrect speaker wiring, volume too low, mute activated | Verify speaker connections. Increase volume. Check if mute function is active. |
| Bluetooth connection issues | Device not paired, interference, app glitches | Ensure Bluetooth is enabled on both devices and paired correctly. Move closer to the unit. Restart the JVC app if used. |
| Settings reset after power off | Constant power wire (yellow) not connected or faulty | Verify the yellow constant power wire is correctly connected to a constant 12V source. |
| Radio reception poor | Antenna not connected, weak signal | Check antenna connection. Try tuning to a stronger station or using a different antenna. |
If the problem persists after attempting these solutions, contact JVC customer support or a qualified service technician.
7. Specifications
| Feature | Specification |
|---|---|
| Model Number | KD-X470BHS |
| Product Dimensions (WxHxD) | 7-3/16" x 2-1/8" x 3-15/16" (182 x 53 x 100mm) |
| Item Weight | 1.9 pounds |
| Connectivity Technology | Auxiliary, Bluetooth, USB |
| Special Feature | 13-Band Equalizer, Amazon Alexa Enabled |
| Compatible Devices | Smartphone |
| Connector Type | 3.5mm Jack, USB |
| Audio Output Mode | Stereo |
| Surround Sound Channel Configuration | 5.1 (via preamp outputs) |
| Output Power | 50 Watts (Peak) |
| Display | 1.5-line display, 2-zone variable color illumination |
| Tuner | AM/FM Tuner, HD Radio |
| Preamp Outputs | 6-channel (5-volt front, rear, subwoofer) |
8. Warranty and Support
8.1 Warranty Information
For detailed warranty terms and conditions, please refer to the warranty card included with your product or visit the official JVC website. Keep your proof of purchase for warranty claims.
8.2 Customer Support
If you require further assistance, technical support, or have questions not covered in this manual, please visit the official JVC website or contact JVC customer support directly. Contact information can typically be found on the JVC website or in your product documentation.


