
De'Longhi V4NST9C2UL
Contents
De'Longhi V4NST9C2UL Micro-Switch Instruction Manual
For De'Longhi Super-Automatic Coffee Machines
Introduction
This document provides essential information and instructions for the De'Longhi V4NST9C2UL micro-switch, an original replacement part designed for various De'Longhi super-automatic coffee machines, including models from the Magnifica, Primadonna, and EN660 series. This micro-switch is a critical internal component responsible for detecting specific states within the coffee machine, such as the position of the water tank, brew unit, or service door.
Please read this manual carefully before attempting any installation or repair. Due to the technical nature of this component, professional installation is highly recommended.
Important Safety Information
- Disconnect Power: Always ensure the coffee machine is unplugged from the main power supply before attempting any inspection, repair, or replacement of internal components.
- Qualified Personnel: Installation and replacement should ideally be performed by a qualified technician. Incorrect installation can lead to damage to the appliance or personal injury.
- Original Parts: Use only original De'Longhi replacement parts to ensure compatibility and proper function.
- Electrical Components: This product is an electrical component. Handle with care and avoid contact with water or moisture.
Product Overview
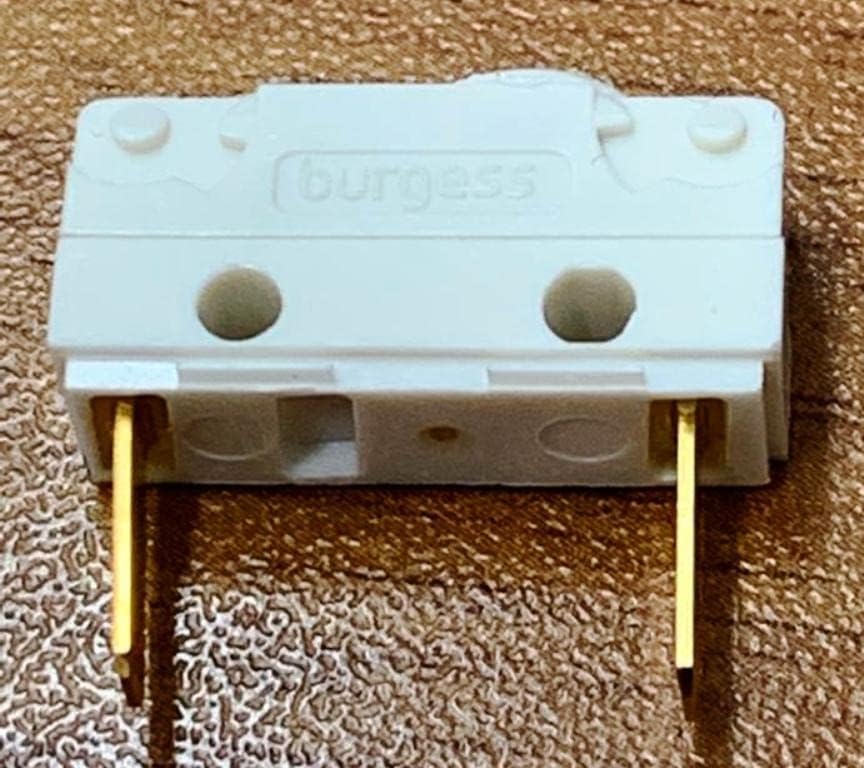
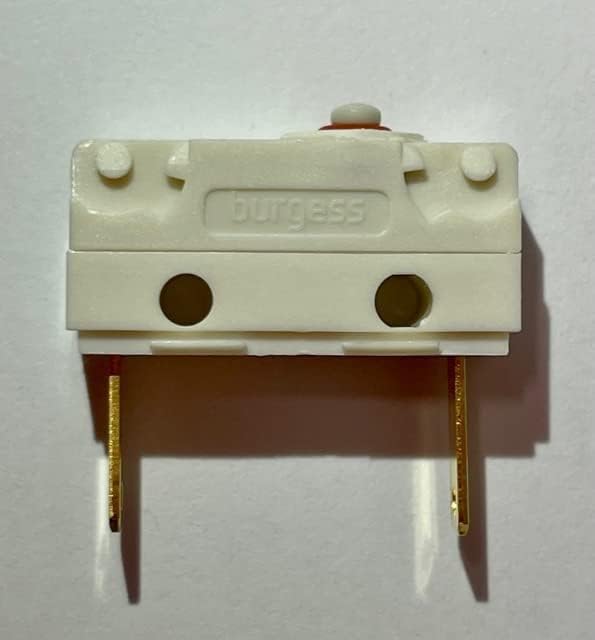
The De'Longhi V4NST9C2UL micro-switch is a compact electrical component. It features a small actuator button that, when pressed or released, changes the state of an electrical circuit. This allows the coffee machine's control system to detect physical positions or conditions.


Setup and Installation
The V4NST9C2UL micro-switch is an internal component of your De'Longhi coffee machine. Its installation requires disassembly of the appliance and handling of electrical connections. It is crucial to follow the safety guidelines provided above.
- Identify the Fault: Confirm that the micro-switch is indeed the faulty component requiring replacement.
- Disconnect Power: Unplug the coffee machine from the electrical outlet.
- Access the Component: Carefully disassemble the coffee machine to gain access to the faulty micro-switch. Refer to your specific coffee machine's service manual or diagrams for guidance on disassembly.
- Note Connections: Before removing the old switch, carefully note or photograph the electrical connections to ensure correct re-connection.
- Remove Old Switch: Disconnect the wires and carefully unmount the old micro-switch.
- Install New Switch: Mount the new De'Longhi V4NST9C2UL micro-switch in the exact position of the old one. Ensure it is securely fastened.
- Reconnect Wires: Reconnect the electrical wires to the new switch according to your previous notes or photographs. Ensure all connections are firm and correct.
- Reassemble Machine: Carefully reassemble the coffee machine, ensuring all parts are correctly fitted and no wires are pinched.
- Test Functionality: Plug the coffee machine back into the power outlet and test its functionality to ensure the new micro-switch is working correctly.
Note: If you are unsure about any step, it is strongly advised to seek assistance from a certified De'Longhi service technician or a qualified appliance repair professional.
Operating Principle
The V4NST9C2UL micro-switch operates as a simple electrical sensor. When the small red actuator button is pressed (e.g., by a moving part like a water tank, brew unit, or door), it closes or opens an internal electrical circuit. This change in circuit state sends a signal to the coffee machine's control board, indicating the presence or position of the component it monitors.
For example, if used for a water tank, the switch might signal "water tank present" when the tank is correctly inserted and presses the actuator. If used for a service door, it might signal "door closed" when the door is securely shut.
Maintenance
The De'Longhi V4NST9C2UL micro-switch is a sealed, non-serviceable component. It does not require routine maintenance. If the switch fails, it must be replaced.
To prolong the life of all components within your coffee machine, including micro-switches, ensure regular cleaning and descaling of your appliance as per your coffee machine's user manual. Avoid excessive force when operating parts that interact with micro-switches (e.g., inserting water tanks, closing doors).
Troubleshooting
Symptoms of a faulty micro-switch often manifest as the coffee machine failing to recognize a component's state or position. Common issues include:
- Machine displays an error message indicating a component is open or missing (e.g., "Insert Water Tank," "Close Door," "Insert Brew Unit") even when it is correctly in place.
- Machine fails to start or operate because it does not detect a necessary condition (e.g., brew unit in position).
- Intermittent operation related to a specific moving part.
Before replacing the switch:
- Ensure the component interacting with the switch (e.g., water tank, door) is correctly seated and not obstructed.
- Visually inspect the switch for any obvious physical damage or corrosion.
- If comfortable and qualified, use a multimeter to test the continuity of the switch in both its open and closed states.
If these checks confirm the micro-switch is faulty, replacement with an original De'Longhi V4NST9C2UL part is necessary.
Specifications
| Attribute | Detail |
|---|---|
| Brand | De'Longhi |
| Model Number | V4NST9C2UL |
| Type | Micro-switch (Original Replacement Part) |
| Electrical Rating | Burgess 5(2)A 250VAC 1E4 T85, 5A 250VAC |
| Voltage | 230 Volts (2.3E+2 Volts) |
| Material | Plastic |
| Number of Items | 1 |
| Manufacturer | De'Longhi (Component by Burgess) |
| Spare Parts Availability | Information unavailable for this specific part. |
Compatible De'Longhi Coffee Machine Models
This De'Longhi V4NST9C2UL micro-switch is compatible with a wide range of De'Longhi super-automatic coffee machines. Please verify your appliance's model number, typically found on a rating plate under the unit, against the list below. If your model is not listed, please contact De'Longhi customer support or your seller for compatibility confirmation.
EABI66.00, EAM1000BJ, EAM1100SDJ, EAM1200SJ, EAM1500SDK, EAM2000.B, EAM2500.B, EAM2600, EAM3000.B, EAM3000BDJ, EAM3000BJ, EAM310.SB, EAM3100.SBJ, EAM3100SDJ, EAM3200.S, EAM3250, EAM3300.S, EAM3300S, EAM3400S, EAM3400.S, EAM3500.N, EAM3500.S, EAM4000.B, EAM4200, EAM4200.S, EAM4300, EAM4400, EAM4400S, EAM4500, EAM4500S, EC850.M, EC860, EC860.M, EC860.R RED, EC9335.BK, EC9335.M, EC9335.R, ECA12600, ECA13000000, ECA13100, ECA13200, ECA13300, ECA13400, ECA13500N, ECA13500S, ECA14000, ECA14200, ECA14300, ECA14400, ECA14500, ECAM20.110.B, ECAM21.110.B, ECAM21.110.B S11, ECAM21.110.SB, ECAM21.110.SB S11, ECAM21.110.W, ECAM21.110.W S11, ECAM21.112.B S1, ECAM21.116.B S11, ECAM21.116.SB S11, ECAM21.117.B, ECAM21.117.B S11, ECAM21.117.SB, ECAM21.117.SB S11, ECAM21.117.W S1, ECAM21.118.B, ECAM21.118.W, ECAM21.210.B, ECAM21.210.W, ECAM22.105.B S11, ECAM22.110.B, ECAM22.110.B S11, ECAM22.110.SB, ECAM22.110.SB S11, ECAM22.110.W S11, ECAM22.113.B S11, ECAM22.114.B S11, ECAM22.117.B S11, ECAM22.119.B S11, ECAM22.320.B, ECAM22.320.B S11, ECAM22.320.SB, ECAM22.320.SB S11, ECAM22.323.B S11, ECAM22.360.B, ECAM22.360.B S11, ECAM22.360.S, ECAM22.360.S S11, ECAM22.360.W S11, ECAM22.366.B, ECAM22.366.B S11, ECAM22.366.S, ECAM22.366.S S11, ECAM22110.B, ECAM22110B S11, ECAM22110S S11, ECAM22110SB, ECAM2110SB S11, ECAM2210SBH, ECAM22110SBHN S11, ECAM22112B S11, ECAM22112W S11, ECAM23.450 SL, ECAM23.120.B, ECAM23.120.B S11, ECAM23.120.SB, ECAM23.120.SB S11, ECAM23.123.B S11, ECAM23.125.B S11, ECAM23.210.B, ECAM23.210.B - N1 S11, ECAM23.210.B NN1, ECAM23.210.B S11, ECAM23.210.SB, ECAM210.SB S11, ECAM23.210.SR, ECAM23.210.W, ECAM23.210.W NN-1 S11, ECAM23.210
Warranty Information
Information regarding the specific warranty for the De'Longhi V4NST9C2UL micro-switch as a standalone spare part is not explicitly provided. Typically, replacement parts may be covered under the warranty of the original appliance if installed by an authorized service center, or by a limited warranty from the seller.
Please retain your proof of purchase. For detailed warranty terms and conditions, refer to the documentation provided with your original De'Longhi coffee machine or contact the seller from whom you purchased this replacement part.
Support and Contact
If you encounter difficulties during installation, suspect a fault, or require further assistance, please:
- Consult the user manual or service manual for your specific De'Longhi coffee machine model.
- Contact the seller or retailer from whom you purchased the micro-switch.
- Visit the official De'Longhi support website for service center locations or contact information.
- Seek assistance from a qualified appliance repair technician.
Ask a question about this manual
Ask about setup, troubleshooting, compatibility, parts, safety, or missing instructions. Manuals+ will review the question and use this page’s manual context to help answer it.