1. Introduction
This manual provides detailed instructions for the installation and operation of the Diode Dynamics RGBW DRL Boards for 2019 and newer Ram 1500 Laramie, Rebel, and Big Horn models equipped with the factory LED package. These replacement LED boards enhance your vehicle's daytime running lights (DRLs) by adding full multicolor functionality while retaining the option for a pure, bright white output.
The RGBW design incorporates an additional dedicated white LED chip alongside the red, green, and blue chips. This allows for a more uniform and brighter white light compared to mixing RGB colors, ensuring a clean, factory-like appearance when desired. The boards are engineered using OEM data for precise fitment and integrate seamlessly with your vehicle's existing headlight optics.

Figure 1.1: Ram truck showcasing the Diode Dynamics RGBW DRL Boards with purple illumination.
2. Safety Information
Always prioritize safety during installation. Disconnect the vehicle's battery before beginning any electrical work. Wear appropriate personal protective equipment, such as safety glasses and gloves. If you are not comfortable performing electrical modifications, seek professional installation.
Proposition 65 Warning: This product may contain chemicals known to the State of California to cause cancer and birth defects or other reproductive harm.
3. Package Contents
Verify that all components are present before beginning installation:
- Two (2) sets of LED boards (one for left, one for right headlight)
- Two (2) waterproof drivers
- One (1) RGBW Extension wire
- One (1) Solid-State Relay Harness
- One (1) Battery Input Wire
- Four (4) T-taps
- Installation guide (this document)
Note: An RGBW controller is required for operation and is not included with this kit. It must be purchased separately.

Figure 3.1: Contents of the Diode Dynamics RGBW DRL Boards kit.
4. Compatibility
This product is compatible with the following vehicles:
- Make: Ram
- Model: 1500 Laramie, Rebel, and Big Horn
- Years: 2019 and Up
- Requirement: Vehicle must be equipped with the factory LED package.
Important Note: These boards are not compatible with aftermarket (non-factory) headlamps.
5. Specifications
| Feature | Specification |
|---|---|
| Operating Voltage | 9-16V |
| Operating Temperature | -40°C to 85°C (-40°F to 185°F) |
| Connector(s) | JST 5-pin Input (+GRBW), T-Tap Inputs |
| Driver Features | External, Waterproof, Linear Regulated Driver |
| Driver Dimensions | 2.5 Inch x 1.38 Inch x 0.88 Inch |
| Materials | Aluminum PCB |
| Cooling | Passive, no heatsink |
| DRL Function | Operates at full brightness |
| Electrical Compatibility | No electrical issues (tested and confirmed) |
The entire kit is tested for long-term operation under extreme conditions, including temperatures from -40°F to 185°F, vibration, and corrosion, meeting SAE/DOT standards.

Figure 5.1: Close-up of the RGBW LED circuit boards.
6. Setup and Installation
Installation of the Diode Dynamics RGBW DRL Boards involves disassembling the factory headlights, replacing the original DRL boards, and wiring the new components. It is recommended that this installation be performed by an experienced technician or individual with advanced automotive electrical knowledge.
6.1. General Procedure Overview
- Headlight Removal: Carefully remove the vehicle's headlights from the front fascia.
- Headlight Disassembly: Open the headlight housing to access the factory DRL boards. This typically involves heating the headlight to soften the sealant.
- Board Replacement: Remove the original DRL boards. The Diode Dynamics RGBW boards are CAD-designed for a perfect fit and will align directly with the factory mounting points.
- Headlight Reassembly: Seal the headlight housing securely to prevent moisture intrusion.
- Wiring Connections: Connect the included waterproof drivers, RGBW extension wire, Solid-State Relay Harness, and Battery Input Wire according to the detailed wiring diagram provided in the physical installation guide.
- Factory Signal Integration: The Solid-State Relay Harness is designed to draw power from the battery while utilizing your factory parking light and sidemarker signals to activate the DRLs. This ensures proper operation without triggering vehicle computer errors.
- Testing: Before fully reassembling the vehicle, test the functionality of the DRLs with your RGBW controller.
- Final Reassembly: Reinstall the headlights and any removed fascia components.
6.2. Important Considerations
- The included T-taps are for connecting to the factory parking light and sidemarker signals. Refer to the specific wiring diagram for your vehicle model.
- The system is engineered to prevent electrical errors with the vehicle's computer by correctly managing power draw.
- Ensure all connections are secure and waterproof to maintain product longevity and prevent electrical issues.
7. Operation
Operation of the RGBW DRL Boards requires a compatible RGBW controller (sold separately). The controller allows you to select various colors and effects for your DRLs.
7.1. Color Selection
Using your RGBW controller, you can:
- Select from a wide spectrum of colors by adjusting the Red, Green, and Blue channels.
- Activate the dedicated white chip independently for a pure, bright white DRL output. This is recommended for everyday driving to maintain a factory appearance.
- Combine colors with the white chip for unique shades.
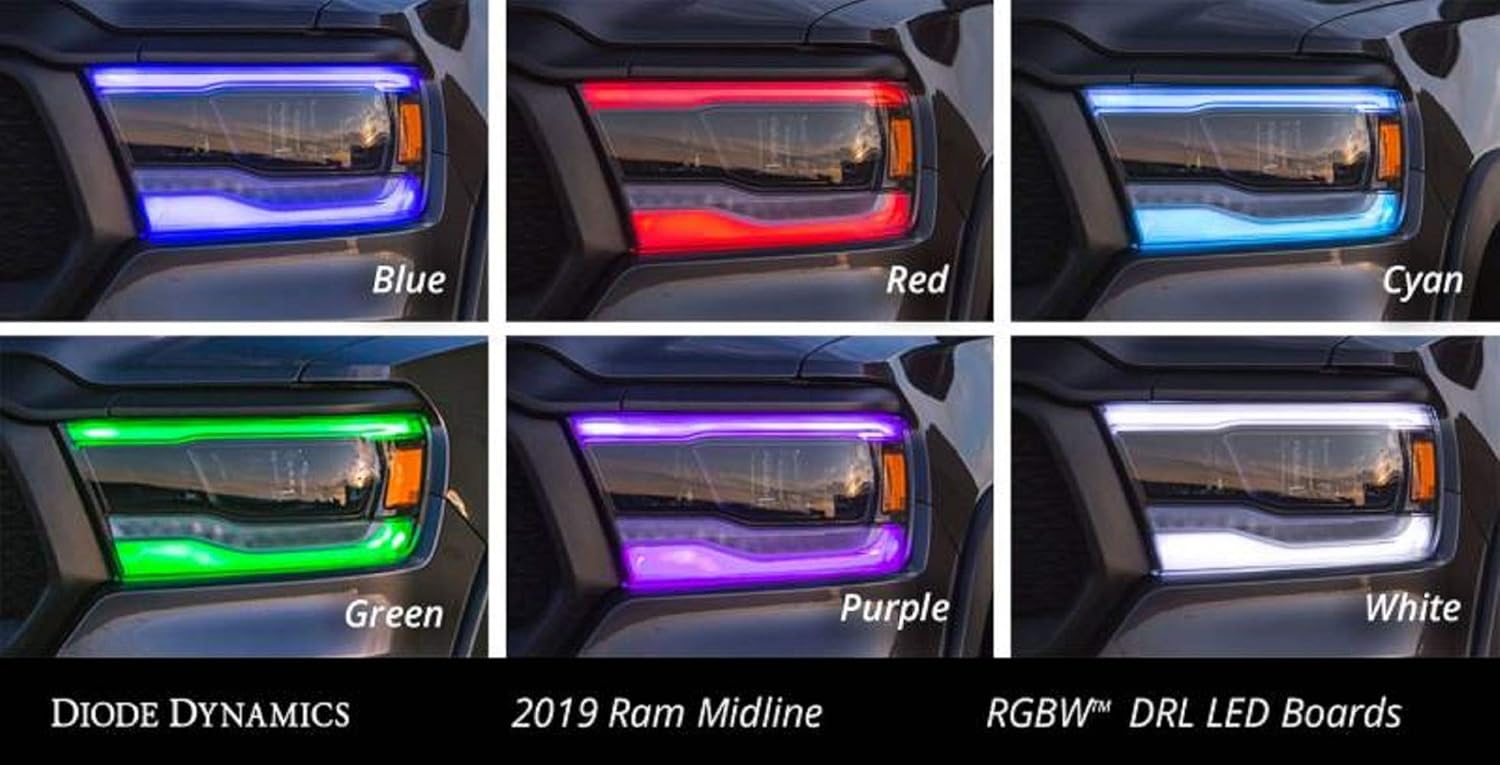
Figure 7.1: Examples of various color outputs from the RGBW DRL Boards.
8. Maintenance
The Diode Dynamics RGBW DRL Boards are designed for durability and long-term performance. The included drivers are waterproof, and the entire kit is tested to withstand harsh automotive environments.
- Cleaning: Clean the headlight lenses as you would normally clean your vehicle's exterior. Avoid abrasive cleaners that could damage the lens.
- Inspection: Periodically inspect wiring connections for any signs of wear or damage, especially after off-road driving or exposure to extreme conditions.
- No user-serviceable parts are inside the LED boards or drivers. Do not attempt to open or modify these components.
9. Troubleshooting
The Diode Dynamics RGBW DRL Boards are engineered to operate without errors. If you encounter any issues, consider the following:
- No Illumination:
- Ensure all wiring connections are secure and correctly made according to the installation guide.
- Verify that the vehicle's battery is properly connected and providing power.
- Check the RGBW controller for proper function and power.
- Incorrect Color Output:
- Confirm that the RGBW controller is correctly paired and functioning.
- Check the RGBW extension wire for proper connection.
- Flickering or Intermittent Operation:
- Re-check all electrical connections for looseness or corrosion.
- Ensure the Solid-State Relay Harness is correctly installed and receiving signals from the factory wiring.
- Vehicle Error Messages:
- This product is designed to prevent error messages. If an error occurs, double-check all wiring, especially connections to factory signals, to ensure they match the provided instructions.
If troubleshooting steps do not resolve the issue, contact Diode Dynamics customer support for further assistance.
10. Warranty and Support
Diode Dynamics stands behind the quality of its products.
- Warranty: This product is covered by a 3-year return policy, which functions as a warranty against manufacturing defects.
- Returns: A 30-day return period with no restocking fee is offered for customer satisfaction.
- Satisfaction: Diode Dynamics aims for 100% customer satisfaction.
For technical support, warranty claims, or any questions regarding your Diode Dynamics RGBW DRL Boards, please visit the official Diode Dynamics website or contact their customer service department.


