
1. Introduction
This manual provides essential instructions for the safe and effective use of your BBRKIN Biometric Rifle Safe, Model QHXP029C. Please read this manual thoroughly before installation and operation to ensure proper functionality and security. Keep this manual for future reference.
2. Safety Information
- Always store firearms unloaded and locked.
- Keep the safe locked at all times when not in use.
- Store backup keys in a secure location away from the safe and out of reach of unauthorized individuals. Do not store keys inside the safe.
- Ensure the safe is securely mounted to prevent unauthorized removal.
- Do not allow children or unauthorized persons access to the safe or its keys/codes.
- Regularly check battery levels to ensure continuous operation of electronic locking mechanisms.
3. Package Contents
Verify that all items are present in the package:
- 1 x BBRKIN Biometric Rifle Safe
- 4 x AA Batteries
- 2 x Spare Keys (for main safe)
- 2 x Keys (for internal lock box)
- 4 x Anchor Bolts
- 1 x Instruction Manual (this document)
4. Product Overview
The BBRKIN Biometric Rifle Safe provides secure storage for firearms and valuables, featuring multiple access methods and robust construction.

Figure 4.1: BBRKIN Biometric Rifle Safe (Closed and Open)
The safe is designed with a biometric fingerprint scanner, a digital keypad, and traditional key access for reliable security.
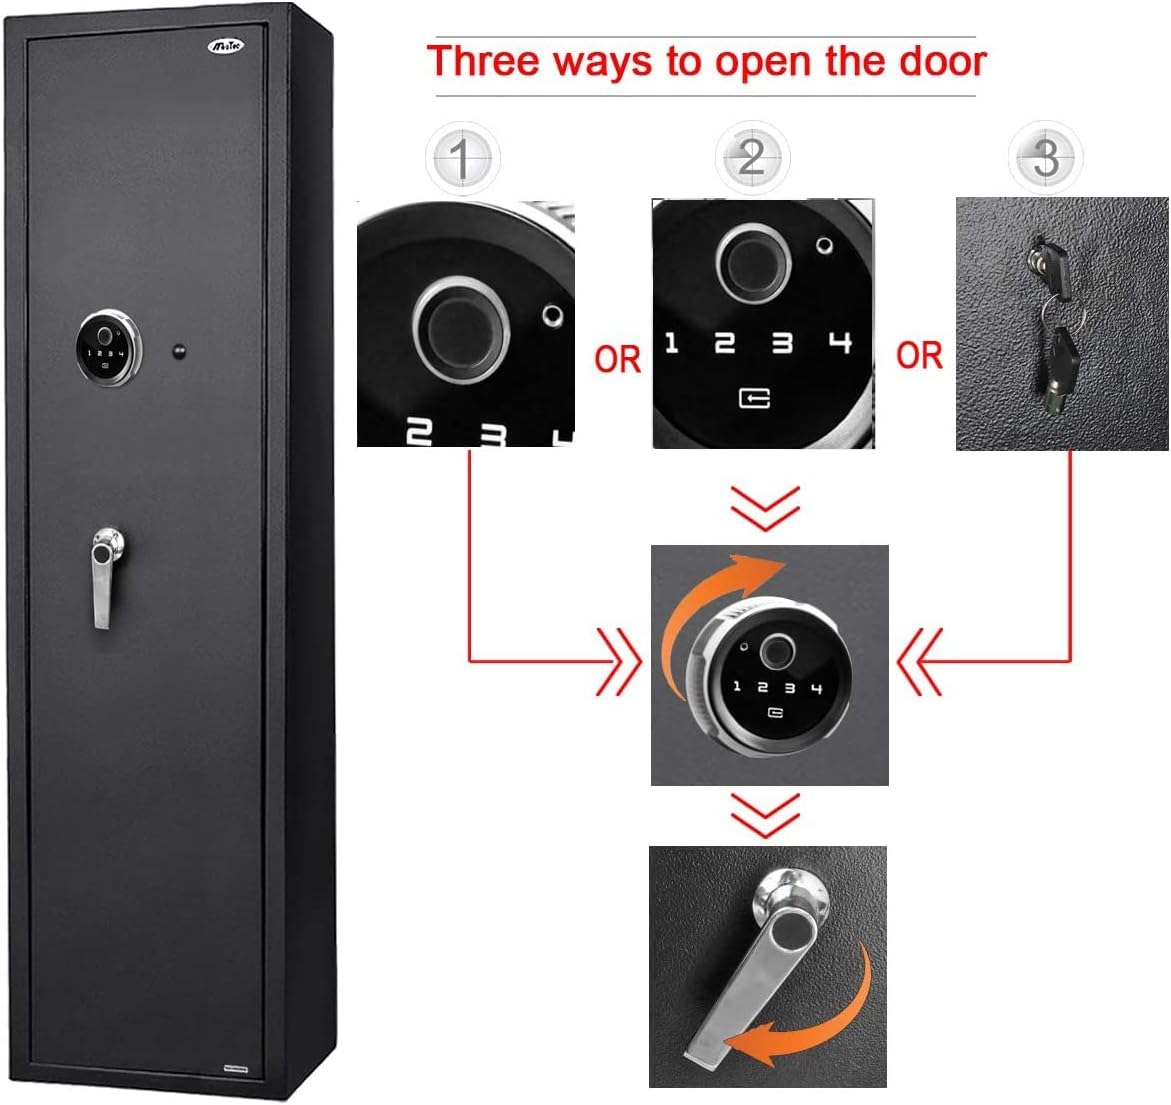
Figure 4.2: Three Access Methods: Fingerprint, Keypad, and Key
The safe includes an internal lock box for additional secure storage of smaller items or handguns.

Figure 4.3: Internal Pistol/Handgun Lock Box
5. Setup
5.1 Battery Installation
- Locate the battery compartment, typically on the inside of the safe door or behind the control panel.
- Insert the 4 AA batteries provided, ensuring correct polarity (+/-).
- Close the battery compartment cover securely.
5.2 Mounting the Safe
For optimal security, it is highly recommended to mount the safe to a floor or wall using the provided anchor bolts.
- Choose a suitable location that is discreet, secure, and offers a solid mounting surface (e.g., concrete floor, wall studs).
- Position the safe and mark the locations for the pre-drilled mounting holes on the back and/or bottom of the safe.
- Drill pilot holes into the chosen surface according to the size of the anchor bolts.
- Align the safe with the drilled holes and insert the anchor bolts.
- Tighten the anchor bolts securely to fasten the safe in place.
6. Operating Instructions
6.1 Initial Access (Using Backup Key)
Before setting up electronic access, use the backup key to open the safe for the first time:
- Locate the keyhole, usually concealed behind the biometric/keypad panel.
- Insert one of the main safe keys and turn it to unlock.
- Turn the handle to open the safe door.
6.2 Setting Up Fingerprints
The biometric system supports up to 100 individual fingerprints.

Figure 6.1: Smart Biometric Control Panel
- With the safe door open, locate the reset button inside the safe (often near the battery compartment).
- Press the reset button. The indicator light on the biometric scanner will illuminate.
- Place your finger firmly on the fingerprint sensor. Lift and repeat several times (typically 4-5 times) until the indicator light confirms successful registration (e.g., a green light or beep).
- Test the registered fingerprint with the door open to ensure it unlocks the safe.
6.3 Setting Up Keypad Code
The keypad allows for a 4-digit code.
- With the safe door open, press the reset button inside the safe.
- Enter your desired 4-digit code on the keypad.
- Press the '#' or 'E' button to confirm. The indicator light will confirm successful registration.
- Test the new code with the door open to ensure it unlocks the safe.
6.4 Unlocking the Safe
You have three options to unlock the safe:

Figure 6.2: Overview of Three Unlock Options
- Biometric Fingerprint: Place a registered finger firmly on the sensor. The safe will unlock in approximately 0.1 seconds.
- Keypad Code: Enter your 4-digit code followed by the '#' or 'E' button.
- Backup Key: If electronic methods fail or batteries are depleted, use the backup key as described in Section 6.1.
6.5 Mute Function
The safe may feature a mute function to silence operational beeps. Refer to the specific instructions on the control panel for activation/deactivation, often by holding a specific key or combination.
7. Maintenance
- Cleaning: Wipe the safe exterior with a soft, dry cloth. Avoid abrasive cleaners or solvents.
- Battery Replacement: Replace batteries promptly when the low battery indicator appears or if the electronic lock becomes unresponsive. Use only AA alkaline batteries.
- Lock Mechanism: Do not lubricate the electronic lock mechanism. If the mechanical key lock becomes stiff, a small amount of graphite lubricant can be applied.
8. Troubleshooting
- Safe does not open with fingerprint/code:
- Check battery level and replace if necessary.
- Ensure your finger is clean and dry, and placed correctly on the sensor.
- Re-enter the code carefully.
- Try using a different registered fingerprint.
- Use the backup key for immediate access.
- Keypad is unresponsive:
- Replace batteries.
- Ensure no debris is obstructing the buttons.
- Safe beeps continuously:
- This may indicate low battery. Replace batteries.
- Could also indicate an alarm trigger (e.g., multiple incorrect entries). Refer to the specific alarm reset procedure in the full manual if available.
9. Specifications
| Feature | Detail |
|---|---|
| Brand | BBRKIN |
| Model Number | QHXP029C |
| Exterior Dimensions (H x W x D) | 56" x 12" x 11.4" |
| Material | Metal (14-gauge carbon steel housing, 11-gauge door) |
| Lock Type | Biometric Fingerprint, Electronic Keypad, Key |
| Fingerprint Capacity | Up to 100 individual fingerprints |
| Keypad Code | 4-digit |
| Power Source | 4 x AA Batteries |
| Mounting Type | Floor or Wall Mount (anchor bolts included) |
| Weight | Approximately 90 lbs (product description states 2.7 lbs, but feature bullets state 90 lbs, using the more realistic 90 lbs for a rifle safe) |

Figure 9.1: Product Dimensions
10. Warranty and Support
BBRKIN provides customer support for this product. If you encounter any issues or have questions, please contact customer service through your purchase platform or via the contact information provided with your product. Please have your model number (QHXP029C) and purchase details ready when contacting support.