1. Introduction
This manual provides essential information for the safe and efficient operation, setup, and maintenance of your SFX JPT UV Laser Engraver Laser Marking Machine. This precision marking system is designed for high-quality engraving on various materials and includes an S&A CWUL-05 Water Chiller and an optional D80 Rotary Axis.

Figure 1: SFX JPT UV Laser Engraver System with Water Chiller
The UV laser technology offers 'cold processing' with minimal thermal impact, making it suitable for delicate materials and applications requiring ultra-fine marking. Please read this manual thoroughly before operating the machine.
2. Safety Information
This device is a Class 1 laser product with an output power of 0.39 mW. While designed for safety, proper precautions are essential to prevent injury and ensure safe operation.
- Eye Protection: Always wear appropriate laser safety goggles when operating or observing the laser marking process.
- Authorized Personnel: Only trained and authorized personnel should operate this equipment.
- Ventilation: Ensure the work area is well-ventilated to dissipate any fumes or particles generated during marking.
- Emergency Stop: Familiarize yourself with the location and operation of the emergency stop button.
- Flammable Materials: Do not operate the laser near flammable liquids, gases, or materials.
- Electrical Safety: Ensure all electrical connections are secure and grounded. Do not operate with damaged cables.
- Water Chiller: Ensure the water chiller is properly filled and functioning before operating the laser to prevent overheating.
3. Packing List
Upon receiving your SFX JPT UV Laser Engraver, carefully unpack and verify that all components listed below are present and undamaged. If any items are missing or damaged, contact customer support immediately.

Figure 2: UV Laser Marking Machine Packing List
| No. | Name | Quantity |
|---|---|---|
| 1 | UV Laser Engraver | 1 SET |
| 2 | Goggles | 1 PAIR |
| 3 | Allen Wrench | 1 SET |
| 4 | USB Drive (Installation & Use Video) | 1 PC |
| 5 | USB Drive (Software User Manual) | 1 PC |
| 6 | Power Line USB Line | 1.5m |
| 7 | Foot Switch | 1 PC |
| 8 | Positioning Screw | Some |
| 9 | Lock Bar | 2 PCS |
| 10 | Water Chiller (CWUL-05) | 1 SET |
| 11 | Transformer (110V to 220V) | 1 SET |
| 12 | Workbench (300*200) | 1 PC (Optional) |
| 13 | Rotary Device (D80) | 1 SET (Optional) |
| 14 | Laptop | 1 SET (Optional) |
Note: Pictures are for information only; actual contents may vary slightly.
4. Setup
Follow these steps to set up your laser engraver system:
- Unpacking and Inspection: Carefully remove all components from their packaging. Inspect for any visible damage during transit.
- Placement: Place the laser engraver and water chiller on a stable, level surface in a well-ventilated area, away from direct sunlight and excessive dust.
- Assemble Laser Unit: If the laser unit requires assembly (e.g., attaching the column to the base), follow the instructions provided in the digital user manual on the USB drive.
- Connect Water Chiller:
- Connect the water inlet and outlet hoses from the laser unit to the corresponding ports on the S&A CWUL-05 Water Chiller.
- Fill the chiller with distilled or deionized water to the recommended level.
- Connect the chiller's power cable to a suitable power outlet.
- Connect Laser Engraver:
- Connect the laser engraver's power cable to the provided transformer, then connect the transformer to a suitable power outlet (110V-240V/50-60Hz).
- Connect the USB cable from the laser engraver to your control computer.
- Install Software: Insert the provided USB drive into your computer and install the laser marking software. Refer to the software user manual on the USB drive for detailed installation instructions.
- Optional Rotary Axis (D80): If using the D80 Rotary Axis, connect it to the designated port on the laser engraver's control unit and secure it to the workbench. Refer to its specific instructions for setup and calibration.

Figure 3: SFX JPT UV Laser Engraver Unit

Figure 4: D80 Three-Jaw Rotary Chuck (Optional Accessory)
5. Operating Instructions
This section outlines the general operating procedure for the UV laser engraver. Always refer to the detailed software manual for specific software functions.
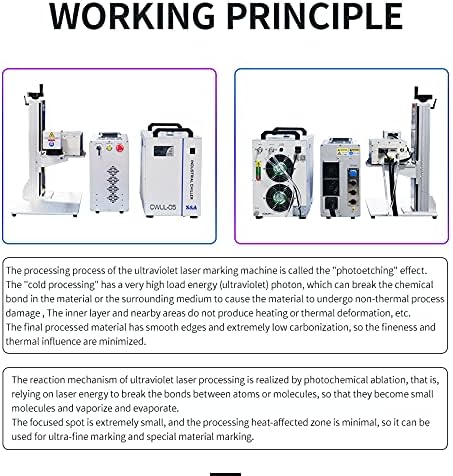
Figure 5: UV Laser Marking Working Principle
- Power On Sequence:
- Ensure the water chiller is powered on and operating correctly. Check for any alarms.
- Turn the key switch on the laser engraver control box to the 'ON' position.
- Launch the laser marking software on your computer.
- Material Preparation: Place the material to be marked on the workbench. Ensure it is flat and securely positioned. For cylindrical objects, use the D80 Rotary Axis.
- Focus Adjustment: Adjust the height of the laser head to achieve optimal focus on the material surface. The digital user manual provides guidance on focus methods.
- Software Operation:
- Import or create your design within the software. The machine is compatible with files from Coredraw, AutoCAD, Photoshop, and supports formats like PLT, PCX, DXF, BMP.
- Set engraving parameters such as laser power (10%-100% adjustment range), marking speed (up to 8m/s), repetition rate (20-200kHz), and engraving depth (0.01-0.5mm, material dependent).
- Use the 'Red Light Preview' function to verify the marking area and position on your material.
- Start Marking: Once parameters are set and the preview is confirmed, press the 'Start' button in the software or use the foot switch to begin the engraving process.
- Emergency Stop: In case of any malfunction or emergency, immediately press the red emergency stop button on the control box.
- Power Off Sequence: After use, exit the software, turn the key switch to 'OFF', and then power off the water chiller.
6. Maintenance
Regular maintenance ensures the longevity and optimal performance of your laser engraver.
- Optical Components: Periodically clean the laser lens and galvanometer mirrors with a specialized optical cleaning solution and lint-free wipes. Avoid touching optical surfaces with bare hands.
- Water Chiller:
- Check the water level regularly and refill with distilled or deionized water as needed.
- Clean the chiller's dust filter every 1-3 months, depending on the operating environment.
- Replace the chiller water every 6-12 months to prevent algae growth and maintain cooling efficiency.
- General Cleaning: Keep the machine and workbench clean and free of debris, especially around moving parts and ventilation openings.
- Cable Inspection: Periodically inspect all cables for wear or damage. Replace any damaged cables immediately.
7. Troubleshooting
This section addresses common issues you might encounter. For more complex problems, refer to the digital user manual or contact technical support.
- Laser Not Firing:
- Check if the key switch is 'ON' and the emergency stop button is disengaged.
- Verify the water chiller is running and not displaying any alarms.
- Ensure the software is connected to the machine and the laser output is enabled.
- Poor Engraving Quality:
- Check the laser focus. Re-adjust the laser head height.
- Verify engraving parameters (power, speed, frequency) are appropriate for the material.
- Clean the laser lens and mirrors.
- Chiller Alarm:
- Check water level and refill if low.
- Ensure water circulation is not obstructed (e.g., kinked hoses).
- Clean the chiller's dust filter.
- Software Connection Issues:
- Ensure the USB cable is securely connected to both the machine and the computer.
- Restart the software and the machine.
- Check device manager for proper USB driver installation.
8. Specifications
The following are the technical specifications for the SFX JPT UV Laser Engraver 5W, 220x220mm model:

Figure 6: Detailed Technical Parameters
| Parameter | Value |
|---|---|
| Laser Power | 5W |
| Marking Area | 220mm x 220mm |
| Laser Source | JPT Seal-355-5 |
| Repetition Rate Frequency | 20-200kHZ |
| Pulse Duration | <10ns@60kHz |
| Wavelength | 355nm |
| Output Power Adjustment Range | 10%-100% |
| Marking Speed | 8m/s |
| Engraving Depth | 0.01-0.5mm (material dependent) |
| Min. Line Width | 0.01mm (material dependent) |
| Min. Character | 0.15mm (material dependent) |
| Repeat Accuracy | ±0.001mm |
| Input Voltage | 110V-240V/50-60Hz |
| Complete Power Consumption | ≤1500W |
| Cooling Way | Water-cooling (S&A CWUL-05 Chiller) |
| Laser Class | Class 1 (Output Power 0.39 mW) |
| Package Dimensions | 31.89 x 30.91 x 19.88 inches |
| Manufacturer | Luoyang SFX Industrial Technology Co.,Ltd |
| Date First Available | February 20, 2020 |
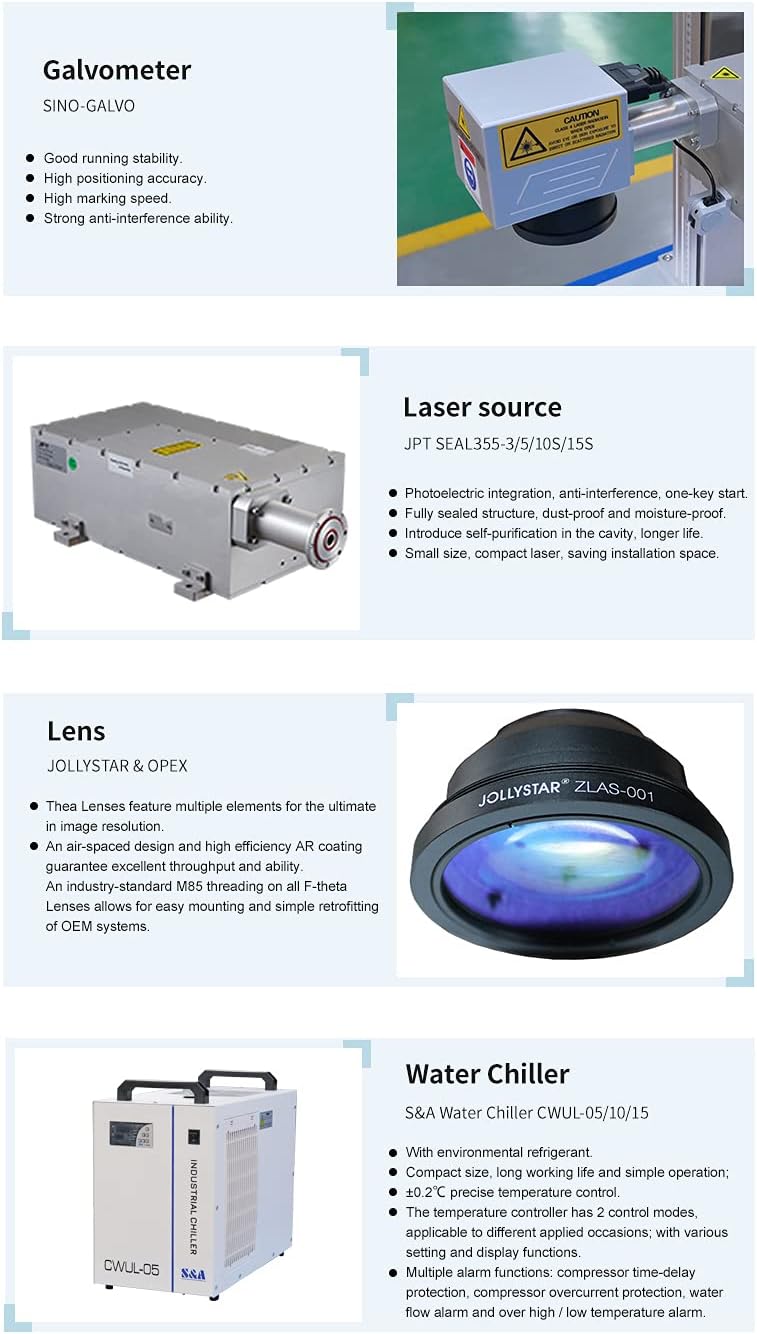
Figure 7: Key Components and Features
9. Application Information
The UV laser marking machine is primarily based on its low-power laser beam, making it suitable for high-end markets requiring ultra-fine processing. Its minimal thermal impact prevents material burning and deformation, achieving hyper-fine marking with smooth edges and low carbonization.
Applicable Materials and Industries:
- Cosmetics, Drugs, Food and other macro-molecule material packaging surfaces.
- Flexible PCBs, LCD Glass QR Codes.
- Metal surface coating, plastic keys, electronic components.
- Gifts, communication equipment, construction materials, rubber, and other non-metallic materials.

Figure 8: Examples of UV Laser Marking Applications
10. Warranty and Support
Your SFX JPT UV Laser Engraver comes with a 1-Year Warranty. For any technical assistance, customer service, or warranty claims, please contact SFX Industrial Technology directly.
Additional support resources include the digital user manual and training videos provided on the USB drive with your machine.


