Introduction
This instruction manual provides essential information for the safe and efficient operation of your Melitta Look V Timer 1025-17 coffee maker. Please read these instructions carefully before first use and keep them for future reference.
Important Safety Instructions
- Read all instructions before using the appliance.
- Do not immerse the appliance, cord, or plug in water or other liquids.
- Close supervision is necessary when any appliance is used by or near children.
- Unplug from outlet when not in use and before cleaning. Allow to cool before putting on or taking off parts, and before cleaning the appliance.
- Do not operate any appliance with a damaged cord or plug, or after the appliance malfunctions or has been damaged in any manner.
- The use of accessory attachments not recommended by the appliance manufacturer may result in fire, electric shock, or injury to persons.
- Do not use outdoors.
- Do not let the cord hang over the edge of a table or counter, or touch hot surfaces.
- Do not place on or near a hot gas or electric burner, or in a heated oven.
- Always attach plug to appliance first, then plug cord into the wall outlet. To disconnect, turn any control to "off", then remove plug from wall outlet.
- Do not use appliance for other than intended use.
Product Overview
The Melitta Look V Timer 1025-17 is a filter coffee maker designed for convenience and optimal coffee taste. It features a timer function, a removable water tank, and an AromaSelector for personalized coffee strength.

Figure 1: Front view of the Melitta Look V Timer 1025-17 coffee maker with thermal carafe.

Figure 2: Diagram illustrating key features of the Melitta Look V Timer 1025-17, including the AromaSelector, removable water tank, swivel filter, drip stop, timer function, and display.
Components:
- Main Unit with Control Panel and Display
- Removable Water Tank
- Swivel Filter Holder with Drip Stop
- Filter Insert (for 1x4 filter bags)
- Thermal Carafe (Stainless Steel)
- AromaSelector Dial
Setup
- Unpacking: Carefully remove all packaging materials and dispose of them responsibly.
- Initial Cleaning: Before first use, clean all removable parts (water tank, filter holder, carafe) with warm water and a mild detergent. Wipe the main unit with a damp cloth.
- First Brew Cycle (without coffee): Fill the water tank to the maximum level with fresh cold water. Place an empty filter bag (size 1x4) into the filter holder. Run a full brewing cycle without coffee to rinse the system. Discard the water.
- Positioning: Place the coffee maker on a stable, level, heat-resistant surface, away from water sources.

Figure 3: Demonstrates how to easily remove the water tank for filling or cleaning.
Operating Instructions
1. Brewing Coffee
- Fill Water Tank: Remove the water tank and fill it with the desired amount of fresh, cold water. The tank has markings for cups (up to 10 cups / 1.25 liters). Reinsert the water tank securely.
- Insert Filter Bag: Open the swivel filter holder and place a Melitta filter bag (size 1x4) into the filter insert.
- Add Ground Coffee: Add the desired amount of ground coffee into the filter bag. A general guideline is one level tablespoon per cup, but adjust to your preference.
- Close Filter Holder: Close the swivel filter holder and ensure the thermal carafe is correctly placed under the drip stop.
- Select Coffee Strength (AromaSelector): Adjust the AromaSelector dial on top of the machine to your preferred coffee strength. Turn towards the "+" symbol for stronger coffee, and towards the "-" symbol for milder coffee.
- Start Brewing: Press the ON/OFF button. The indicator light will illuminate, and the brewing process will begin.
- Automatic Shut-off: The appliance will automatically switch off after the brewing cycle is complete.

Figure 4: Close-up view of the removable water tank with clear water level indicators.
2. Using the Timer Function
The timer function allows you to program the coffee maker to start brewing at a specific time.
- Prepare Coffee Maker: Follow steps 1-5 from the "Brewing Coffee" section (fill water, add filter and coffee, set AromaSelector).
- Set Current Time: Press and hold the h button to set the hour and the m button to set the minutes. Release the buttons when the correct time is displayed.
- Set Start Time: Press the TIMER button. The display will flash. Use the h and m buttons to set the desired start time for brewing.
- Activate Timer: Press the TIMER button again. The display will show the current time, and a small timer icon will appear, indicating the timer is active.
- Brewing: The coffee maker will automatically start brewing at the programmed time.

Figure 5: Close-up of the control panel showing the digital display, 'h' and 'm' buttons for time setting, 'TIMER' button, 'CALC' button for descaling, and the 'ON/OFF' button.
3. Keep Warm Function
The thermal carafe keeps your coffee warm for an extended period due to its insulation. The appliance itself does not have a heating plate, relying on the carafe's thermal properties. The automatic shut-off ensures energy efficiency.
Maintenance
1. Daily Cleaning
- Unplug: Always unplug the coffee maker from the power outlet before cleaning.
- Wash Removable Parts: Wash the water tank, filter holder, and thermal carafe with warm soapy water after each use. Rinse thoroughly and dry. These parts are generally not dishwasher safe unless specified by the manufacturer.
- Wipe Main Unit: Wipe the exterior of the coffee maker with a soft, damp cloth. Do not use abrasive cleaners or scourers.
2. Descaling Program
Regular descaling is crucial to maintain the performance and lifespan of your coffee maker, especially in areas with hard water. The Melitta Look V Timer 1025-17 has an integrated descaling program.
- Prepare Descaling Solution: Use a commercially available descaling agent suitable for coffee makers, following the manufacturer's instructions for dilution.
- Fill Water Tank: Pour the descaling solution into the water tank up to the maximum level.
- Start Descaling: Press and hold the CALC button for approximately 3 seconds. The CALC indicator light will illuminate, and the descaling program will start.
- Rinse Cycles: After the descaling program is complete, run at least two full brewing cycles with fresh, cold water (without coffee or descaling agent) to thoroughly rinse the system.
- Frequency: The frequency of descaling depends on water hardness and usage. The CALC indicator may light up to remind you when descaling is needed.
Troubleshooting
| Problem | Possible Cause | Solution |
|---|---|---|
| Coffee maker does not start. | Not plugged in; power outage; ON/OFF button not pressed. | Check power connection; ensure power is available; press ON/OFF button. |
| Coffee tastes weak or too strong. | Incorrect coffee-to-water ratio; AromaSelector setting. | Adjust amount of ground coffee; adjust AromaSelector dial. |
| Water does not flow through. | Filter holder clogged; appliance needs descaling. | Clean filter holder; perform descaling program. |
| Water leaks from the appliance. | Water tank not correctly inserted; carafe not correctly placed. | Ensure water tank is fully seated; position carafe correctly under drip stop. |
| CALC indicator light is on. | Appliance requires descaling. | Perform the integrated descaling program. |
Specifications
- Model: Melitta Look V Timer 1025-17
- Capacity: 1.25 Liters (approx. 10 cups)
- Power: 1080 Watts
- Voltage: 230 Volts
- Dimensions (L x W x H): 26 x 25.5 x 40.2 cm (10.2 x 10.0 x 15.8 inches)
- Weight: 1 Kilogram (2.2 lbs)
- Carafe Type: Insulated Thermal Carafe (Stainless Steel)
- Filter Size: 1x4
- Special Features: Timer function, AromaSelector, Removable Water Tank, Integrated Descaling Program, Automatic Shut-off, Drip Stop.
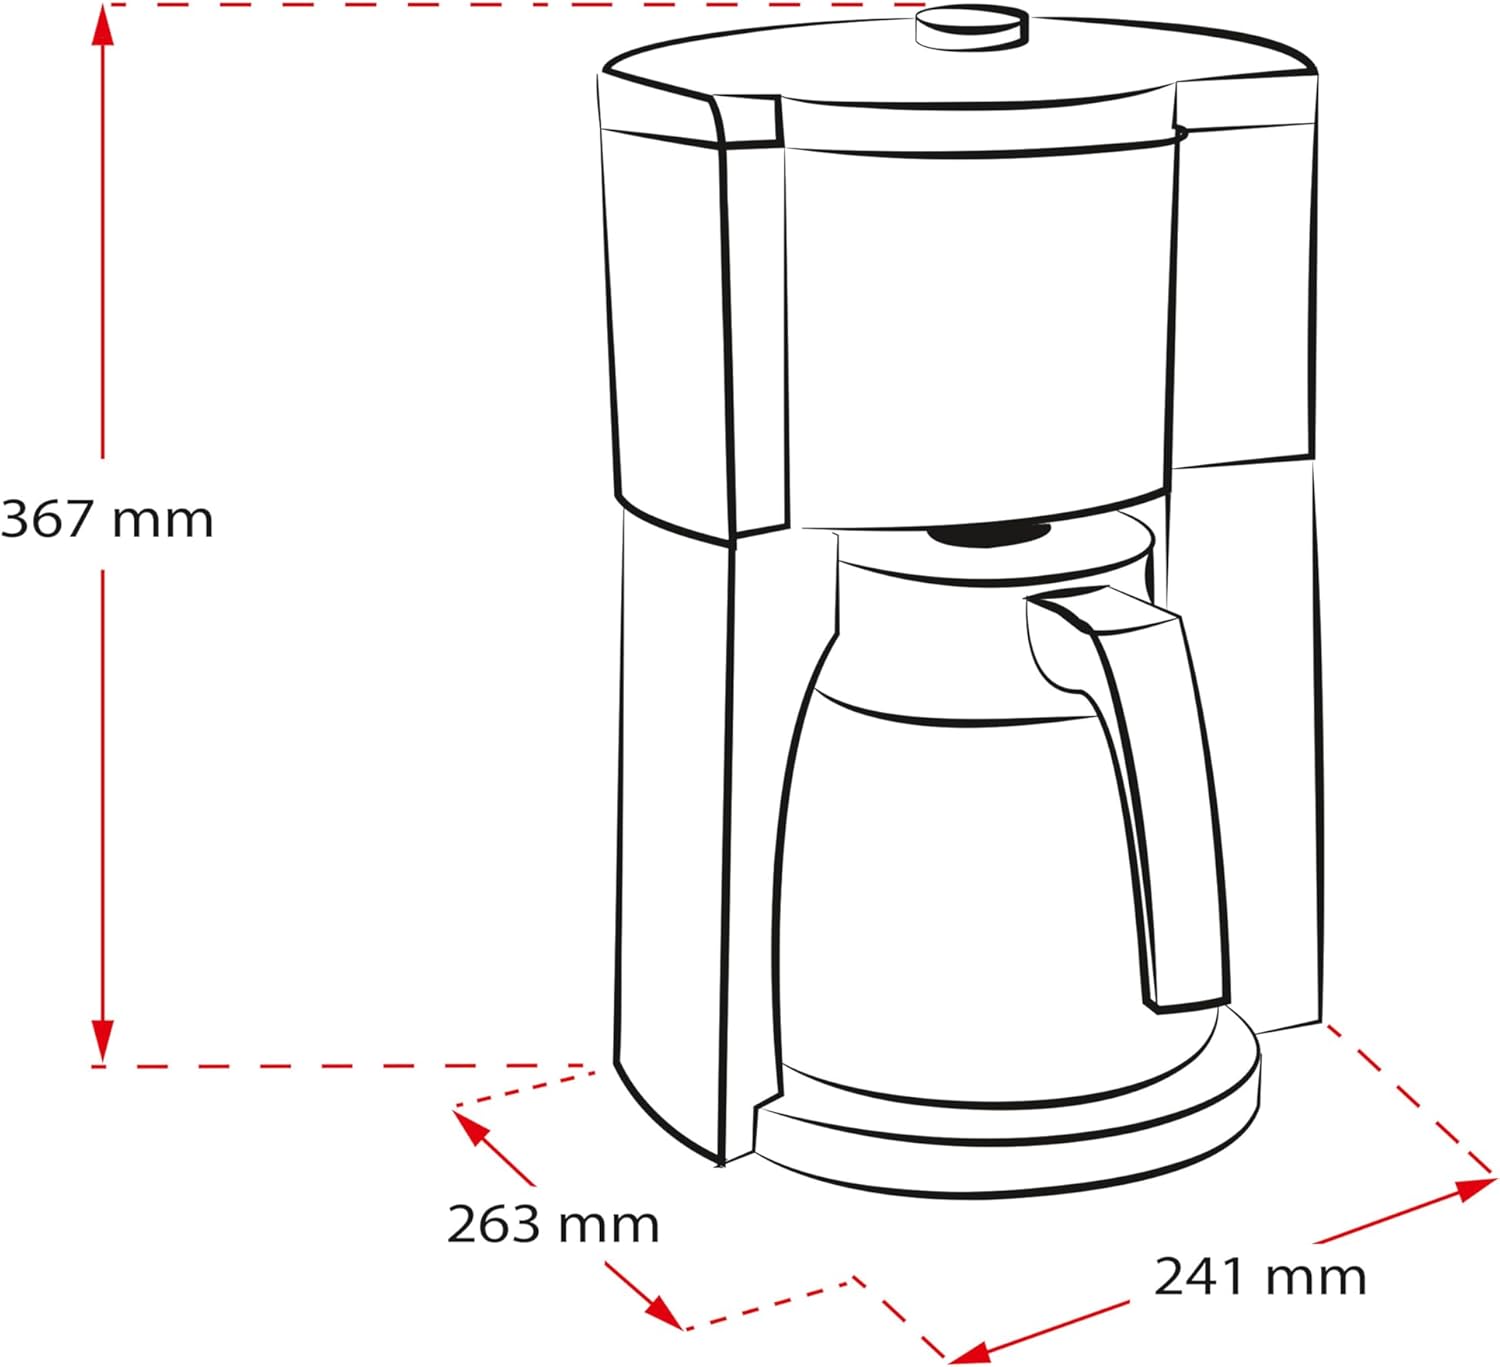
Figure 6: Technical drawing showing the dimensions of the Melitta Look V Timer coffee maker.
Warranty and Support
For detailed warranty information and customer support, please refer to the official Melitta website or contact Melitta customer service directly. Keep your proof of purchase for warranty claims.
Melitta Official Website: www.melitta.com


