
Truper ESMA-4512N
Truper Industrial 4-1/2" 1200W Angular Grinder ESMA-4512N User Manual
Model: ESMA-4512N | Brand: Truper
Introduction
This manual provides essential information for the safe and effective operation, maintenance, and troubleshooting of your Truper Industrial 4-1/2" 1200W Angular Grinder, model ESMA-4512N. Please read these instructions carefully before using the tool and keep them for future reference.
General Safety Instructions
WARNING: Read all safety warnings, instructions, illustrations, and specifications provided with this power tool. Failure to follow all instructions listed below may result in electric shock, fire, and/or serious injury.
Work Area Safety
- Keep work area clean and well lit. Cluttered or dark areas invite accidents.
- Do not operate power tools in explosive atmospheres, such as in the presence of flammable liquids, gases, or dust.
- Keep children and bystanders away while operating a power tool.
Electrical Safety
- Power tool plugs must match the outlet. Never modify the plug in any way.
- Avoid body contact with earthed or grounded surfaces, such as pipes, radiators, ranges, and refrigerators.
- Do not expose power tools to rain or wet conditions.
- Do not abuse the cord. Never use the cord for carrying, pulling, or unplugging the power tool.
Personal Safety
- Always wear eye protection. Use safety glasses, goggles, or a face shield.
- Wear hearing protection when operating power tools for extended periods.
- Dress properly. Do not wear loose clothing or jewelry. Keep your hair and clothing away from moving parts.
- Stay alert, watch what you are doing, and use common sense when operating a power tool.
Power Tool Use and Care
- Do not force the power tool. Use the correct power tool for your application.
- Disconnect the plug from the power source before making any adjustments, changing accessories, or storing power tools.
- Store idle power tools out of the reach of children and do not allow persons unfamiliar with the power tool or these instructions to operate the power tool.
- Maintain power tools and accessories. Check for misalignment or binding of moving parts, breakage of parts, and any other condition that may affect the power tool’s operation.
Product Overview
The Truper Industrial Angular Grinder is a robust tool designed for grinding, cutting, and polishing various materials. Familiarize yourself with its components for safe and efficient use.
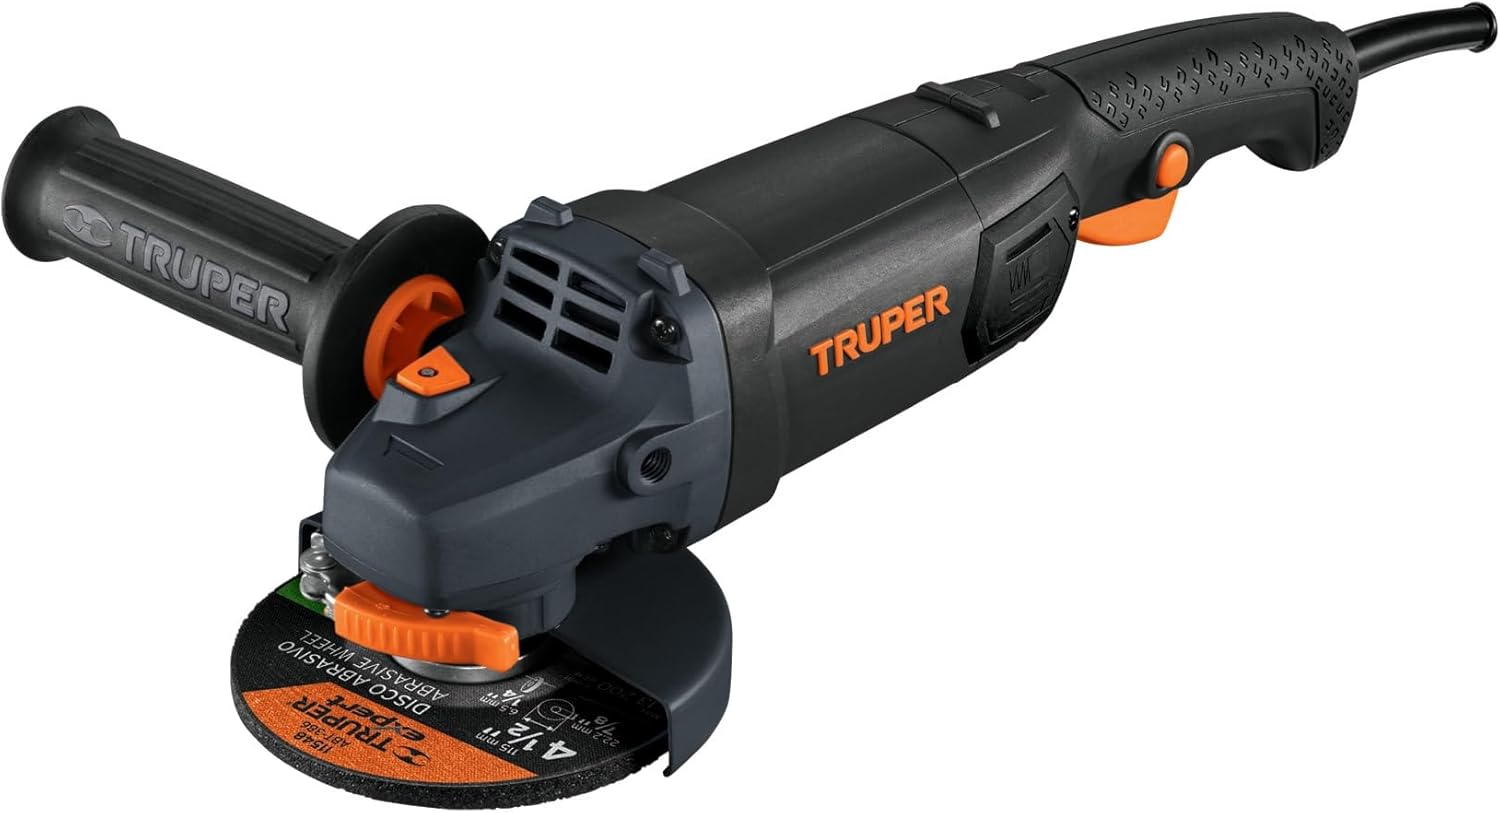
Figure 1: Front view of the Truper Industrial Angular Grinder, showcasing its compact design and primary components.

Figure 2: Detailed diagram highlighting key components of the angular grinder.
- 1. 2-Position Auxiliary Handle: Provides better control for the operator.
- 2. Spindle Lock: Facilitates easy accessory changes.
- 3. Heavy-Duty Cable: Durable power cable for robust use.
- 4. Quick-Adjust Guard: Allows for fast and safe work adjustments.
- 5. Exposed Carbon Brushes: Designed for easy and quick replacement.
- 6. Continuous Operation Button: For extended use without holding the trigger.
- 7. Non-Slip Grip: Enhances holding comfort and security.
- 8. Ball Bearing Mounted Motor: Contributes to greater durability and longevity.
- 9. Vibration Reducer: Minimizes operational vibration for user comfort.

Figure 3: Side view illustrating the approximate dimensions of the grinder: Height 11 cm, Length 39 cm.

Figure 4: Close-up of the heavy-duty power cable, designed for durability and safety in industrial environments.
Setup and Assembly
Before connecting the tool to a power source, ensure all components are correctly assembled.
1. Attaching the Auxiliary Handle
- The auxiliary handle can be screwed into either side of the gear housing, depending on user preference and application.
- Tighten securely by hand.
2. Adjusting the Guard
- Loosen the quick-adjust lever on the guard.
- Rotate the guard to protect against sparks and debris in the direction of operation.
- Securely tighten the quick-adjust lever. Never operate the grinder without the guard properly positioned.
3. Installing the Grinding Disc
- Ensure the tool is unplugged from the power source.
- Press and hold the spindle lock button.
- Place the inner flange onto the spindle.
- Position the grinding disc onto the inner flange, ensuring it sits flat.
- Thread the outer flange (nut) onto the spindle and tighten it using the provided wrench.
- Release the spindle lock.
- Verify the disc is securely mounted and rotates freely without wobbling.
Operating Instructions
Starting and Stopping
- To Start: Plug the tool into a suitable power outlet. Press the ON/OFF switch.
- Continuous Operation: For prolonged use, press the continuous operation button after starting the tool.
- To Stop: Release the ON/OFF switch. If in continuous operation mode, press the ON/OFF switch again to disengage.
General Grinding and Cutting Tips
- Always hold the grinder firmly with both hands.
- Allow the disc to reach full speed before contacting the workpiece.
- Apply moderate pressure. Excessive pressure can reduce efficiency and damage the disc or motor.
- Maintain a consistent angle (typically 15-30 degrees for grinding) to the workpiece.
- For cutting, use a cutting disc and ensure the workpiece is securely clamped. Cut in a straight line, allowing the disc to do the work.
- Be aware of sparks and debris. Ensure they are directed away from yourself and others.
Maintenance
Regular maintenance ensures optimal performance and extends the life of your tool.
Cleaning
- Always unplug the tool before cleaning.
- Clean the ventilation openings regularly to prevent overheating. Use compressed air if available.
- Wipe the tool housing with a damp cloth. Do not use harsh chemicals or abrasive cleaners.
Carbon Brush Replacement
This model features exposed carbon brushes for easy replacement. Worn carbon brushes can lead to reduced power or intermittent operation.
- Unplug the tool.
- Locate the carbon brush caps on the sides of the motor housing (refer to Figure 2, item 5).
- Unscrew the caps using a screwdriver or coin.
- Carefully remove the old carbon brushes.
- Insert new carbon brushes, ensuring they slide in smoothly.
- Replace and tighten the caps.
- After replacement, run the tool without load for a few minutes to allow the brushes to seat properly.
General Inspection
- Regularly inspect the power cord for damage. If damaged, have it replaced by a qualified technician.
- Check all screws and fasteners for tightness.
- Ensure the guard and auxiliary handle are securely attached.
Troubleshooting
| Problem | Possible Cause | Solution |
|---|---|---|
| Tool does not start. | No power supply; faulty switch; worn carbon brushes. | Check power connection and outlet; replace switch; replace carbon brushes. |
| Reduced power or intermittent operation. | Worn carbon brushes; motor overload; loose connections. | Replace carbon brushes; reduce load; check connections. |
| Excessive vibration. | Damaged or improperly mounted disc; loose components. | Inspect and replace disc if damaged; ensure disc is correctly mounted; tighten all fasteners. |
| Overheating. | Blocked ventilation openings; continuous heavy load. | Clean ventilation openings; allow tool to cool down; reduce load. |
Specifications
| Feature | Detail |
|---|---|
| Brand | Truper |
| Model Number | ESMA-4512N |
| Power Source | Corded Electric |
| Wattage | 1200 Watts |
| Voltage | 120 Volts |
| Maximum Rotational Speed | 6000 RPM |
| Disc Diameter | 4-1/2 inches |
| Item Weight | 3.26 Kilograms (7.17 pounds) |
| Product Dimensions | 15.35 x 5.91 x 4.33 inches |
| Material | Metal |
| Style | Angled |
Warranty and Support
The Truper Industrial 4-1/2" 1200W Angular Grinder (Model ESMA-4512N) comes with a 5-year unconditional warranty. For warranty claims, technical support, or service inquiries, please contact Truper customer service or your authorized dealer. Keep your purchase receipt as proof of purchase.

Figure 5: Product packaging indicating a 5-year unconditional warranty.
Ask a question about this manual
Ask about setup, troubleshooting, compatibility, parts, safety, or missing instructions. Manuals+ will review the question and use this page’s manual context to help answer it.