1. Introduction and Overview
The BRESSER Explore Scientific 7-in-1 WiFi Professional Weather Station is designed to provide comprehensive meteorological data directly from your vicinity. This advanced system measures a wide range of weather parameters and offers connectivity to online weather services like Weather Underground and Weathercloud for remote viewing and data sharing. The station features a new light intensity measurement function, enhancing its capabilities compared to previous models.
Key features include:
- 7-in-1 Sensor: Measures outdoor temperature, humidity, wind direction, wind speed, rainfall, UV index, and light intensity.
- Indoor Monitoring: Displays indoor temperature and humidity.
- WiFi Connectivity: Enables internet time synchronization and data publishing to Weather Underground or Weathercloud.
- Advanced Data: Provides air pressure with 24-hour history, graphical weather forecast, 'feels like' function, dew point, heat index, wind chill factor, trend indicators, moon phases, sunrise/sunset times.
- Alerts: Includes alarm with snooze, weekday alarm, and ice/frost warning.
- Expandability: Supports additional optional sensors such as the BRESSER soil temperature and moisture meter (item no. 7009972) and the BRESSER Spa and pool thermometer (item no. 7009973).
2. Package Contents
Please ensure all components are present and in good condition upon unpacking:
- Main Display Unit (Base Station)
- 7-in-1 Outdoor Multi-Sensor (WSX3001 Wireless Temperature Sensor)
- Mounting Arm and Hardware
- Power Adapter for Base Station
- User Manual (this document)
- Batteries (3 AAA batteries required for the base station, not always included)
3. Setup
3.1 Outdoor Sensor Assembly
The 7-in-1 outdoor sensor requires minor assembly before installation. Carefully attach the wind cups, wind vane, and mounting pole as instructed in the quick start guide provided in the packaging.

Description: This image displays the individual components of the BRESSER 7-in-1 outdoor sensor, including the black wind cups, the black wind vane, and the rain collector funnel. A small solar panel is integrated into the side of the unit, which powers the sensor and charges its internal battery.

Description: This image shows the fully assembled BRESSER 7-in-1 outdoor sensor from a top-down view. The wind cups and wind vane are clearly visible on the left, while the rain collector is on the right. The solar panel is positioned underneath the main body, indicating its role in powering the device.
3.2 Outdoor Sensor Installation
Mount the outdoor sensor in an open area, away from obstructions that could affect wind, rain, or sunlight measurements. Ensure it is securely fastened to a pole or suitable structure using the provided mounting hardware. The solar panel should face south for optimal charging.

Description: This image presents the BRESSER 7-in-1 outdoor sensor fully assembled and mounted on a white vertical pole. The sensor's various components, including the anemometer, wind vane, and rain gauge, are clearly visible, indicating a complete installation ready for operation.

Description: This image shows the BRESSER 7-in-1 outdoor sensor mounted on a pole on a rooftop, with a sunny, natural background of trees. This illustrates a common and ideal placement for the sensor to ensure accurate readings, free from ground-level obstructions.
3.3 Base Station Power and Initial Setup
Insert 3 AAA batteries into the base station (if not already installed) and connect the power adapter. The display will power on. The base station will automatically attempt to synchronize with the outdoor sensor and connect to your WiFi network.

Description: This image displays the front of the BRESSER weather station's main display unit. It features a vibrant color LCD screen showing various weather parameters such as outdoor and indoor temperature and humidity, wind speed and direction, UV index, light intensity, time, date, and a weather forecast icon.
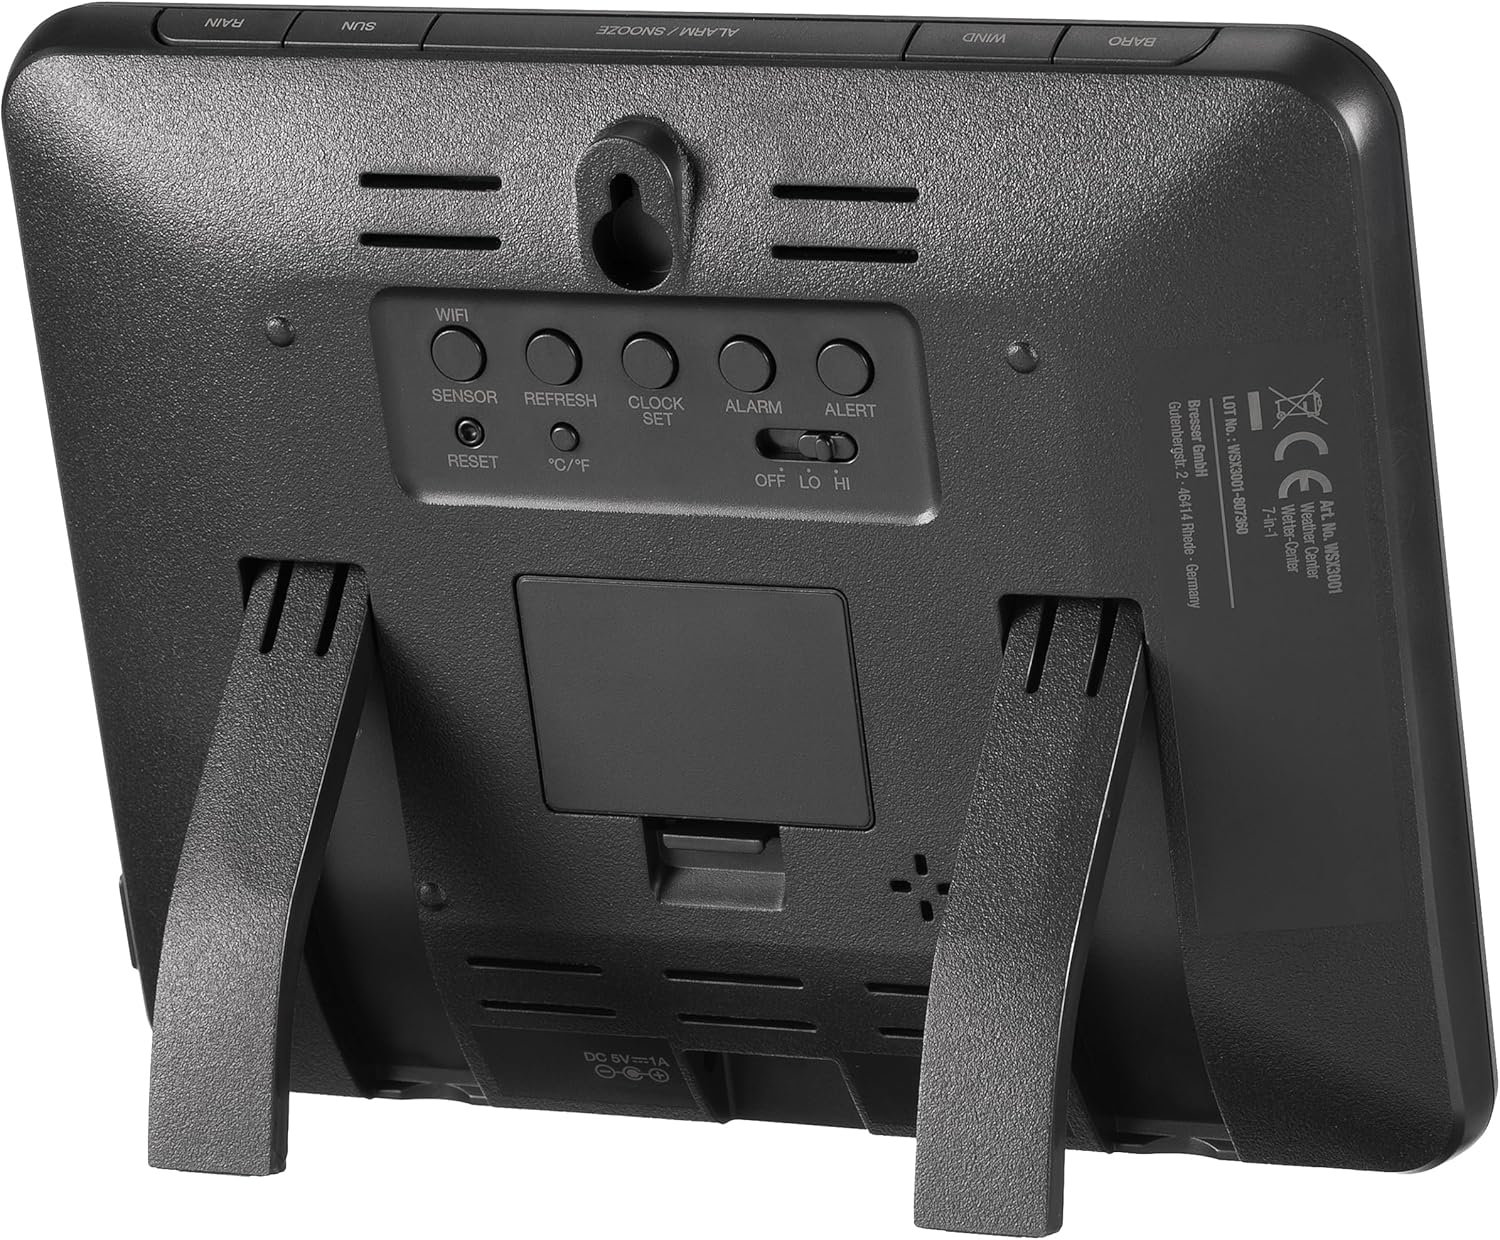
Description: This image shows the back of the BRESSER weather station's main display unit. Visible are several control buttons labeled 'WIFI', 'SENSOR', 'REFRESH', 'CLOCK SET', 'ALARM', 'ALERT', 'RESET', and '°C/°F'. There's also a battery compartment, a DC 5V/1A power input, and a fold-out stand for tabletop use, along with a wall-mounting slot.
3.4 WiFi Connection and Online Services
Follow the on-screen prompts or refer to the detailed instructions in the full manual for connecting the base station to your home WiFi network. Once connected, you can register your station with Weather Underground or Weathercloud to publish your local weather data online. This allows you to view your data remotely via their websites or mobile applications.
4. Operating Instructions
4.1 Display Layout and Information
The main display unit provides a comprehensive overview of current weather conditions. The screen is divided into sections for easy readability:
- OUT (Outdoor): Displays outdoor temperature and humidity.
- IN (Indoor): Displays indoor temperature and humidity.
- WIND: Shows wind direction (compass rose) and speed (m/s, km/h, knots, mph).
- SUN: Indicates UV index, exposure level, recommended protection, and light intensity (Klux / Kfc / W/m²).
- FORECAST: Graphical weather forecast for the next 12-24 hours.
- BARO (Barometric Pressure): Displays air pressure with 24-hour history.
- RAIN: Shows rainfall with daily, weekly, and monthly history.
- INDEX: Includes 'feels like' temperature, dew point, and heat index.
- TIME/DATE: Current time, date, moon phase, sunrise, and sunset times.

Description: This image shows the BRESSER weather station's main display unit mounted on a light-colored wall in a modern living room. The display is clearly visible, showcasing its various weather data readouts, blending seamlessly into the home environment.
Description: This image displays the front of the BRESSER weather station's main display unit. It features a vibrant color LCD screen showing various weather parameters such as outdoor and indoor temperature and humidity, wind speed and direction, UV index, light intensity, time, date, and a weather forecast icon.
4.2 Button Functions
The buttons on the side and back of the display unit allow for various settings and data access:
- UP/DOWN Arrows: Navigate through display modes or adjust settings.
- INDEX: Cycles through weather index values ('feels like', dew point, heat index).
- HISTORY: Access historical data for various parameters.
- MAX/MIN: View maximum and minimum recorded values.
- CHANNEL: If multiple indoor sensors are connected, cycles through their data.
- WIFI: Initiates or manages WiFi connection.
- SENSOR: Manually search for or re-pair with the outdoor sensor.
- REFRESH: Manually refresh data from sensors.
- CLOCK SET: Enter time and date setting mode.
- ALARM: Set or activate alarms.
- ALERT: Set weather alerts (e.g., high/low temperature).
- °C/°F: Toggle temperature units between Celsius and Fahrenheit.
- RESET: Factory reset the unit (use with caution).
4.3 Setting Alarms and Alerts
Use the ALARM and ALERT buttons to configure time alarms, weekday alarms, and specific weather alerts such as ice/frost warnings or high/low temperature thresholds. Refer to the detailed manual for step-by-step instructions on setting each type of alarm.
5. Maintenance
5.1 Cleaning the Outdoor Sensor
Periodically inspect and clean the outdoor sensor. Ensure the rain collector funnel is free of debris (leaves, insects) to maintain accurate rainfall measurements. Gently wipe the solar panel with a soft, damp cloth to ensure optimal charging efficiency. Avoid using abrasive cleaners.
5.2 Battery Replacement
The base station requires 3 AAA batteries. Replace them when the low battery indicator appears on the display. The outdoor sensor is primarily solar-powered but may contain a backup battery; consult the full manual for specific battery types and replacement procedures for the outdoor unit.
5.3 Firmware Updates
The weather station supports firmware updates via its WiFi connection. Check the BRESSER website for available updates and follow their instructions carefully to ensure your station operates with the latest features and improvements.
6. Troubleshooting
6.1 No Data from Outdoor Sensor
- Check Batteries: Ensure the outdoor sensor has sufficient power (solar panel clean, backup battery functional).
- Range: Verify the outdoor sensor is within range of the base station.
- Interference: Move the base station or sensor away from potential sources of electronic interference.
- Re-pair: Use the SENSOR button on the base station to manually re-establish connection.
6.2 Incorrect Readings
- Sensor Placement: Ensure the outdoor sensor is correctly installed and free from obstructions (e.g., wind cups spinning freely, rain collector clear).
- Calibration: Some parameters, like barometric pressure, may require manual calibration to a local official weather source. Refer to the full manual for calibration procedures.
6.3 WiFi Connection Issues
- Router Proximity: Ensure the base station is within range of your WiFi router.
- Password: Double-check your WiFi password.
- 2.4GHz Network: The station typically supports 2.4GHz WiFi networks only. Ensure your router is broadcasting on this frequency.
- Reset WiFi: Use the WIFI button or the RESET button (if necessary) to restart the WiFi setup process.
7. Specifications
| Feature | Specification |
|---|---|
| Model Number | WSX3001cm3LC2 |
| Product Dimensions | 21.5 x 2.9 x 17.2 cm |
| Item Weight | 0.1 Kilograms (Base Station) |
| Power Source | Battery Powered (Base Station: 3 AAA batteries required), Solar Powered (Outdoor Sensor) |
| Connectivity Technology | Wi-Fi |
| Material | Plastic |
| Special Features | Alarm, Lightweight |
| Included Components | WSX3001 Wireless Temperature Sensor |
| Color | Black/White |
8. Warranty Information
For detailed warranty information regarding your BRESSER Explore Scientific 7-in-1 WiFi Professional Weather Station, please refer to the manufacturer's official website or the warranty card included in your product packaging. Warranty terms and conditions may vary by region and retailer.
9. Support
Should you require technical assistance, have questions about setup, operation, or troubleshooting that are not covered in this manual, please contact BRESSER customer service. Contact details, including phone numbers and email addresses, can typically be found on the official BRESSER website (www.bresser.de) or in your product documentation.


