1. Introduction
This manual provides comprehensive instructions for the meross Smart Plug Mini (Model: MSS110HK). It covers setup, operation, maintenance, and troubleshooting to ensure optimal performance and a seamless smart home experience. The meross Smart Plug Mini allows you to control your devices remotely, set schedules, and use voice commands through platforms like Apple HomeKit, Amazon Alexa, and Google Assistant.
2. Product Overview
2.1. What's in the Box
- meross Smart Plug Mini (4 units)
- User Manual
2.2. Key Features
- Remote Control: Control connected devices from anywhere via the meross app or compatible smart home platforms.
- Voice Control: Compatible with Apple HomeKit, Siri, Amazon Alexa, and Google Assistant for hands-free operation.
- Compact Size: Designed to occupy only one socket, allowing two mini smart plugs to be used in a standard duplex outlet.
- Scheduling & Timer: Automate devices to turn on/off at specific times, including sunrise/sunset settings.
- Reliable Wi-Fi: Requires a 2.4GHz Wi-Fi network for connectivity.
- Safety Certified: Made from PC flame retardant material, ETL and FCC certified, supporting appliances up to 15A.

Image 2.1: The meross Smart Plug Mini (MSS110HK) in a 4-pack configuration.

Image 2.2: Overview of meross Smart Plug Mini features and compatible devices.

Image 2.3: Comparison of meross Smart Plug performance and features against other smart plugs.
3. Setup Instructions
Before you begin, ensure your smartphone is connected to a 2.4GHz Wi-Fi network. The meross Smart Plug Mini does not support 5GHz Wi-Fi networks. Also, enable Bluetooth on your phone for easier pairing.
3.1. Initial Power-On and Reset
- Plug the meross Smart Plug Mini into a power outlet.
- Wait for the LED indicator to blink green/amber. If it is solid green or not blinking, press and hold the power button on the side of the plug for approximately 5 seconds until it starts blinking green/amber. This indicates the device is in setup mode.
3.2. Connecting to Apple HomeKit
You can set up the meross Smart Plug Mini directly through the Apple Home app without needing the meross app first.
- Open the Apple Home app on your iPhone or iPad.
- Tap the '+' icon in the top right corner and select 'Add Accessory'.
- Scan the HomeKit QR code located on the side of the meross Smart Plug Mini or on the included manual.
- Follow the on-screen prompts to add the device, assign it to a room, and give it a name.
- Ensure your phone remains close to the smart plug during the setup process.
3.3. Connecting to the meross App (Optional but Recommended)
While HomeKit setup is primary, installing the meross app allows for firmware updates and additional features.
- Download the meross app from the App Store or Google Play.
- Create a meross account or log in.
- Tap the '+' icon in the top right corner. The app should detect the HomeKit-configured device as 'unlinked'.
- Follow the in-app instructions to link the device to your meross account.
- If prompted, perform any available firmware updates.
3.4. Remote Control for HomeKit
To enable remote control for HomeKit devices when you are away from home, you need a HomeKit hub.
- Set up an Apple HomePod, Apple TV 4K, Apple TV HD, or an iPad as a HomeKit bridge.
- Ensure the HomeKit bridge device is connected to your home's 2.4GHz Wi-Fi network and remains online.

Image 3.1: Smart Plug Mini used for scheduling Christmas lights and a bedside lamp.

Image 3.2: Demonstrating voice and remote control capabilities with various smart assistants.

Image 3.3: Setting up HomeKit remote control with a HomePod, Apple TV, or iPad as a home hub. For more details, refer to Apple HomeKit support.
4. Operating Instructions
4.1. Manual Control
Press the power button on the side of the smart plug to manually turn the connected device on or off.
4.2. App Control
Use the meross app or the Apple Home app to control your smart plug from your smartphone or tablet. You can turn devices on/off, check their status, and manage settings.
4.3. Voice Control
Once integrated with your preferred smart assistant, use voice commands:
- Siri: "Hey Siri, turn on the living room light."
- Alexa: "Alexa, turn off the coffee maker."
- Google Assistant: "Hey Google, turn on the fan."
4.4. Scheduling and Timers
Set up schedules and timers through the meross app or Apple Home app to automate your devices. This includes daily schedules, sunrise/sunset automation, and countdown timers.
4.5. Offline Control
The meross Smart Plug Mini supports local control, meaning that once configured, it can respond to commands from your local network even if the internet connection is temporarily unavailable. Schedules and timers will also continue to function.
5. Maintenance
5.1. Cleaning
To clean the smart plug, ensure it is unplugged from the wall outlet. Use a dry, soft cloth to wipe the exterior. Do not use liquid cleaners or abrasive materials.
5.2. Firmware Updates
Regularly check for firmware updates via the meross app. Updates can improve performance, add new features, and enhance security. Ensure the smart plug remains powered on and connected to Wi-Fi during the update process.
6. Troubleshooting
6.1. Cannot Pair with HomeKit or meross App
- 2.4GHz Wi-Fi: Ensure your phone is connected to a 2.4GHz Wi-Fi network. The smart plug does not support 5GHz networks.
- Bluetooth: Make sure Bluetooth is enabled on your smartphone during setup.
- Reset Device: If the LED is not blinking green/amber, press and hold the power button for 5 seconds to reset it to setup mode.
- Proximity: Keep your smartphone close to the smart plug during the pairing process.
- Router Settings: Some routers combine 2.4GHz and 5GHz networks under one SSID. Temporarily disable the 5GHz band on your router during setup if you encounter issues.
- QR Code: Ensure the QR code is clean and well-lit when scanning.

Image 6.1: Scan this QR code for additional HomeKit pairing troubleshooting tips. You can also visit meross support page.
6.2. Device Unresponsive or Offline
- Wi-Fi Signal: Check your Wi-Fi signal strength at the smart plug's location. Move the plug closer to your router if necessary.
- Router Reboot: Try restarting your Wi-Fi router.
- Power Cycle: Unplug the smart plug from the outlet, wait a few seconds, and plug it back in.
- HomeKit Hub: For remote HomeKit control, ensure your HomeKit hub (HomePod, Apple TV, iPad) is online and connected to the same 2.4GHz Wi-Fi network.

Image 6.2: Understanding the difference between meross's local control and typical cloud-dependent control for faster response times.
7. Specifications
| Feature | Detail |
|---|---|
| Model Number | MSS110HK |
| Product Dimensions | 2.7 x 1.5 x 2.3 inches |
| Weight | 10.86 ounces (for 4-pack) |
| Input Voltage | 120 Volts (AC) |
| Max Load | 15A / 1800W |
| Wireless Connectivity | 2.4GHz Wi-Fi (IEEE 802.11 b/g/n) |
| Material | Polycarbonate (PC) |
| Certifications | ETL, FCC |
| Compatible Devices | Smartphone (Apple HomeKit, Siri, Alexa, Google Assistant) |
8. Safety Information
Please read and follow all safety instructions to prevent injury or damage.
- Do not use the device in wet or damp environments.
- Do not exceed the maximum load of 15A / 1800W.
- The smart plug is made of PC flame retardant material for enhanced safety.
- Features overload protection to prevent damage to connected appliances.
- Do not disassemble or attempt to repair the device yourself. Contact customer support if needed.
- Keep out of reach of children.
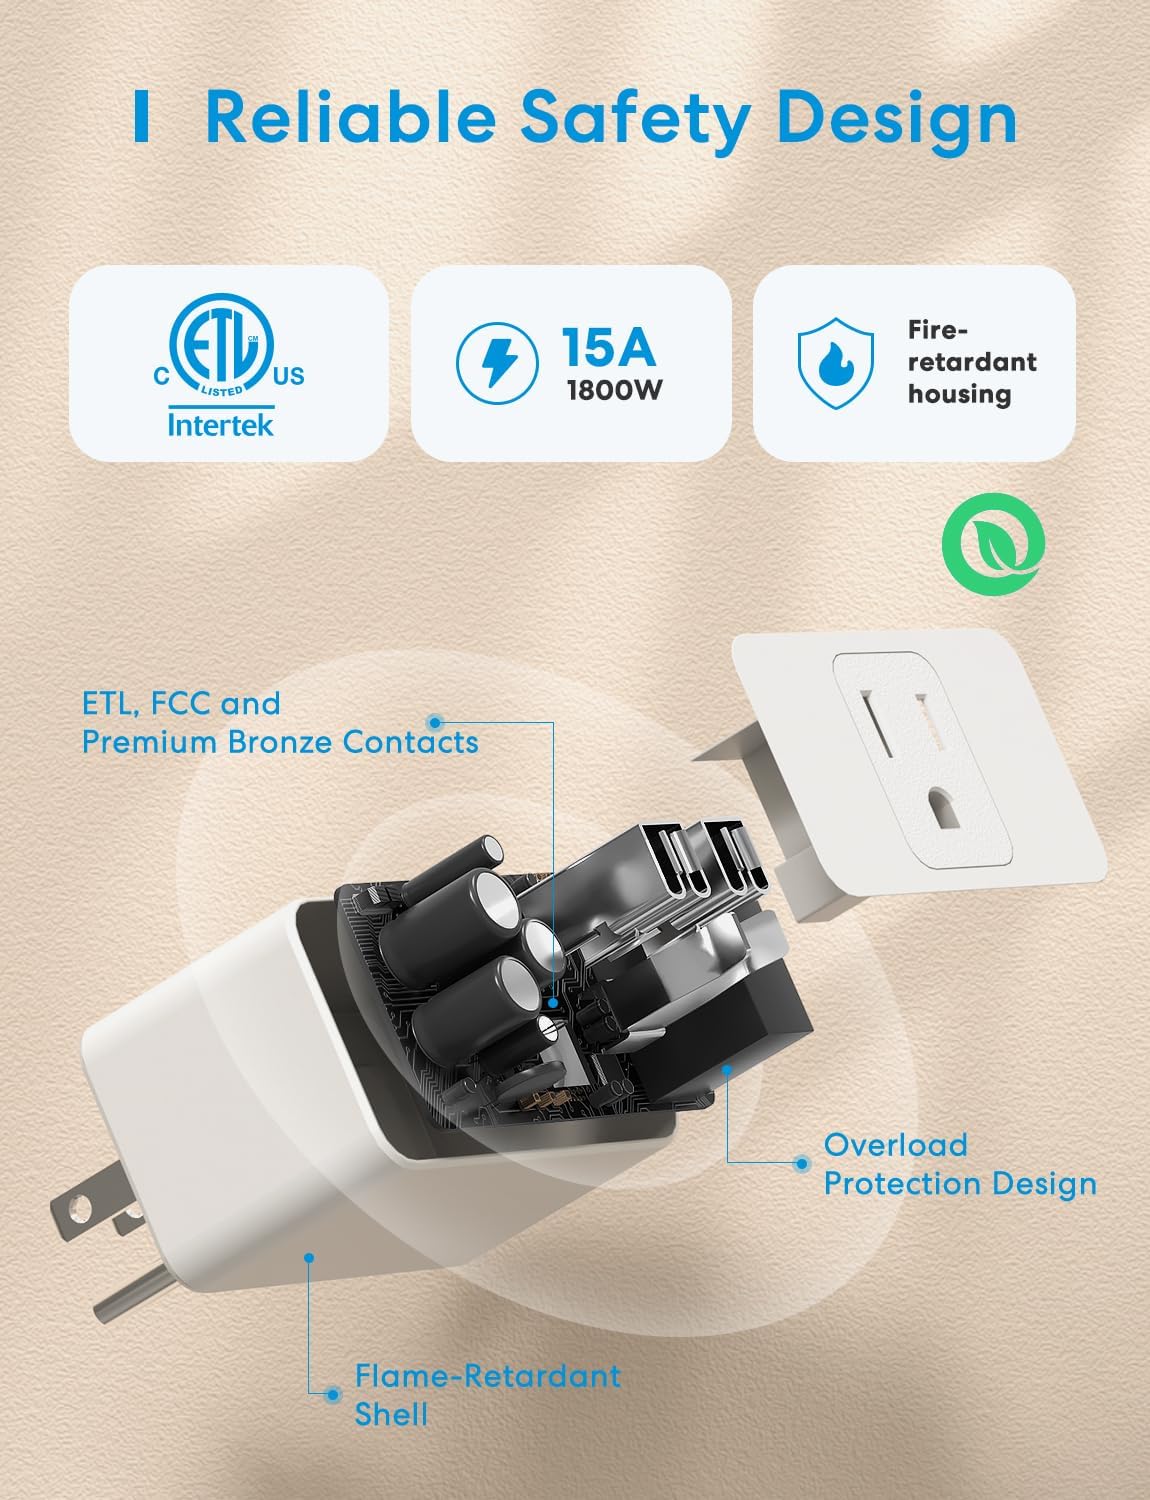
Image 8.1: Internal view highlighting the safety design and certifications of the meross Smart Plug Mini.
9. Warranty and Support
meross products come with a standard manufacturer's warranty. For specific warranty details, please refer to the documentation included with your purchase or visit the official meross website.
9.1. Customer Support
If you encounter any issues or have questions regarding your meross Smart Plug Mini, please contact meross customer support through their official website or the meross app. Provide your model number (MSS110HK) and a detailed description of the issue for faster assistance.


