
LEONLITE ZY3LSL-3WBLK30-12P
LEONLITE 12-Pack Low Voltage Path Lights Instruction Manual
Model: ZY3LSL-3WBLK30-12P
Introduction
This manual provides detailed instructions for the installation, operation, and maintenance of your LEONLITE 12-Pack Low Voltage Path Lights. These 3W LED landscape pathway lights are designed for outdoor use, offering 3000K warm white illumination for driveways, gardens, and pathways. Please read this manual thoroughly before installation and retain it for future reference.
Safety Information
- Electrical Safety: This product operates on 12-24V AC/DC low voltage. Ensure the power supply is disconnected before installation or maintenance.
- Professional Installation: If you are unsure about electrical wiring, consult a qualified electrician.
- Outdoor Use: Designed for outdoor wet locations with an IP65 waterproof rating. Ensure all connections are properly sealed to prevent water ingress.
- Heat Dissipation: The aluminum housing is designed for heat dissipation. Do not cover the lights with materials that could impede airflow.
- Damage Inspection: Inspect lights for any damage before installation. Do not install damaged products.
Package Contents
The LEONLITE 12-Pack Low Voltage Path Lights package includes the following items:
- 12 x LED Path Lights
- 12 x Ground Stakes
- Wire Connectors (quantity sufficient for installation)
Note: A low voltage transformer and main landscape cables are not included and must be purchased separately.


Specifications
| Brand | LEONLITE |
| Model Number | ZY3LSL-3WBLK30-12P |
| Color Temperature | 3000K Warm White |
| Wattage | 3 Watts per light |
| Brightness | 120 Lumens per light |
| Voltage | 12-24V AC/DC |
| Material | Aluminum |
| Water Resistance Level | IP65 Waterproof |
| Product Dimensions | 2.36"L x 2.36"W x 15"H (per light) |
| Lifespan | 50,000 hours |
| Certifications | ETL Listed |
Installation Guide
1. Planning Your Layout
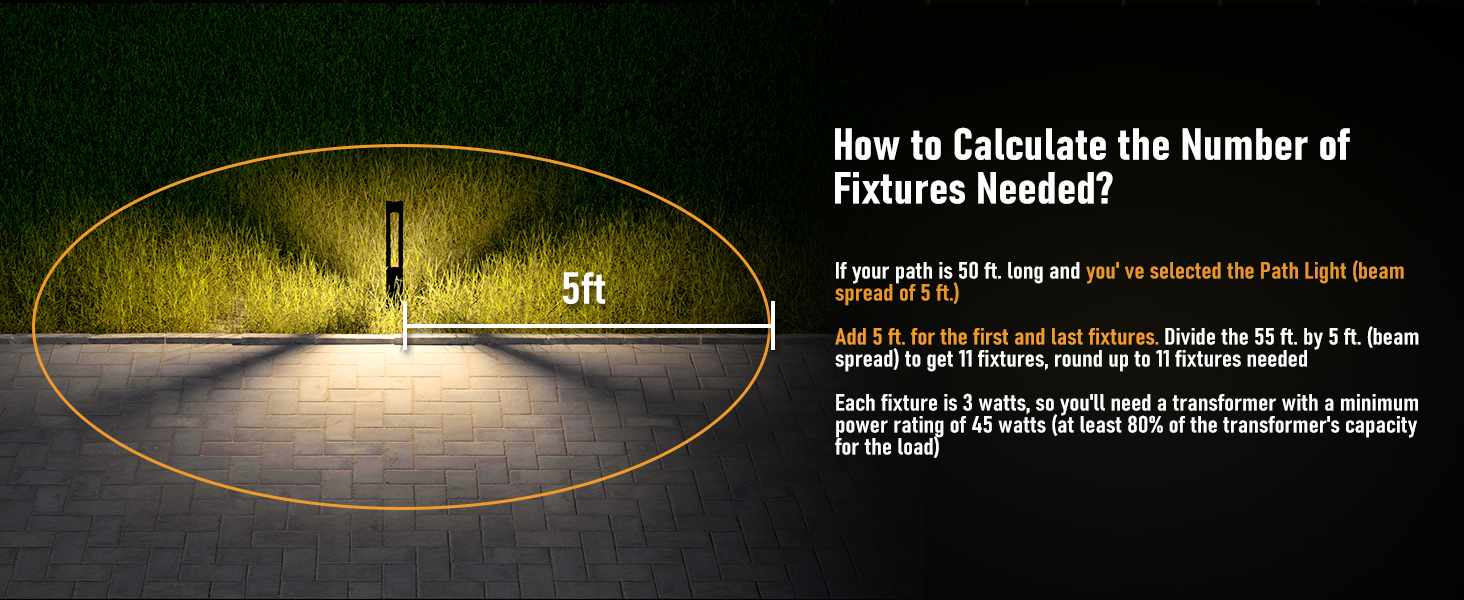
Before beginning installation, plan the placement of your path lights. Consider the desired illumination area and the path length. These lights provide a downward glow with a beam angle of 160 degrees and a light coverage of approximately 3.25 feet in diameter.

2. Calculating Fixture Needs and Transformer Sizing
To determine the number of fixtures needed and the appropriate transformer size:
- Measure the total length of your pathway.
- Add 5 feet for the first and last fixtures.
- Divide the total length (including the added 5 feet) by 5 feet (the recommended beam spread/spacing). Round up to the nearest whole number to get the required number of fixtures.
- Each fixture is 3 watts. Multiply the number of fixtures by 3 watts to get the total wattage.
- Select a transformer with a minimum power rating that is at least 80% of the total wattage calculated. For example, if you need 11 fixtures (33 watts total), you'll need a transformer with a minimum rating of 45 watts (33W / 0.8 = 41.25W, rounded up to 45W).
3. Wiring Diagram
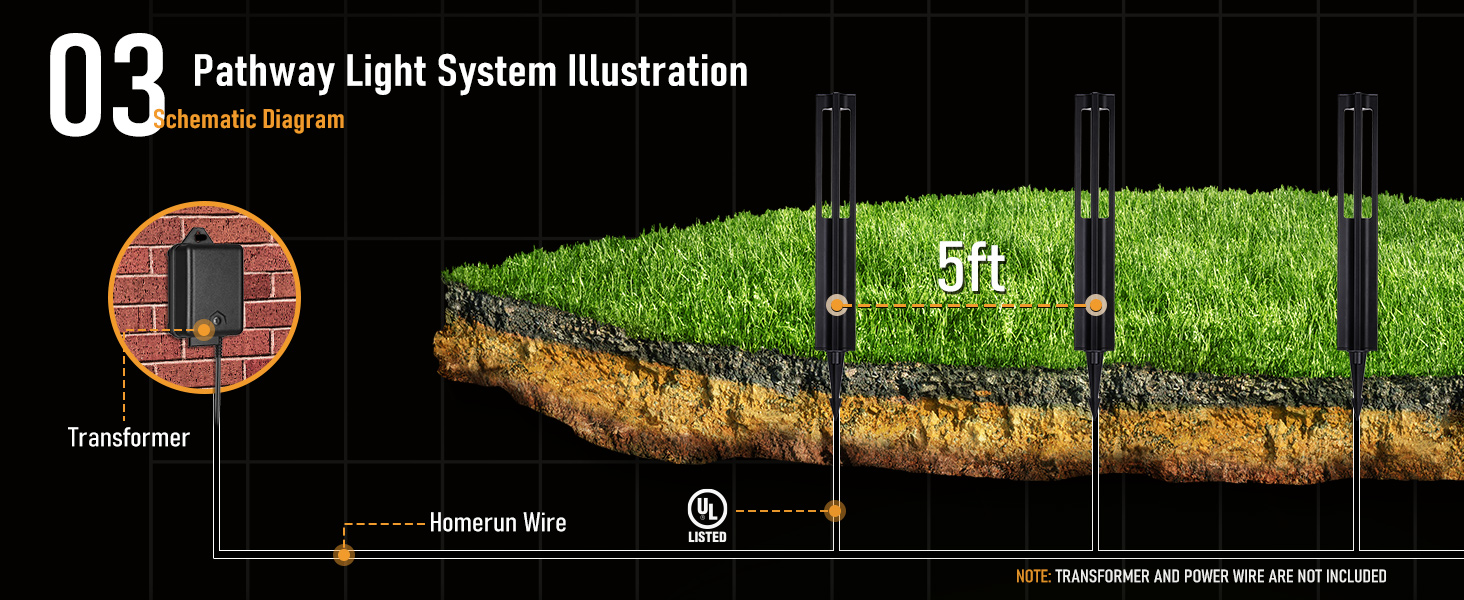
The path lights connect to a low voltage transformer via a main homerun wire. Ensure the transformer is installed in a suitable outdoor location and connected to a power source.
4. Step-by-Step Installation
- Prepare the Area: Clear any debris or obstacles from the pathway where the lights will be installed.
- Install Ground Stakes: Attach a ground stake to the bottom of each path light. Firmly push or gently hammer the ground stakes into the soil at your planned locations. Ensure the lights are stable and upright.
- Lay Main Cable: Lay out your main low voltage landscape cable along the pathway, ensuring it reaches all light locations and the transformer. Bury the cable a few inches deep for protection and aesthetics.
- Connect Lights: Using the provided wire connectors, connect the wires from each path light to the main landscape cable. Ensure a secure and waterproof connection.
- Connect to Transformer: Connect the main landscape cable to your low voltage transformer according to the transformer's instructions.
- Test System: Once all connections are made, plug in the transformer to test the lights. If any lights do not illuminate, check the connections.


Operating Instructions
LEONLITE Low Voltage Path Lights are designed for continuous operation when connected to a compatible low voltage transformer. The operation of the lights is controlled by the transformer's settings (e.g., timer, photocell, manual on/off).
- Ensure the transformer is properly configured for your desired operating schedule.
- The lights will turn on and off according to the transformer's settings.
Maintenance
- Cleaning: Periodically clean the light fixtures with a soft, damp cloth to remove dirt and debris. Do not use abrasive cleaners.
- Inspection: Regularly inspect the wiring and connections for any signs of wear, damage, or corrosion. Ensure all connections remain waterproof.
- Obstruction: Keep vegetation and other objects clear of the lights to ensure proper light distribution and prevent heat buildup.
- LED Lifespan: The integrated LED light source has a long lifespan (50,000 hours) and is not user-replaceable. If a light fails, the entire fixture may need replacement.

Troubleshooting
| Problem | Possible Cause | Solution |
|---|---|---|
| Lights do not turn on. |
|
|
| Some lights are off, others are on. |
|
|
| Lights flicker or are dim. |
|
|
Warranty and Support
LEONLITE products are backed by a 2-year limited warranty. This warranty covers defects in materials and workmanship under normal use.
For warranty claims, technical assistance, or any questions regarding your product, please contact LEONLITE customer support. Refer to the contact information provided with your purchase or visit the official LEONLITE website.
As a leading provider of professional lighting solutions, LEONLITE products are ETL certified, ensuring quality and reliability.
Related documentsZY3LSL-3WBLK30-12P


Ask a question about this manual
Ask about setup, troubleshooting, compatibility, parts, safety, or missing instructions. Manuals+ will review the question and use this page’s manual context to help answer it.