Introduction
This user manual provides comprehensive instructions for the proper installation, operation, and maintenance of your Sun Energise Waterproof 12V 20W Solar Battery Charger Pro. Please read this manual thoroughly before using the product to ensure safe and efficient operation and to prevent damage.
Safety Information
Always observe the following safety precautions to reduce the risk of injury or damage:
- Do not disassemble or modify the product.
- Keep the product away from extreme temperatures, direct sunlight, and corrosive materials.
- Ensure proper ventilation when operating.
- Disconnect power before performing any maintenance or cleaning.
- Use only specified accessories and components.
Package Contents
Verify that all items are present in the package:
- 1 x Solar Battery Charger Pro (SE-20W)
- 1 x Alligator Clip Cable
- 1 x Cigarette Lighter Plug Cable
- 4 x Mounting Screws
- 1 x User Manual (this document)

Image: The Solar Battery Charger Pro (SE-20W) shown with its included accessories: alligator clips, cigarette lighter plug, and mounting screws.
Setup and Installation
Follow these steps to set up your solar battery charger:
- Choose a Location: Select a location for the solar panel that receives maximum direct sunlight throughout the day. Ensure the surface is stable and secure.
- Mounting (Optional): If permanent mounting is desired, use the provided screws to secure the solar panel to a flat surface. Ensure the panel is angled towards the sun for optimal performance.
- Connect to Battery:
- Using Alligator Clips: Connect the red alligator clip to the positive (+) terminal of your 12V battery and the black alligator clip to the negative (-) terminal.
- Using Cigarette Lighter Plug: Insert the cigarette lighter plug into your vehicle's 12V auxiliary power outlet. This method is suitable for maintaining batteries via the vehicle's internal wiring, provided the outlet is active when the vehicle is off.
- Connect Solar Panel to Cable: Plug the output cable from the solar panel into the chosen battery connection cable (alligator clips or cigarette lighter plug). Ensure a secure connection.
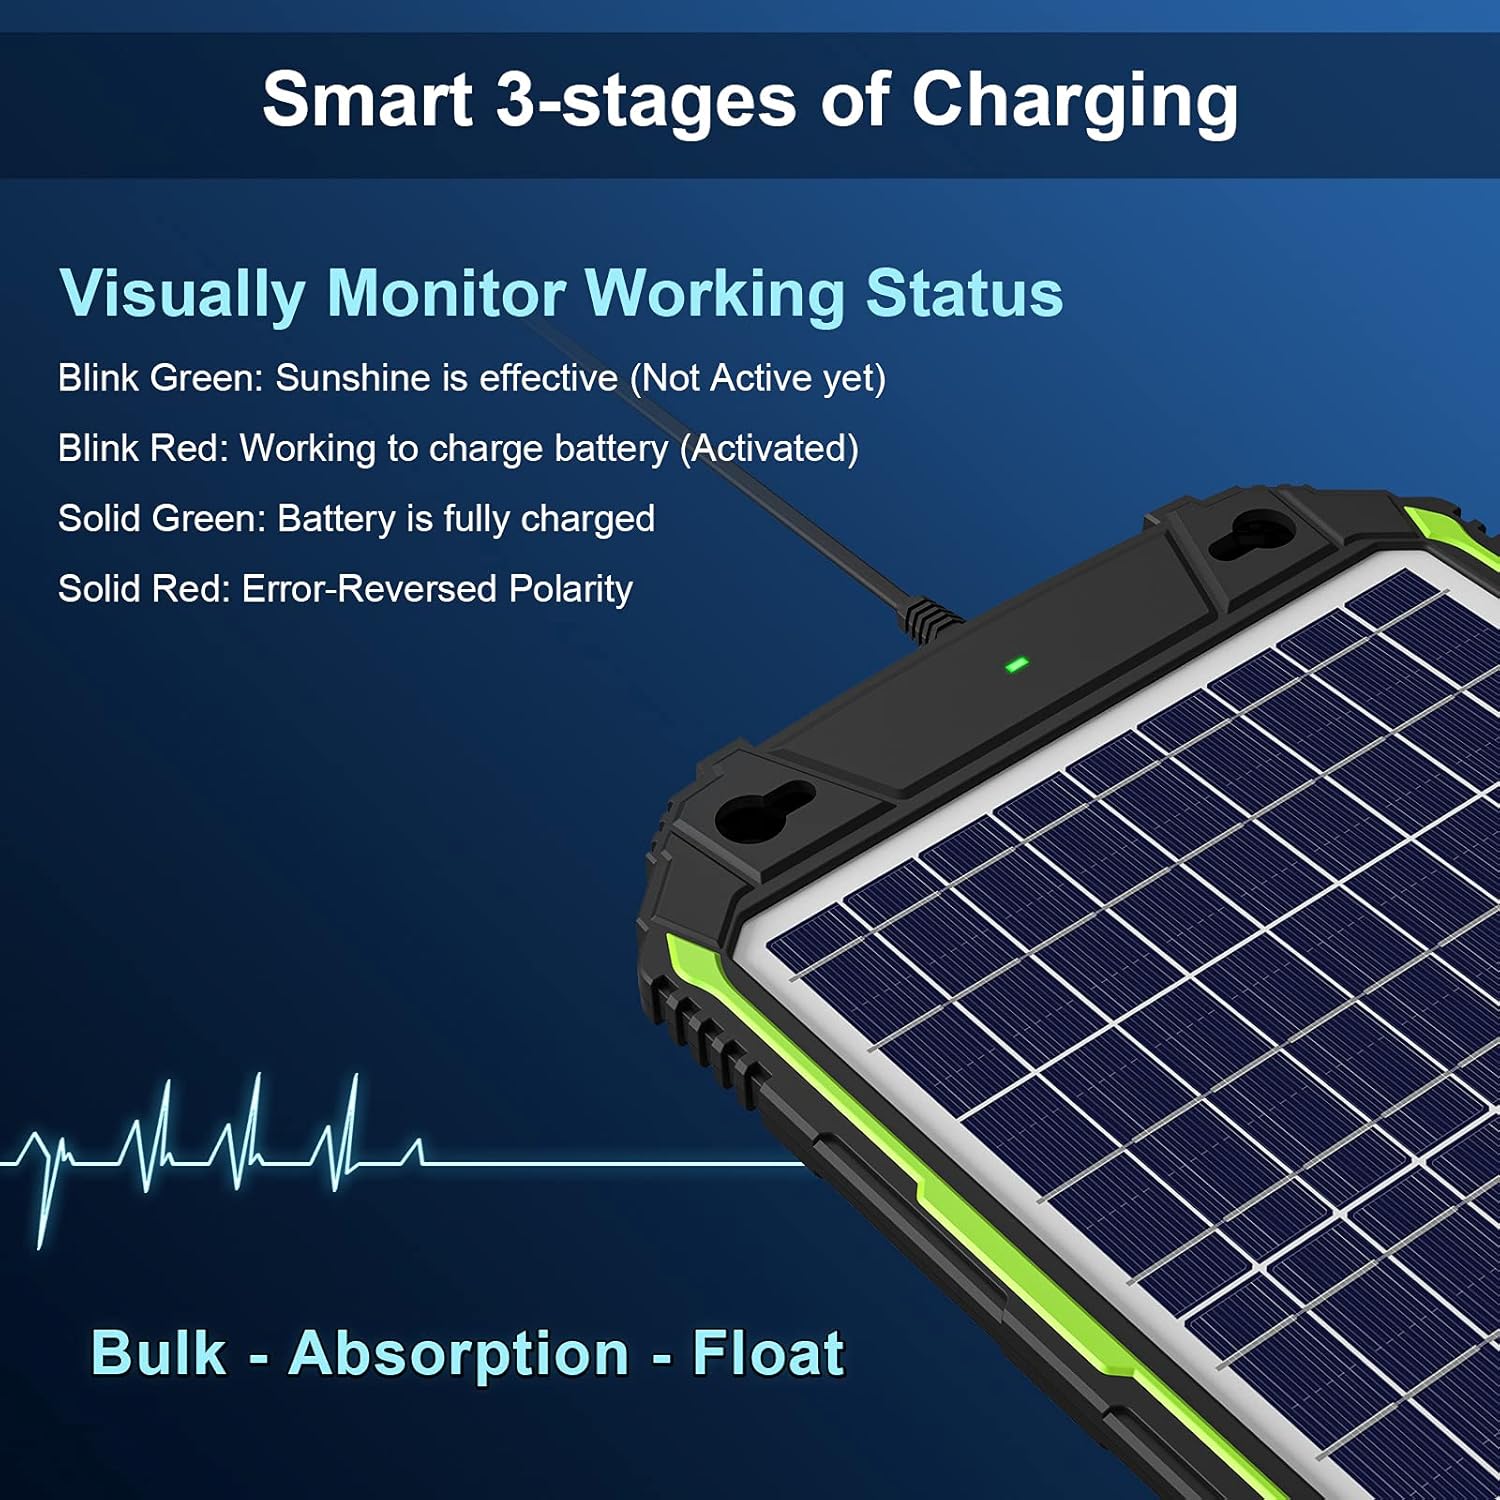
Image: A close-up view of the solar panel's connection point, illustrating how the alligator clip cable connects to the panel's output for battery charging.

Image: The solar panel installed on the deck of a boat, demonstrating a typical outdoor application for battery maintenance.
Operating Instructions
The Solar Battery Charger Pro features a built-in MPPT charge controller and a 3-stage charging process to optimize battery health and lifespan.
Charging Process (3-Stages)
- Bulk Stage: Charges the battery at the maximum current until it reaches approximately 80% of its capacity.
- Absorption Stage: Charges the battery at a constant voltage, gradually reducing the current as the battery approaches full charge.
- Float Stage: Maintains the battery at a safe voltage, compensating for self-discharge and keeping the battery fully charged without overcharging.
LED Indicator Status
The integrated LED light provides visual feedback on the charger's operational status:
| LED Status | Meaning |
|---|---|
| Blink Green | Sunshine is effective (Not Active yet) |
| Blink Red | Working to charge battery (Activated) |
| Solid Green | Battery is fully charged |
| Solid Red | Error: Reversed Polarity |

Image: An illustration detailing the "Smart 3-stages of Charging" (Bulk, Absorption, Float) and the visual indicators for working status via the LED light on the solar panel.
Maintenance
Regular maintenance ensures optimal performance and longevity of your solar charger:
- Cleaning: Periodically clean the solar panel surface with a soft, damp cloth to remove dust, dirt, or debris that may obstruct sunlight. Do not use abrasive cleaners.
- Connections: Inspect all cable connections regularly to ensure they are secure and free from corrosion.
- Storage: If storing the charger for an extended period, disconnect it from the battery and store it in a cool, dry place away from direct sunlight.
Troubleshooting
If you encounter issues with your solar battery charger, refer to the following common problems and solutions:
| Problem | Possible Cause | Solution |
|---|---|---|
| No LED activity | Insufficient sunlight; Loose connections; Faulty battery. | Ensure panel is in direct sunlight; Check all cable connections; Test battery voltage. |
| Solid Red LED (Reversed Polarity) | Battery connections are reversed. | Immediately disconnect and reconnect the alligator clips, ensuring red is to positive (+) and black to negative (-). |
| Battery not charging effectively | Panel obstructed; Battery too deeply discharged; Incorrect battery type. | Clear obstructions from panel; For deeply discharged batteries, a conventional charger may be needed first; Ensure battery is 12V lead-acid type. |
Specifications
| Feature | Detail |
|---|---|
| Product Name | Waterproof 12V 20W Solar Battery Charger Pro |
| Model | SE-20W |
| Brand | Sun Energise |
| Rated Power | 20 Watts |
| Output Voltage | 12 Volts (DC) |
| Charge Controller | Built-in MPPT |
| Charging Stages | 3-Stages (Bulk, Absorption, Float) |
| Waterproof Rating | Yes |
| Dimensions | 22.75 x 14 x 1.25 inches (approx.) |
| Weight | 4.99 pounds (approx.) |
| UPC | 779283404552 |
Warranty and Support
Sun Energise provides a limited warranty for this product. For detailed warranty information, technical support, or customer service, please visit the official Sun Energise website or contact their customer support team.
Official Brand Store: Sun Energise Store on Amazon


