
Introduction
The NEXX X-Com 2 is a communication system designed for seamless integration with NEXX X.Vilitur and NEXX X.Vilijord helmets. This system allows riders to connect with their technology and communicate with up to 8 other riders over a distance of up to 1.6 kilometers (1.0 mile) in open terrain. It features Bluetooth 4.1, advanced audio distribution, noise cancellation, and an integrated FM radio.
Package Contents
Before beginning installation, please verify that all components are present:
- 1 x X-Com 2 Main Module
- 1 x Remote Control
- Mounting Hardware (e.g., clamps, adhesive mounts) - (Assumed)
- Speakers and Microphone Kit - (Assumed)
- USB Charging Cable - (Assumed)
- User Manual (this document)
Product Overview
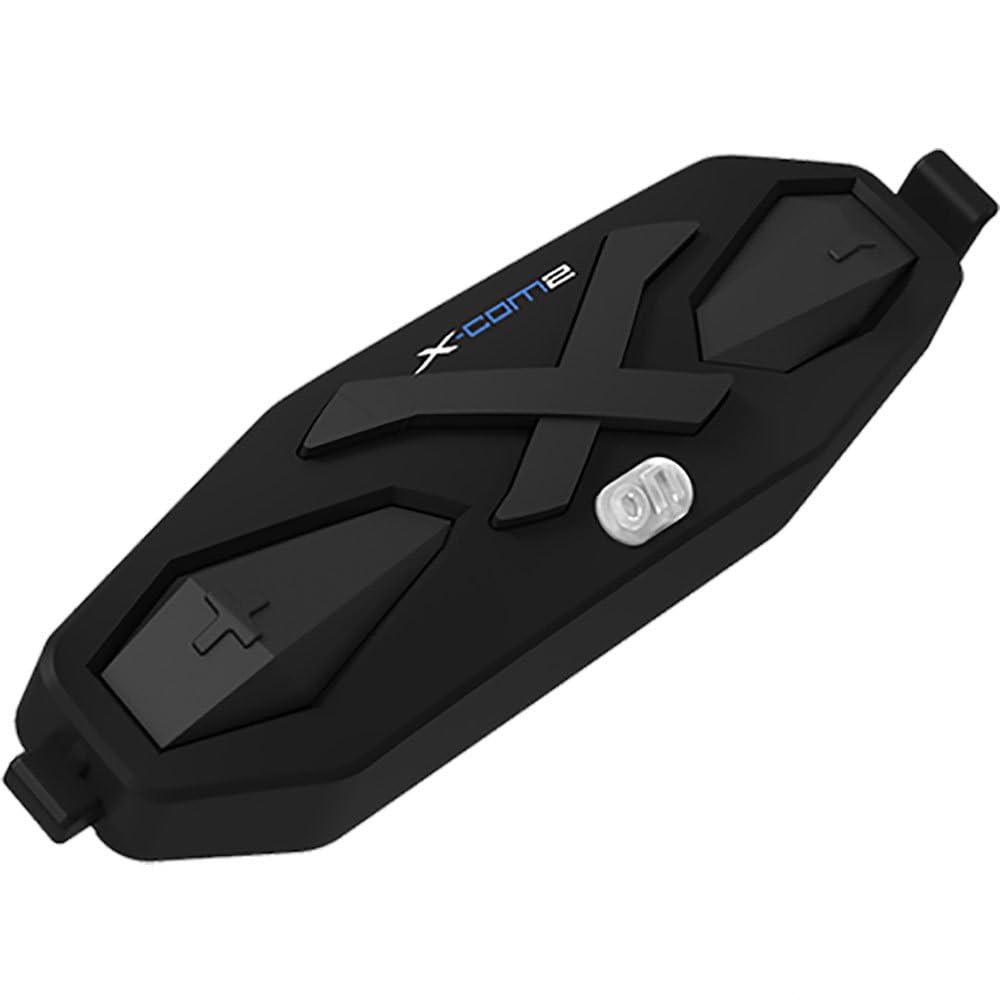
Figure 1: The NEXX X-Com 2 main module. This black, elongated unit features a prominent 'X' design, the 'X-Com2' logo, and several tactile buttons for operation, including a central power/function button and volume/navigation controls.
Main Module Components:
- Power/Function Button: Central button for powering on/off, pairing, and accessing main functions.
- Volume Up/Next Track Button: Typically located on one side, used to increase volume or navigate forward.
- Volume Down/Previous Track Button: Typically located on the opposite side, used to decrease volume or navigate backward.
- Charging Port: For connecting the USB charging cable.
- Speaker/Microphone Ports: For connecting the helmet's audio components.
Setup and Installation
1. Mounting the Main Module:
- Identify the designated mounting area on your NEXX X.Vilitur or X.Vilijord helmet, usually on the left side.
- Choose between the clamp mount or adhesive mount based on your helmet type and preference.
- Securely attach the mounting bracket to the helmet.
- Slide the X-Com 2 main module onto the mounted bracket until it clicks into place.
2. Installing Speakers and Microphone:
- Carefully remove the helmet's interior padding to access the ear pockets.
- Place the speakers into the designated ear pockets, ensuring they are centered over your ears.
- Route the microphone boom towards your mouth, securing it within the helmet's chin bar area.
- Connect the speaker and microphone cables to the corresponding ports on the X-Com 2 main module.
- Reinstall the helmet's interior padding, ensuring cables are neatly tucked away and do not interfere with comfort or safety.
Operating Instructions
Power On/Off:
- Power On: Press and hold the Power/Function button for approximately 2 seconds until you hear an audible prompt.
- Power Off: Press and hold the Power/Function button for approximately 5 seconds until you hear an audible prompt.
Bluetooth Pairing:
- With the X-Com 2 powered off, press and hold the Power/Function button for 7 seconds until the LED flashes red and blue, indicating pairing mode.
- On your mobile device, enable Bluetooth and search for "NEXX X-Com 2".
- Select the device to pair. A voice prompt will confirm successful pairing.
Intercom Functionality:
- The X-Com 2 supports intercom communication with up to 8 riders.
- Initiating Intercom: Briefly press the Intercom button (if available, or a specific combination of main buttons) to connect with the last paired intercom.
- Ending Intercom: Briefly press the Intercom button again.
- Refer to the full manual for detailed instructions on multi-rider intercom pairing and group management.
FM Radio:
- Turn On/Off FM Radio: Double-tap the Power/Function button.
- Scan Stations: Press the Volume Up or Volume Down button to scan for the next available station.
- The unit supports 10 preset station memory.
Volume Control:
- Press the Volume Up button to increase audio volume.
- Press the Volume Down button to decrease audio volume.
Maintenance
- Cleaning: Use a soft, damp cloth to wipe the main module. Do not use harsh chemicals or abrasive cleaners.
- Charging: Charge the device using the provided USB cable. A full charge takes approximately 2.5 hours. Avoid overcharging.
- Storage: Store the X-Com 2 in a cool, dry place when not in use. If storing for extended periods, charge the battery every few months to maintain its lifespan.
- Battery Care: The unit uses a Lithium Polymer Battery. Do not expose to extreme temperatures.
Troubleshooting
| Problem | Possible Cause | Solution |
|---|---|---|
| Device does not power on. | Battery is depleted. | Charge the device for at least 30 minutes. |
| Cannot pair with phone. | Device not in pairing mode; Bluetooth on phone is off; too many paired devices. | Ensure device is in pairing mode (flashing red/blue). Turn phone's Bluetooth off and on. Delete old Bluetooth connections on phone. |
| Intercom connection issues. | Out of range; interference; incorrect pairing. | Ensure riders are within 1.6 km (1.0 mile) in open terrain. Move away from sources of strong electromagnetic interference. Re-pair intercom units. |
| Poor audio quality / Noise. | Microphone not positioned correctly; excessive wind noise; Advanced Noise Control not active. | Adjust microphone closer to mouth. Ensure helmet vents are closed if causing excessive wind noise. Verify Advanced Noise Control is enabled (automatic). |
Specifications
- Model: 09SEN99200099999X-COM2
- Bluetooth Version: 4.1
- Bluetooth Profiles: Headset Profile (HSP), Hands-Free Profile (HFP), Advanced Audio Distribution Profile (A2DP), Audio Video Remote Control Profile (AVRCP)
- Intercom Working Distance: Up to 1.6 kilometers (1.0 mile) in open terrain
- Max Intercom Riders: Supports up to 8 riders
- Noise Cancellation: Advanced Noise Control
- Codec: Built-in SBC Codec
- FM Radio Frequency: 76 ~ 108MHz (10 preset station memory)
- Talk Time: 10 hours
- Charging Time: 2.5 hours
- Battery Type: Lithium Polymer Battery
- Operating Temperature: -10°C ~ 55°C (-14°F ~ 131°F)
- Main Module Weight: 100 g (3.53 oz)
- Product Dimensions: 8 x 7 x 8 inches
- Item Weight: 1.01 pounds
Warranty and Support
For specific warranty information and detailed support, please refer to the official NEXX website or contact NEXX customer service directly. Keep your proof of purchase for warranty claims.
NEXX Official Website: www.nexx-helmets.com (Note: This is a placeholder URL, please verify the actual official website for NEXX products)
Customer Service: Refer to the contact information provided on the NEXX official website or within your product packaging.


