
1. Introduction
The Philips Norelco Nose Trimmer 5000 is a premium precision trimming kit designed for grooming unwanted facial hair, including nose, ear, and eyebrow hair. It features a Protective Guard System for ultimate comfort and dual-sided steel blades for efficient trimming without pulling. The trimmer is fully washable for easy cleaning and operates on a long-lasting lithium battery.

Figure 1: Philips Norelco Nose Trimmer 5000 in its retail packaging.
2. Package Contents
Your Philips Norelco Nose Trimmer 5000 package includes the following items:
- Philips Norelco Nose Trimmer 5000 handle
- Rotary trimming head (for nose and ear hair)
- Detail trimming head (for sideburns, beard lines)
- Eyebrow combs (2 sizes)
- 1 AA Lithium Ultra battery
- Cleaning brush
- Storage pouch
- User manual

Figure 2: All components included with the Philips Norelco Nose Trimmer 5000.
3. Setup
3.1 Battery Installation
- Grip the bottom piece of the trimmer and twist it counter-clockwise to remove the battery compartment cap.
- Insert the provided AA Lithium Ultra battery, ensuring the positive (+) and negative (-) ends align correctly with the indicators inside the compartment.
- Replace the battery compartment cap by aligning the grooves and twisting clockwise until secure.
3.2 Attaching/Detaching Trimming Heads
- To detach a trimming head, twist it counter-clockwise until it unlocks and then pull it off.
- To attach a trimming head, align the head with the main unit, push it down, and twist clockwise until it locks into place. Ensure the arrows on the head and body align.

Figure 3: The trimmer with the rotary head, suitable for nose and ear hair.
4. Operating Instructions
Always ensure the trimmer is clean and the battery is correctly inserted before use. The trimmer features a simple on/off slide switch.
4.1 Trimming Nose Hair
- Attach the rotary trimming head.
- Turn on the trimmer.
- Carefully insert the trimmer tip into your nostril.
- Slowly rotate the trimmer to cut unwanted hair.
- Avoid inserting the trimmer too deeply into the nostril.
4.2 Trimming Ear Hair
- Attach the rotary trimming head.
- Turn on the trimmer.
- Carefully insert the trimmer tip into your ear canal or slowly trim around the rim of your ear.
- Slowly rotate the trimmer to cut unwanted hair.
- Avoid inserting the trimmer too deeply into the ear canal.
4.3 Trimming Eyebrows
- Attach the rotary trimming head.
- Select one of the two eyebrow combs (different lengths for desired trim). Slide the comb onto the rotary head.
- Turn on the trimmer.
- Trim your eyebrows with light pressure, moving the trimmer against the hair growth.
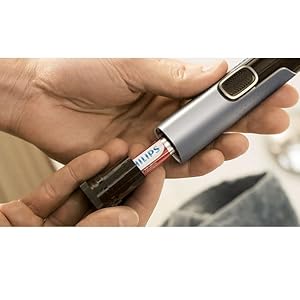
Figure 4: The trimmer with an eyebrow comb for precise eyebrow grooming.
4.4 Detail Trimming (Sideburns, Beard Lines)
- Attach the detail trimming head.
- Turn on the trimmer.
- Use the detail trimmer to define sideburns, beard lines, or other facial hair areas. Adjust the angle for defined edges.

Figure 5: The trimmer with the detail trimming head for sharp lines.
4.5 Official Product Video
Video 1: Official Philips Norelco Nose Trimmer 5000 demonstration, showing various uses and features.
5. Maintenance
The Philips Norelco Nose Trimmer 5000 is fully washable for easy cleaning. Always ensure the trimmer is turned off before cleaning.
- Remove the trimming head from the handle.
- Rinse the trimming head under warm running water to remove hair clippings.
- You may also turn the device on while rinsing to help dislodge stubborn hairs.
- Use the provided cleaning brush to remove any remaining hair from the trimming head.
- Rinse the main unit (handle) under warm running water, ensuring water does not enter the battery compartment.
- Allow all parts to air dry completely before reassembling or storing.
6. Troubleshooting
If you experience any issues with your Philips Norelco Nose Trimmer 5000, please consider the following:
- Trimmer not turning on: Check if the battery is inserted correctly with the correct polarity. Ensure the battery compartment cap is securely closed. Replace the battery if it is depleted.
- Reduced trimming performance: Clean the trimming head thoroughly to remove any accumulated hair or debris. Ensure the trimming head is properly attached and locked.
- Pulling or discomfort: Ensure the trimming head is clean and free of damage. Use the trimmer with light pressure and move it slowly against the direction of hair growth.
If the issue persists, please refer to the Warranty and Support section for further assistance.
7. Specifications
| Feature | Detail |
|---|---|
| Model Number | NT5600/42 |
| Power Source | 1 AA Battery (included) |
| Product Dimensions | 1.42 x 3.94 x 8.27 inches |
| Item Weight | 159 Grams (5.61 ounces) |
| Blade Material | Stainless Steel |
| Special Features | Waterproof, Easy to Clean, Protective Guard System |
| Recommended Uses | Nose, Ears, Eyebrows, Face |
8. Warranty and Support
The Philips Norelco Nose Trimmer 5000 comes with a 2-year manufacturer's warranty. For warranty claims, technical support, or any product-related inquiries, please contact Philips Norelco customer service.
Please visit the official Philips Norelco website or refer to the contact information provided in your product packaging for the most up-to-date support details.


