
Truper 14623
Truper 100 Watt Pencil Type Soldering Iron Instruction Manual
Model: 14623 (CAU-100)
1. Introduction
This manual provides essential instructions for the safe and effective use of your Truper 100 Watt Pencil Type Soldering Iron. Please read this manual thoroughly before initial operation, maintenance, or storage to ensure proper function and to prevent injury or damage.

Figure 1: Truper 100 Watt Pencil Type Soldering Iron, main view.
2. Safety Information
Always observe the following safety precautions to reduce the risk of electric shock, fire, or injury:
- Electrical Safety: Ensure the power outlet matches the voltage requirements of the soldering iron. Do not use in wet conditions or with damaged cords.
- Heat Hazard: The soldering iron tip reaches very high temperatures (up to 500°C). Avoid direct contact with skin or flammable materials. Use a heat-resistant stand.
- Ventilation: Solder fumes can be harmful. Always work in a well-ventilated area or use a fume extractor.
- Eye Protection: Wear safety glasses to protect against splashes of molten solder or flux.
- Storage: Allow the soldering iron to cool completely before storing. Store in a safe, dry place out of reach of children.
- Maintenance: Disconnect from power before cleaning or replacing parts.
3. Product Components
Familiarize yourself with the main parts of your soldering iron and the included accessories:

Figure 2: Key components of the soldering iron, including the power cable, handle, and soldering tip.
- Soldering Tip (Punta): The heated element that melts solder.
- Handle (Mango): Provides a comfortable grip and insulates from heat.
- Power Cable (Cable): Connects the iron to an electrical outlet.
The Truper 100 Watt Soldering Iron typically includes various tips for different soldering tasks:
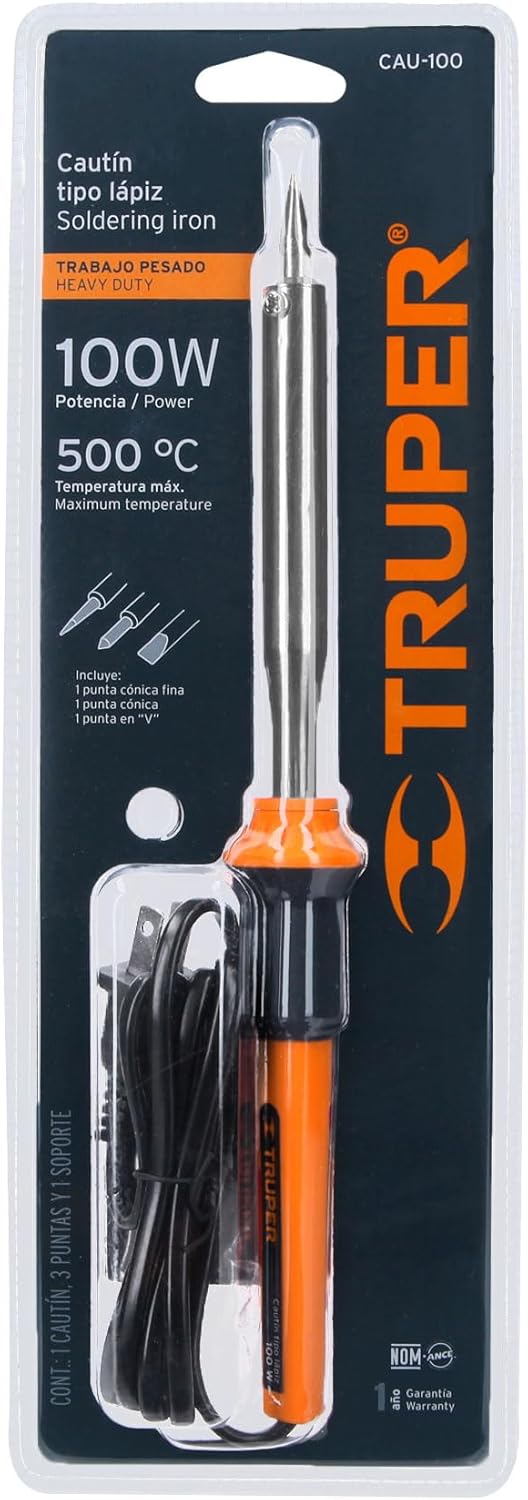
Figure 3: Included accessories, showing different soldering tip types and a stand.
- Conical Tip: Standard tip for general soldering.
- Fine Conical Tip: For precision work on smaller components.
- V-Tip: Specialized tip for specific applications.
- Soldering Stand: A safety accessory to hold the hot iron when not in use.
4. Setup Instructions
- Unpack: Carefully remove the soldering iron and all accessories from the packaging. Inspect for any visible damage.
- Placement: Place the soldering iron stand on a stable, heat-resistant surface. Ensure adequate ventilation in your workspace.
- Tip Installation: Ensure the desired soldering tip is securely fastened to the heating element.
- Power Connection: Plug the power cable into a standard electrical outlet.
- Initial Tinning: Before first use, allow the iron to heat up. Once hot, apply a small amount of solder to the tip. This "tins" the tip, protecting it from oxidation and improving heat transfer.
5. Operating Instructions
- Power On: Once plugged in, the soldering iron will begin to heat. It typically reaches operating temperature within a few minutes.
- Prepare Workpiece: Ensure the components and PCB pads to be soldered are clean and free of grease or oxidation.
- Apply Heat: Place the hot soldering tip against both the component lead and the PCB pad simultaneously.
- Apply Solder: After a second or two, touch the solder wire to the junction of the tip and the workpiece. The solder should melt and flow smoothly, forming a shiny, concave joint. Do not apply solder directly to the iron tip.
- Remove Solder and Iron: Once enough solder has flowed, remove the solder wire, then quickly remove the soldering iron. Allow the joint to cool undisturbed.
- Power Off: When finished, unplug the soldering iron from the power outlet. Place it securely on its stand and allow it to cool completely before handling or storing.
6. Maintenance
- Tip Cleaning: Regularly wipe the hot soldering tip on a damp sponge or brass wool cleaner to remove excess solder and oxidation. This helps maintain efficient heat transfer.
- Re-tinning: If the tip becomes oxidized and solder no longer adheres well, re-tin it by applying fresh solder. For heavily oxidized tips, a tip tinner compound may be used.
- Tip Replacement: Over time, soldering tips wear out. To replace, ensure the iron is unplugged and cool. Unscrew the retaining collar, remove the old tip, insert the new tip, and secure the collar. Always re-tin a new tip.
- General Cleaning: Keep the handle and power cord clean and free of debris. Do not use abrasive cleaners or solvents.
7. Troubleshooting
| Problem | Possible Cause | Solution |
|---|---|---|
| Soldering iron does not heat up. | No power, faulty power cord, or internal element failure. | Check power outlet. Inspect power cord for damage. If still not heating, discontinue use and contact support. |
| Solder does not melt or flows poorly. | Tip is not hot enough, tip is oxidized, or incorrect solder type. | Allow more time to heat. Clean and re-tin the tip. Ensure you are using appropriate solder for electronics. |
| Solder joints are dull or "cold". | Insufficient heat, movement during cooling, or dirty components. | Ensure proper heat transfer. Hold components steady until solder cools. Clean components thoroughly before soldering. |
8. Specifications
Technical specifications for the Truper 100 Watt Pencil Type Soldering Iron:
| Feature | Detail |
|---|---|
| Brand | Truper |
| Model Number | 14623 |
| Part Number | CAU-100 |
| Wattage | 100 Watts |
| Power Source | Corded Electric |
| Style | Pencil Type |
| Maximum Temperature | 500 °C |
| Item Weight | 0.26 Kilograms (9.2 ounces) |
| Product Dimensions | 12.99 x 1.57 x 4.92 inches |
| Material | Iron |
| Specific Uses | Electronics Assembly, Circuit Board Repair |

Figure 4: Soldering iron dimensions, showing a length of 25 cm and a tip diameter of 8 mm.
9. Warranty Information
This Truper soldering iron is covered by a 1-year warranty from the date of purchase, as indicated on the product packaging. This warranty covers manufacturing defects under normal use. It does not cover damage resulting from misuse, abuse, unauthorized modifications, or normal wear and tear of consumable parts like soldering tips. Please retain your proof of purchase for warranty claims.
10. Customer Support
For technical assistance, warranty claims, or to purchase replacement parts, please contact Truper customer service. Refer to the official Truper website or product packaging for the most current contact information.
Online Resources: Visit the official Truper website for FAQs, additional product information, and support contacts.
Ask a question about this manual
Ask about setup, troubleshooting, compatibility, parts, safety, or missing instructions. Manuals+ will review the question and use this page’s manual context to help answer it.