Introduction
This manual provides detailed instructions for the installation, operation, and maintenance of your EBTOOLS Motorcycle Wireless Tire Pressure Monitoring System (TPMS). Please read this manual thoroughly before using the product to ensure proper function and safety.
Product Overview
The EBTOOLS Motorcycle Wireless TPMS is designed to monitor your motorcycle's tire pressure and temperature in real-time, enhancing riding safety and extending tire life. This system features a waterproof display unit and two external sensors.
Key Features:
- Real-time monitoring of tire pressure and temperature for two wheels.
- Wireless data transmission from sensors to the display unit.
- High accuracy for precise readings.
- Waterproof design (IP5K4K rating) for reliable performance in various weather conditions.
- Automatic power on/off with motorcycle ignition.
- Adjustable alarm thresholds for high/low pressure and high temperature.
- Strong anti-interference capability.
- Designed to help prevent tire bursts and predict air leakage.

Image: The TPMS display unit showing real-time tire pressure and temperature readings, alongside an infographic highlighting key features such as real-time monitoring, fuel saving, and abnormal alarming.
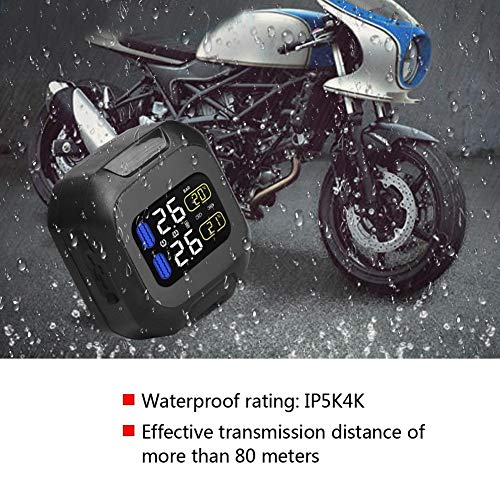
Image: The TPMS display unit mounted on a motorcycle handlebar, with raindrops visible, illustrating its waterproof design (IP5K4K rating) and suitability for outdoor use.
Safety Information
- Always ensure the sensors are securely tightened to prevent air leakage.
- Do not attempt to disassemble or modify the TPMS unit or sensors.
- Keep the display unit away from direct sunlight for prolonged periods to prevent overheating.
- Regularly check tire pressure with a calibrated gauge, as the TPMS is an auxiliary monitoring system.
- Ensure the display unit is mounted securely and does not obstruct your view or control of the motorcycle.
- Consult a professional if you are unsure about installation or encounter persistent issues.
Package Contents
Please verify that all items listed below are included in your package:
- 1 x TPMS Display Unit
- 2 x External Tire Pressure Sensors (marked 'L' for Left and 'R' for Right)
- 1 x Mounting Bracket Kit (for handlebar installation)
- 1 x USB Charging Cable
- 1 x Sensor Wrench
- 2 x Anti-theft Nuts
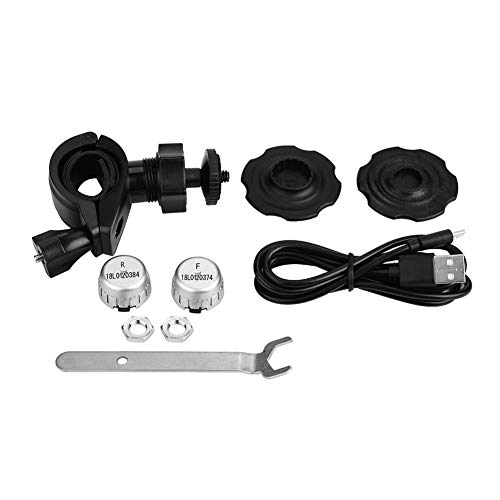
Image: A complete view of all components included in the TPMS package, including the display, two external sensors, mounting hardware, USB cable, and tools.
Setup Instructions
1. Charging the Display Unit
Before first use, fully charge the TPMS display unit using the provided USB cable. Connect the small end of the USB cable to the charging port on the side of the display unit and the other end to a standard USB power adapter (not included).

Image: A close-up side view of the TPMS display unit, highlighting the USB charging port, typically protected by a rubber cover to maintain its waterproof integrity.
2. Mounting the Display Unit
- Attach the mounting bracket to your motorcycle's handlebar. Ensure it is securely fastened and does not interfere with steering or controls.
- Slide the TPMS display unit onto the mounting bracket until it clicks into place. Adjust the viewing angle for optimal visibility.
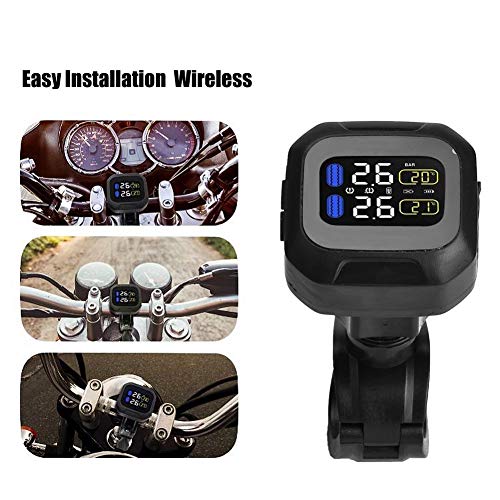
Image: The TPMS display unit securely mounted on a motorcycle handlebar, providing a clear view of the screen for the rider.
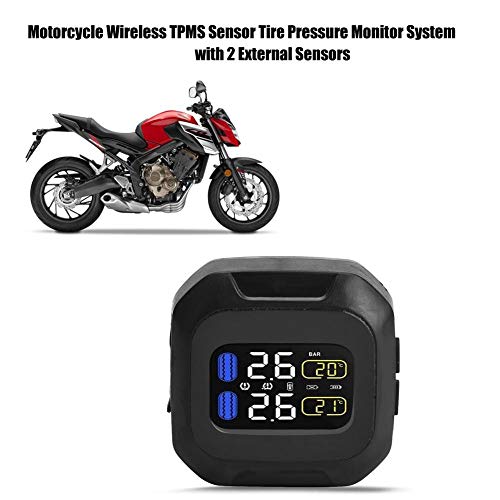
Image: A wider shot of the TPMS display unit mounted on a motorcycle handlebar, showing its integration with the motorcycle's cockpit.
3. Installing the External Sensors
The sensors are marked 'L' for the left (front) wheel and 'R' for the right (rear) wheel. Install them according to their markings.
- Unscrew the original valve cap from the tire valve.
- Screw on an anti-theft nut onto the tire valve stem.
- Screw the corresponding sensor (L or R) onto the tire valve stem until it is hand-tight.
- Using the provided wrench, tighten the anti-theft nut against the sensor to secure it. This prevents accidental loosening and theft.
- Repeat for the other tire.
Important: Ensure sensors are tightly secured to prevent air leakage. Check for leaks after installation.
Operating Instructions
1. Power On/Off
- The TPMS display unit will automatically power on when the motorcycle ignition is turned on and detects movement.
- It will automatically power off after a period of inactivity to save battery.
- To manually power on/off, press and hold the power button (if available, otherwise rely on auto-start).
2. Display Information
The display shows real-time data for both tires:
- Pressure: Indicated in BAR (or PSI, depending on settings).
- Temperature: Indicated in degrees Celsius (or Fahrenheit, depending on settings).
- Battery Level: Icon indicating the display unit's battery status.
- Sensor Battery: Icons indicating the battery status of each sensor.
3. Alarm Functions
The system will alert you with visual and/or audible alarms under the following conditions:
- High Pressure Alarm: Tire pressure exceeds the preset high limit.
- Low Pressure Alarm: Tire pressure drops below the preset low limit.
- High Temperature Alarm: Tire temperature exceeds the preset high limit.
- Sensor Low Battery Alarm: A sensor's battery is low and needs replacement.
- Sensor Data Loss Alarm: No signal received from a sensor.
Refer to the full manual (if provided separately) for instructions on adjusting alarm thresholds and units of measurement.
Maintenance
1. Battery Charging
Recharge the display unit's internal battery when the battery indicator shows low power. Use the provided USB cable.
2. Sensor Battery Replacement
External sensors typically use replaceable button cell batteries (e.g., CR1632). When a sensor low battery alarm occurs:
- Unscrew the sensor from the tire valve.
- Carefully open the sensor casing (usually by twisting or prying gently).
- Replace the old battery with a new one, ensuring correct polarity.
- Close the sensor casing and reinstall it on the tire valve, securing with the anti-theft nut.
3. Cleaning
Wipe the display unit and sensors with a soft, damp cloth. Do not use harsh chemicals or abrasive cleaners.
Troubleshooting
| Problem | Possible Cause | Solution |
|---|---|---|
| Display unit does not power on. | Low battery; unit not detecting movement. | Charge the display unit. Ensure the motorcycle is moving or ignition is on for auto-start. |
| No tire pressure/temperature reading. | Sensor not installed correctly; sensor battery low; signal interference. | Reinstall sensors securely. Replace sensor battery. Move away from strong electromagnetic sources. |
| Inaccurate readings. | Sensors not calibrated; external factors. | Ensure sensors are correctly paired (L/R). Compare with a reliable pressure gauge. |
| Air leakage from sensor. | Sensor not tightened properly; damaged O-ring. | Retighten sensor and anti-theft nut. Check and replace O-ring if damaged. |
Specifications
- Model: EBTOOLS65igqn0tsv
- Brand: EBTOOLS
- Product Dimensions: 10 x 10 x 10 cm (3.94 x 3.94 x 3.94 inches)
- Weight: 350 grams (0.77 lbs)
- Waterproof Rating: IP5K4K
- Effective Transmission Distance: > 80 meters
- UPC: 738603102790
- Manufacturer: EBTOOLS
- Country of Origin: China
Warranty and Support
This EBTOOLS product is covered by a standard manufacturer's warranty. For specific warranty terms, duration, and conditions, please refer to the documentation provided with your purchase or contact EBTOOLS customer support directly.
For technical assistance, troubleshooting not covered in this manual, or spare parts, please contact EBTOOLS customer service through their official website or the retailer where the product was purchased. Please have your model number (EBTOOLS65igqn0tsv) and purchase date ready when contacting support.